Near Real Time Configuration Audit for AWS
Near Real-Time (NRT) Configuration Audit significantly reduces the time to find new configuration audit violations in AWS. Instead of waiting on a daily scan, which could leave a new configuration vulnerable up to 24 hours, events are sent to Skyhigh CASB almost immediately.
How it Works
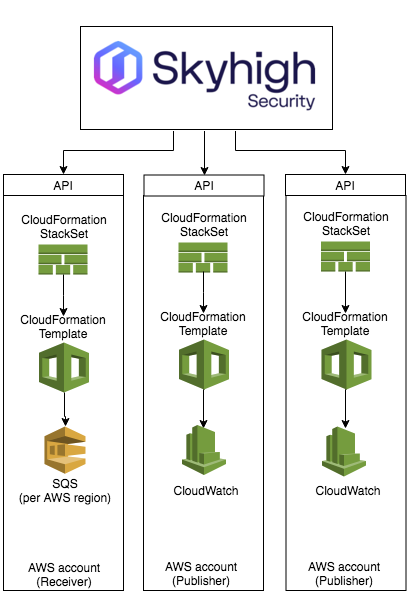
There is a one (receiver) to many (publisher) relationship for publishers and the receiver. A single AWS account is set up as the receiver and this AWS account houses the SQS queues (one per AWS region as required) that Skyhigh CASB will poll every minute.
Each AWS account you want Skyhigh CASB to monitor must be configured as a publisher. A publisher takes events from their own account using CloudWatch and adds them to the receiver's SQS queue. If you want to monitor the AWS account acting as the receiver, you must configure it as a publisher.
NOTE: The AWS account acting as the receiver can also be a publisher. This would be a common setup for a single AWS account environment.
AWS Service Provisioning
A number of components are required in AWS to set up the Near Real Time configuration audit functionality. The setup of all the AWS services is completed automatically when we enable NRT config audit from the Skyhigh CASB.
The setup process for each of these components is completed by Skyhigh CASB using the AWS API. To achieve this, Skyhigh CASB needs these permissions and additional roles:
- CloudFormation: CloudFormation is a set of AWS tools providing automation to provision AWS resources. For more information see AWS CloudFormation documentation. We use 2 sub-services of the CloudFormation service:
- CloudFormation StackSet: A stackset is a component of CloudFormation and is used to create a CloudFormation Template.
- CloudFormation Template: A CloudFormation Template is created and acts as a template to configure the SQS and CloudWatch.
- SQS Queue(s): Simple Queue Service (SQS) is used as a queue to store events received from CloudWatch. SQS queues are scoped by AWS region, so you need a queue per region to monitor resources in multiple AWS regions. For more information, see AWS SQS documentation. SQS queues are only deployed on the receiver AWS account.
- CloudWatch: This is a service provided by Amazon to monitor AWS resources for activity. It is similar in concept to CloudTrail. The main difference is rules are used to determine what to monitor in AWS. When a rule is triggered, the event is sent to an SQS queue. An S3 bucket is NOT utilized. During the setup, Skyhigh CASB uses the CloudFormation template to configure the CloudWatch rules. For more information see AWS CloudWatch documentation.
The following diagram shows Skyhigh CASB interacting with the single receiver and one or many publisher AWS accounts via the AWS API to perform the necessary configuration.
Near Real-Time Event Collection
Once the CloudWatch rules have been configured to send the necessary events to the SQS queue on the receiver, Skyhigh CASB retrieves the events, and based on their associated service. For example, when Skyhigh CASB gets an event related to S3, it runs all the S3 config audit policies.

NOTES:
- Lambda based policies can be associated to a specific service, and hence near real-time feature to detect configuration audit violations are applicable to these
- List of supported services are presented in the custom Lambda policy page
Configuration
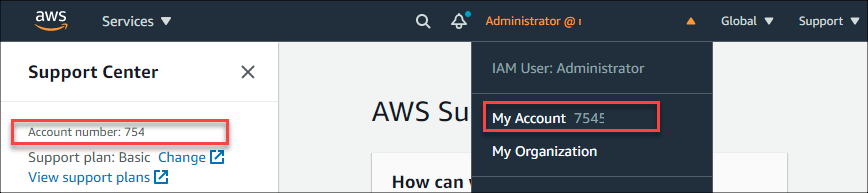
You will need your AWS account number, which can be found in the AWS Support > Support Center.
IMPORTANT: AWS UI may suggest that some of the permissions are not valid. This is an issue with the UI - please ignore these errors and proceed with the lab.
Receiver AWS Account
To set up AWS receiver account:
1. Login to your AWS account you wish to use as the receiver.
2. Navigate to IAM and create a new policy:
- Using the following JSON
- Name the new policy "MVC_NrtConfigAuditReceiver"
{
    "Version": "2012-10-17",
    "Statement": [
        {
            "Sid": "ShnNrtConfigAuditReceiverPermissions",
            "Effect": "Allow",
            "Action": [
                "cloudformation:CreateStackInstances",
                "cloudformation:DeleteStackInstances",
                "cloudformation:UpdateStackInstances",
                "cloudformation:ListStackInstances",
                "cloudformation:DescribeStacks",
                "sqs:ListQueues",
                "sqs:AddPermission",
                "sqs:DeleteMessageBatch",
                "sqs:ReceiveMessage",
                "sqs:CreateQueue",
                "cloudformation:DescribeStackSet",
                "cloudformation:CreateStackSet",
                "cloudformation:UpdateStackSet",
                "cloudformation:DescribeStackSetOperation",
                "cloudformation:ListStackSetOperationResults",
                "cloudformation:DeleteStackSet"
            ],
            "Resource": [
                "*"
            ]
        }
    ]
}
3. Create another policy:
- Using the following JSON, replacing <receiver-account> with your AWS account number in the Resource section.
- Name the new policy "MVC_NrtConfigAuditReceiver_Publishers"
{
    "Version": "2012-10-17",
    "Statement": [
        {
            "Sid": "ShnNrtConfigAuditReceiverProducerList",
            "Effect": "Allow",
            "Action": [
                "events:PutPermission",
                "events:DescribeEventBus",
                "events:DescribeRule",
                "events:RemovePermission"
            ],
            "Resource": [
                "arn:aws:events:*:<receiver-account>:event-bus/default"
            ]
        }
    ]
}
|
Example:
|
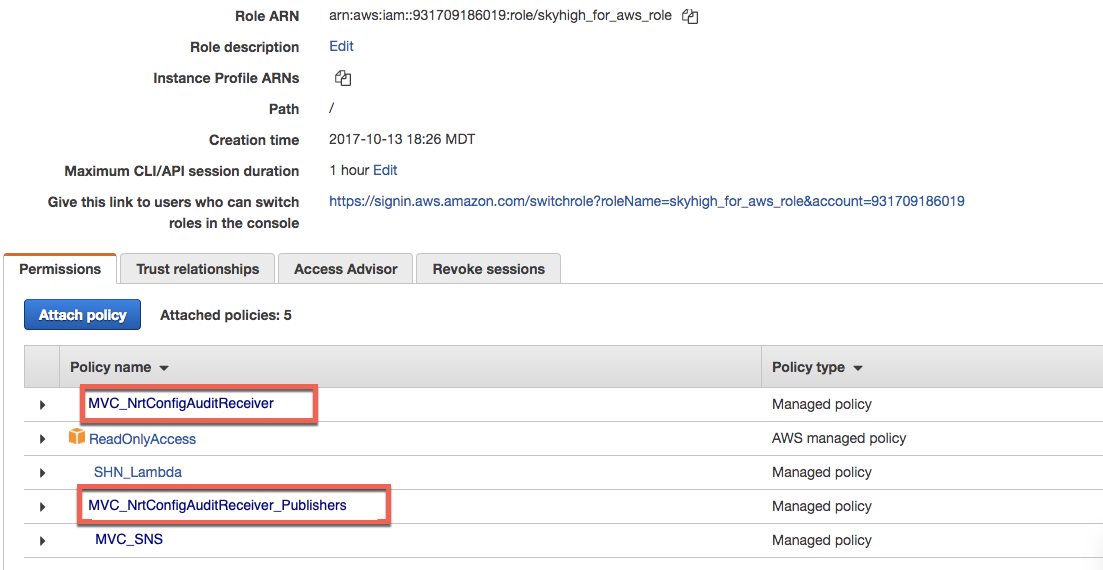
4. Find your existing MVC_for_AWS_role and attach these 2 new policies to this role.
5. Create a new policy that will be used later with a new role.
- Use the JSON provided below.
- Name the policy AWSCloudFormationStackSetAdministrationRolePolicy
{
    "Version": "2012-10-17",
    "Statement": [
        {
            "Action": [
                "sts:AssumeRole"
            ],
            "Resource": [
                "arn:aws:iam::*:role/AWSCloudFormationStackSetExecutionRole"
            ],
            "Effect": "Allow"
        }
    ]
}
6. Create a new role (important, the name MUST be exactly as documented below)
- Type of trusted entity = AWS Service
- Choose the service that will use this role = CloudFormation
- Attach permission policies = AWSCloudFormationStackSetAdministrationRolePolicy
- Name = AWSCloudFormationStackSetAdministrationRole <-- MUST BE EXACTLY AS SHOWN (ref: https://docs.aws.amazon.com/AWSCloudFormation/latest/UserGuide/stacksets-prereqs.html)
7. Create a new policy which will be used later with a new role:
- Use the JSON provided below.
- Name = AWSCloudFormationStackSetExecutionRolePolicy
{
    "Version": "2012-10-17",
    "Statement": [
        {
            "Sid": "VisualEditor0",
            "Effect": "Allow",
            "Action": [
"sns:Publish",
"cloudformation:CancelUpdateStack",
"cloudformation:ContinueUpdateRollback",
"cloudformation:CreateStack",
"cloudformation:DeleteStack",
"cloudformation:DescribeStacks",
"cloudformation:GetStackPolicy",
"cloudformation:ListStackResources",
"cloudformation:ListStacks",
"cloudformation:SetStackPolicy",
"cloudformation:UpdateStack",
"events:DeleteRule",
"events:DescribeRule",
"events:PutRule",
"events:PutTargets",
"events:RemoveTargets",
"sqs:AddPermission",
"sqs:CreateQueue",
"sqs:DeleteMessage",
"sqs:DeleteMessageBatch",
"sqs:DeleteQueue",
"sqs:GetQueueAttributes",
"sqs:ListQueues",
"sqs:RemovePermission",
"sqs:SetQueueAttributes"
            ],
            "Resource": "*"
        }
    ]
}
8. Create a new role (important, the name MUST be exactly as documented below)
- Type of trusted entity = AWS Service
- Choose the service that will use this role = CloudFormation
- Attach permission policies = AWSCloudFormationStackSetExecutionRolePolicy
- Name = AWSCloudFormationStackSetExecutionRole <-- MUST BE EXACTLY AS SHOWN
9. Edit the AWSCloudFormationStackSetExecutionRole role trust relationships.
Change the trust relationship by adding the following JSON, substituting <receiver-aws-account-id> with your receiver AWS account ID.
    {
      "Effect": "Allow",
      "Principal": {
        "AWS": "arn:aws:iam::<receiver-aws-account-id>:root"
      },
      "Action": "sts:AssumeRole",
      "Condition": {}
    }
|
Before |
After Note: your JSON should have your receiver AWS account ID and not the 931709... as shown in the example. |
Publisher AWS Account
For the purpose of our example, we will use the same AWS account as the Receiver. If you have many AWS accounts you wish to deploy the publisher role to, repeat these steps per AWS account.
1. Create a new policy that will be used later with a new role. Please note: If you are setting up the Publisher in the same AWS account as you did already setup the receiver you do not have to perform this step, as the policy was already created while setting up the the Receiver configuration.
- Use the JSON provided below.
- Name = AWSCloudFormationStackSetExecutionRolePolicy
{
    "Version": "2012-10-17",
    "Statement": [
        {
            "Sid": "VisualEditor0",
            "Effect": "Allow",
            "Action": [
                "events:PutTargets",
                "events:DeleteRule",
                "sqs:ListQueues",
                "events:DescribeRule",
                "cloudformation:CreateStack",
                "cloudformation:ListStacks",
                "cloudformation:UpdateStack",
                "cloudformation:DeleteStack",
                "cloudformation:DescribeStacks",
                "cloudformation:SetStackPolicy",
                "cloudformation:GetStackPolicy",
                "cloudformation:CancelUpdateStack",
                "cloudformation:ContinueUpdateRollback",
                "cloudformation:ListStackResources",
                "events:PutRule",
                "sqs:GetQueueAttributes",
                "events:RemoveTargets",
                "sns:Publish"
            ],
            "Resource": "*"
        }
    ]
}
2. Create a new role (important, the name MUST be exactly as documented below) Please note: If you are setting up the Publisher in the same AWS account as you did already setup the receiver, you do not have to perform this step, as the role was already created while setting up the the Receiver configuration.
- Type of trusted entity = AWS Service
- Choose the service that will use this role = CloudFormation
- Attach permission policies = AWSCloudFormationStackSetExecutionRolePolicy
- Name = AWSCloudFormationStackSetExecutionRole
3. Edit the AWSCloudFormationStackSetExecutionRole role trust relationships.
Change the trust relationship by adding the following JSON, substituting <receiver-aws-account-id> with your receiver AWS account ID.
    {
      "Effect": "Allow",
      "Principal": {
        "AWS": "arn:aws:iam::<receiver-aws-account-id>:root"
      },
      "Action": "sts:AssumeRole",
      "Condition": {}
    }
|
Before
{
  "Version": "2012-10-17",
  "Statement": [
    {
      "Sid": "",
      "Effect": "Allow",
      "Principal": {
        "Service": "cloudformation.amazonaws.com"
      },
      "Action": "sts:AssumeRole"
    }
  ]
}
|
After
{
  "Version": "2012-10-17",
  "Statement": [
    {
      "Sid": "",
      "Effect": "Allow",
      "Principal": {
        "Service": "cloudformation.amazonaws.com"
      },
      "Action": "sts:AssumeRole"
    },
    {
      "Effect": "Allow",
      "Principal": {
        "AWS": "arn:aws:iam::931709186019:root"
      },
      "Action": "sts:AssumeRole",
      "Condition": {}
    }
  ]
}
Note: Your JSON should have your receiver AWS account ID and not the 931709... as shown in the example. |
Enable or Update the AWS API Configuration
To enable or update the AWS API configuration:
- Log in to Skyhigh CASB and go to Settings > Service Management.
- Select your AWS instance.
- On the Setup tab, for API, click Edit.
- Edit the enabled features.
- Under Security Configuration Audit, select the On-Demand Scan radio button and activate Near Real Time (NRT) checkbox.
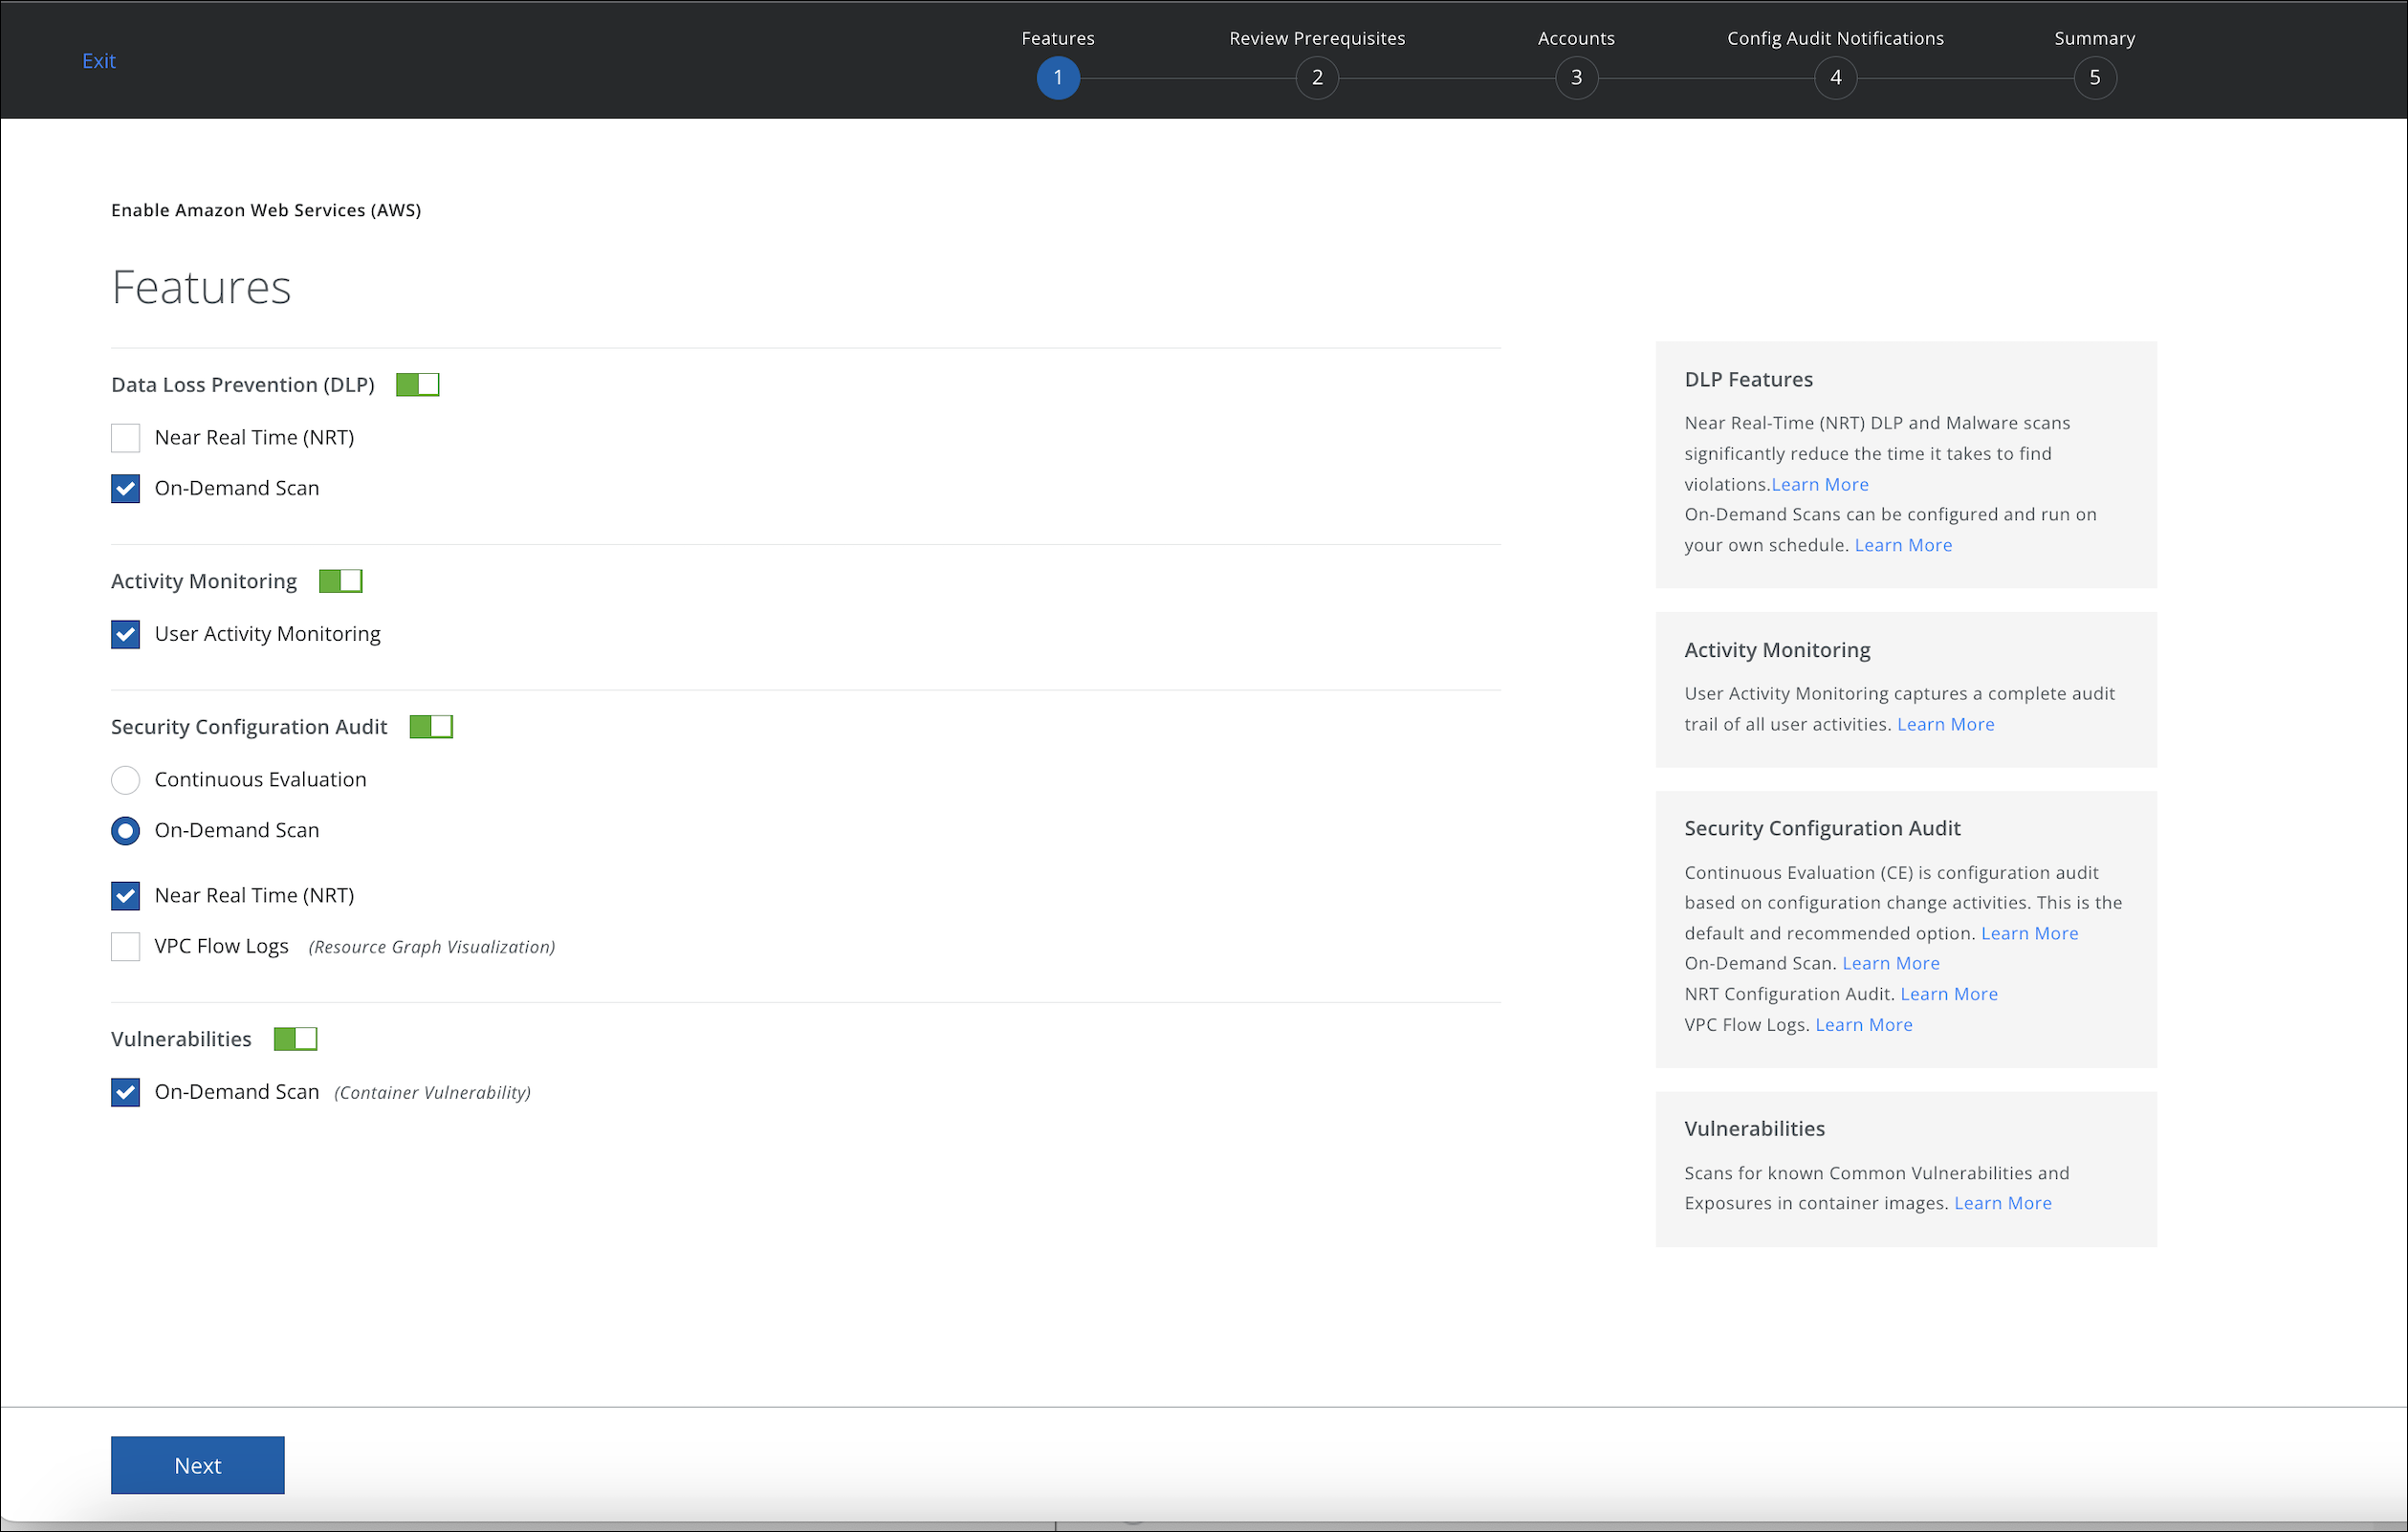
- Review the prerequisites, then click Next.
- Your existing accounts should be present on the Add Accounts page, simply press the Authenticate Accounts button to proceed.
- On the Real-Time Monitoring page, select Edit Accounts and select the AWS account you want to enable for Near Realtime Audit.
- Select the receiver account and select I grant Skyhigh CASB permission.
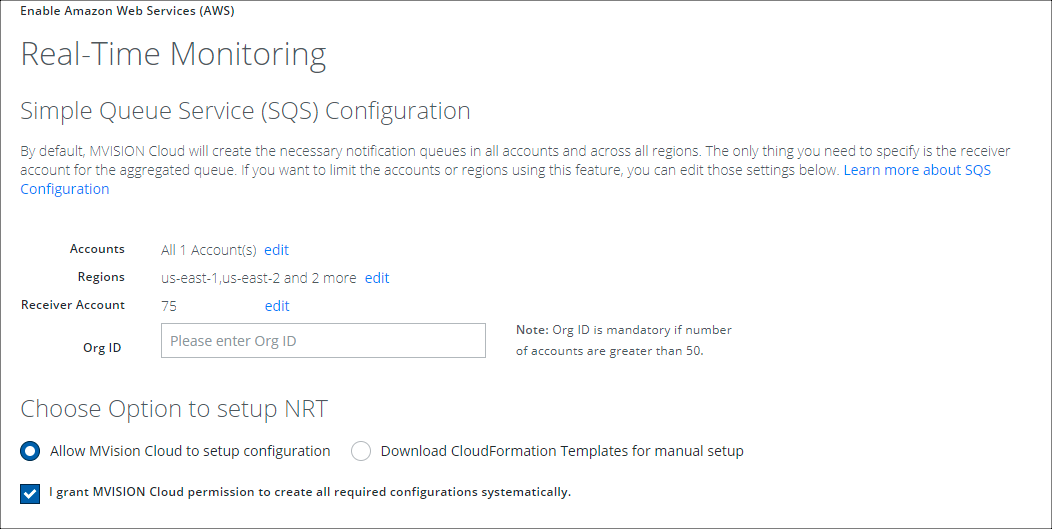
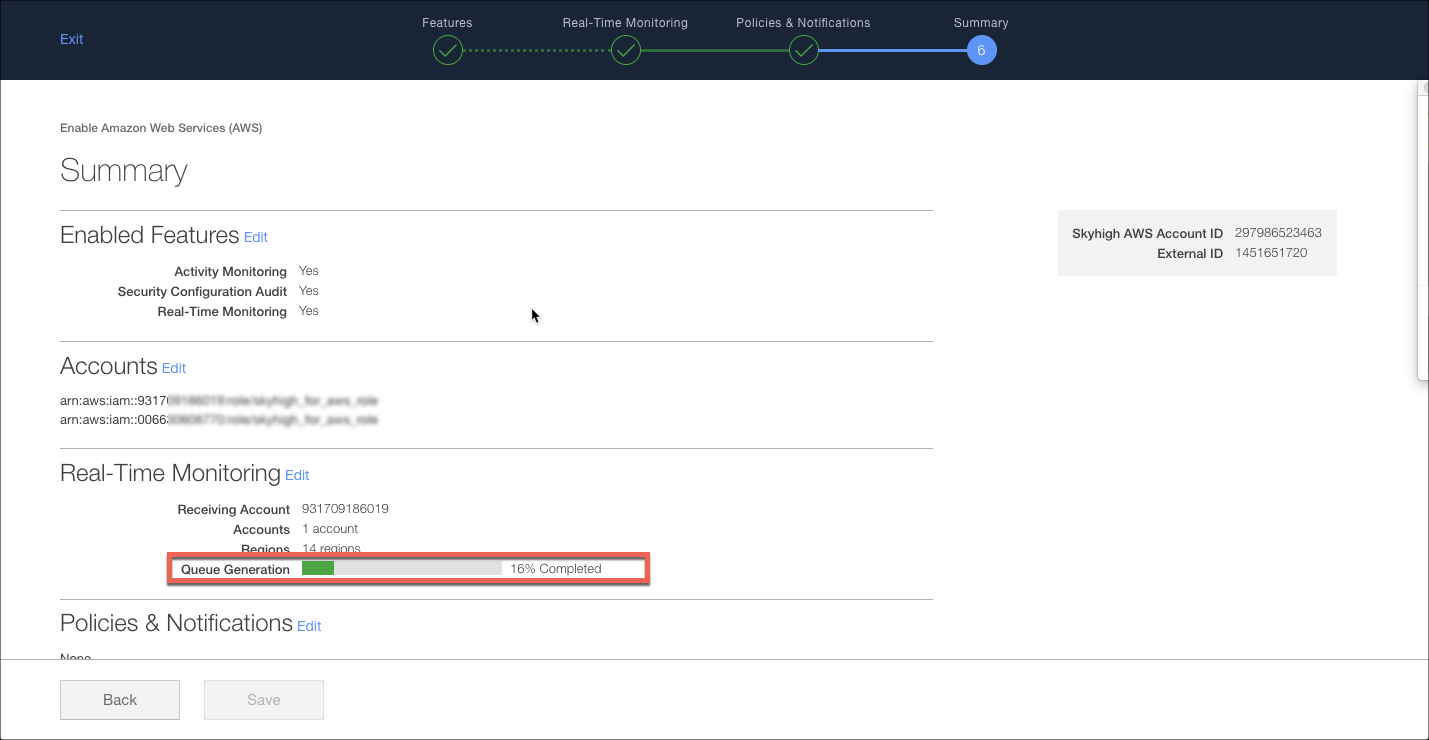
NOTE: In the example above we did not edit the regions so all 14 AWS regions will be selected for monitoring. This will take some time (up to an hour) to complete. If you wish to expedite this process, select only the region(s) you have AWS resources configured.
- Click through the rest of the wizard until you reach the summary page. Review the Real-Time configuration, and then save.
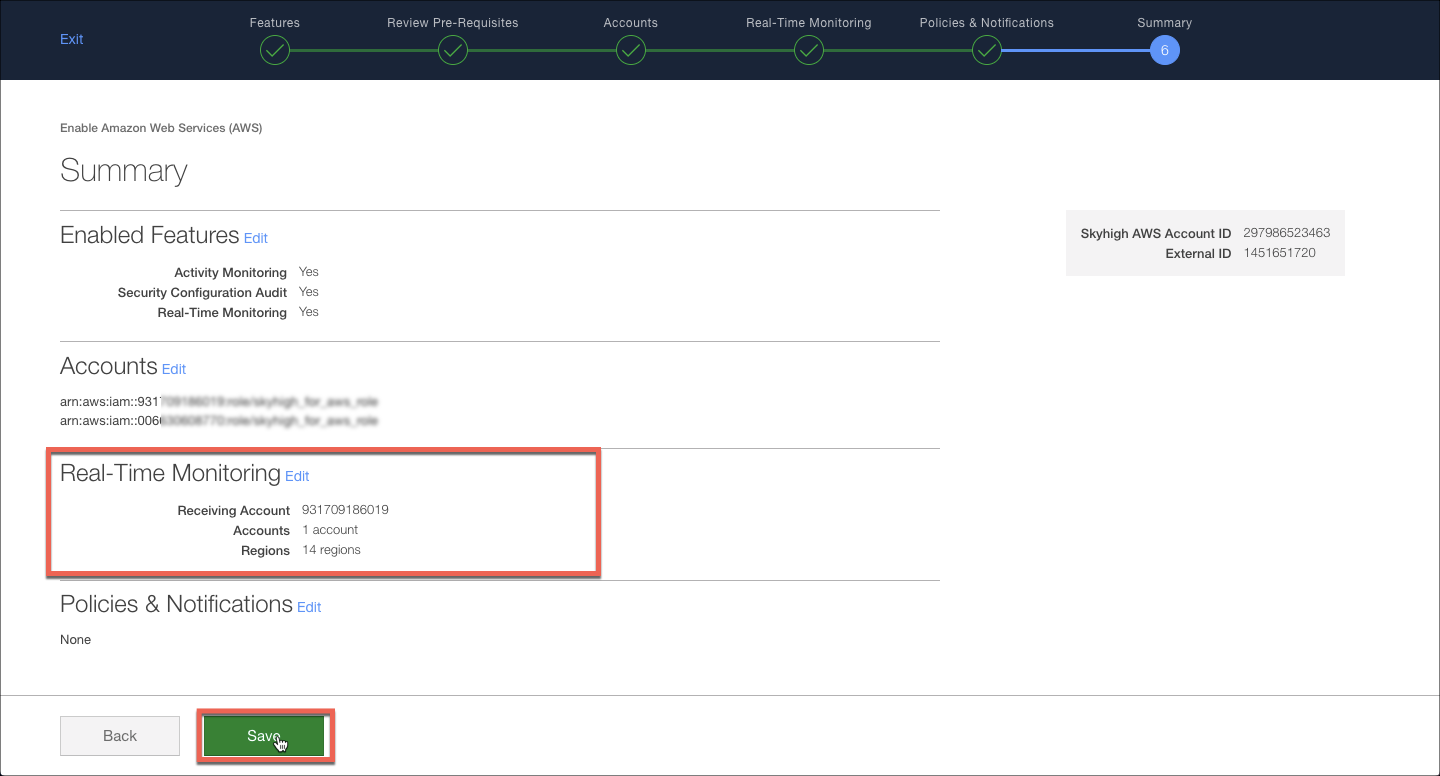
- Monitor the creation of the SQS queues, as mentioned earlier if you selected all regions, the queue creation may take an hour to complete.