Configure Cloud Firewall Policy
-
 Watch the visual story about Creating a Cloud Firewall Policy
Configure Cloud Firewall policy to control, manage, and protect your network traffic. You can enforce the policy with rules that control how the firewall inspects, allows, or denies network traffic. Each firewall is associated with a single policy, but a policy can be associated to multiple set of rules. You can define rules based on source and destination IP addresses, host names, location names, port numbers, names of detected protocols, process names, URL, user groups or user names. Furthermore, Cloud Firewall seamlessly integrates with web policy to provide an additional layer of security for web traffic.
How Cloud Firewall Rules Works
- Rule evaluates to true or false based on the criteria, values, and action specified in each rule.
- Rules are triggered when all their conditions are evaluated to true.
- When a rule matches the traffic information, the firewall applies the specified rule action.
- After a rule action is applied, the firewall does not evaluate any further rules.
- By default, Cloud Firewall allows all traffic. You can configure the firewall rule to accept or deny traffic. To block the traffic, you can add a last rule with default action set to block.
Make sure to configure a rule with DNS protocol set to Allow when you create a BLock All traffic as the last rule. This will ensure that Cloud Firewall does not block any DNS traffic.
Supported Protocols
You can configure Cloud Firewall rules with one or more of the following protocols:
CMP, TCP, UDP, DNS, FTP, HTTP, HTTPS, SSH, TLS, DHCP, IMAP, Kerberos, LDAP, NFS, POP3, RIP, RTP, SMB, SMTP, SNMP, Syslog, Telnet, TFTP, VoIP, IRC, L2TP, PPTP, SFTP, SIP, WHOIS, MGCP, QUIC, NTP, TDS, RDP, Gnutella, Ident, and RADIUS.
To configure a Cloud Firewall policy:
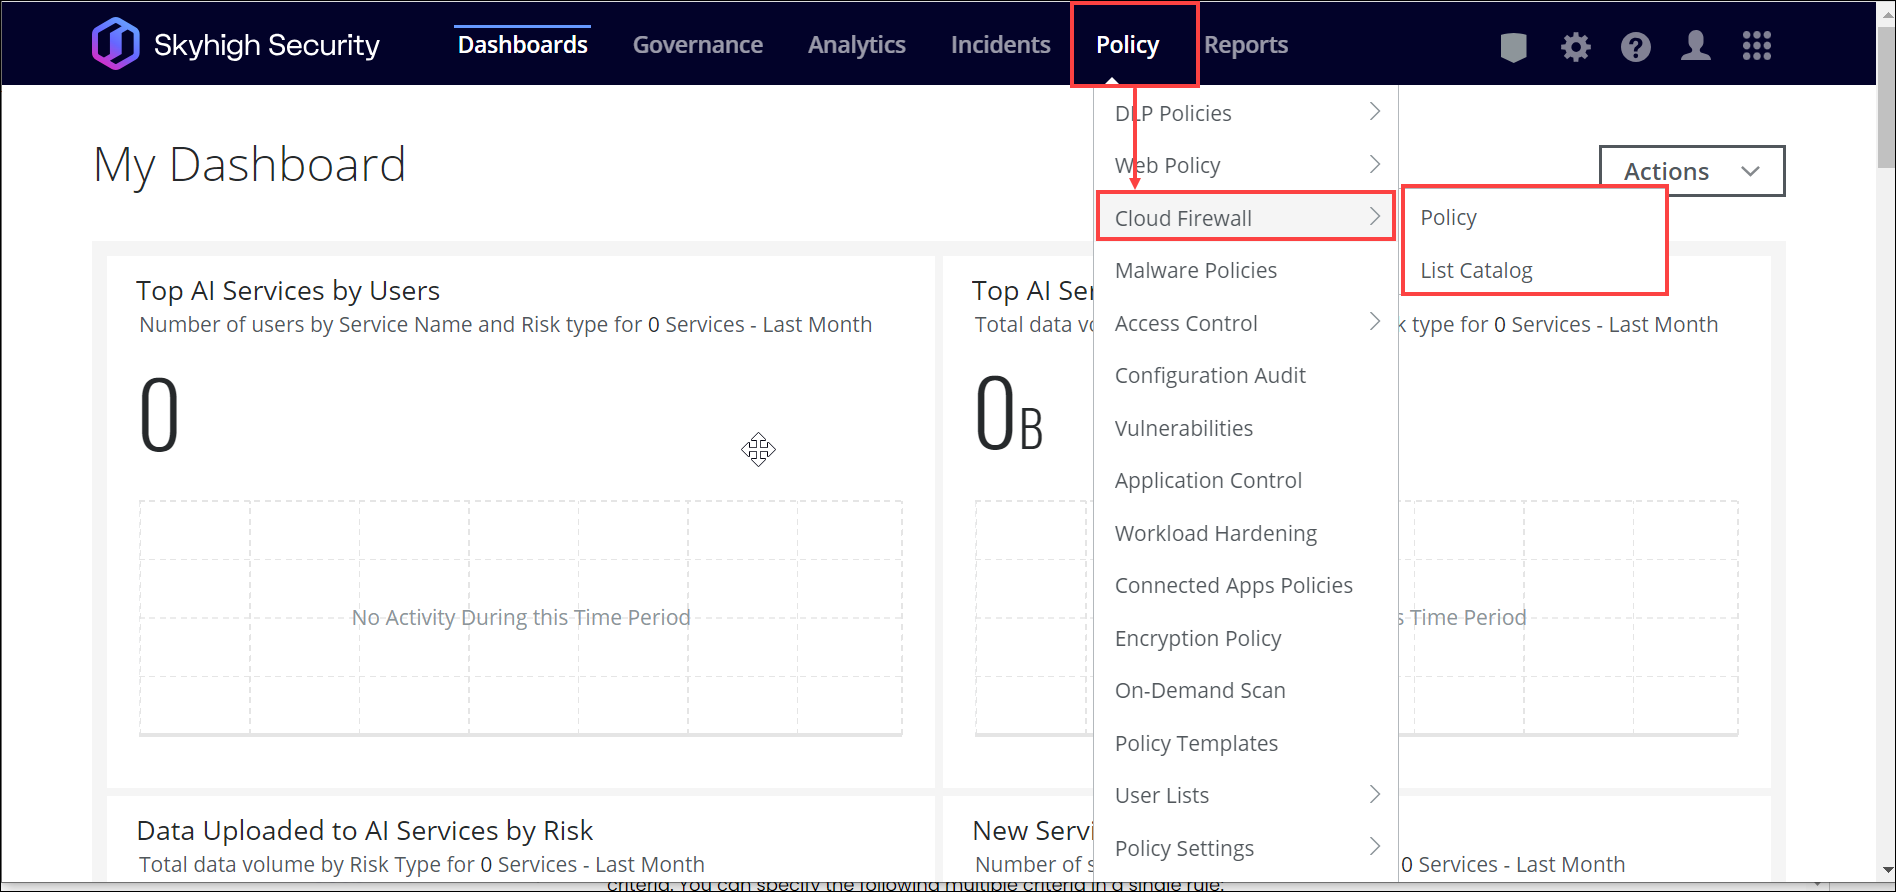
- Go to Policy > Cloud Firewall > Policy.
-
You now have the Default Policies available on the Policy page. This makes it easier for the initial configuration of Cloud Firewall Policies especially for first time users. You can modify/delete/disable/enable these Default Policies on the Cloud Firewall page based on the specific enterprise requirement.
-
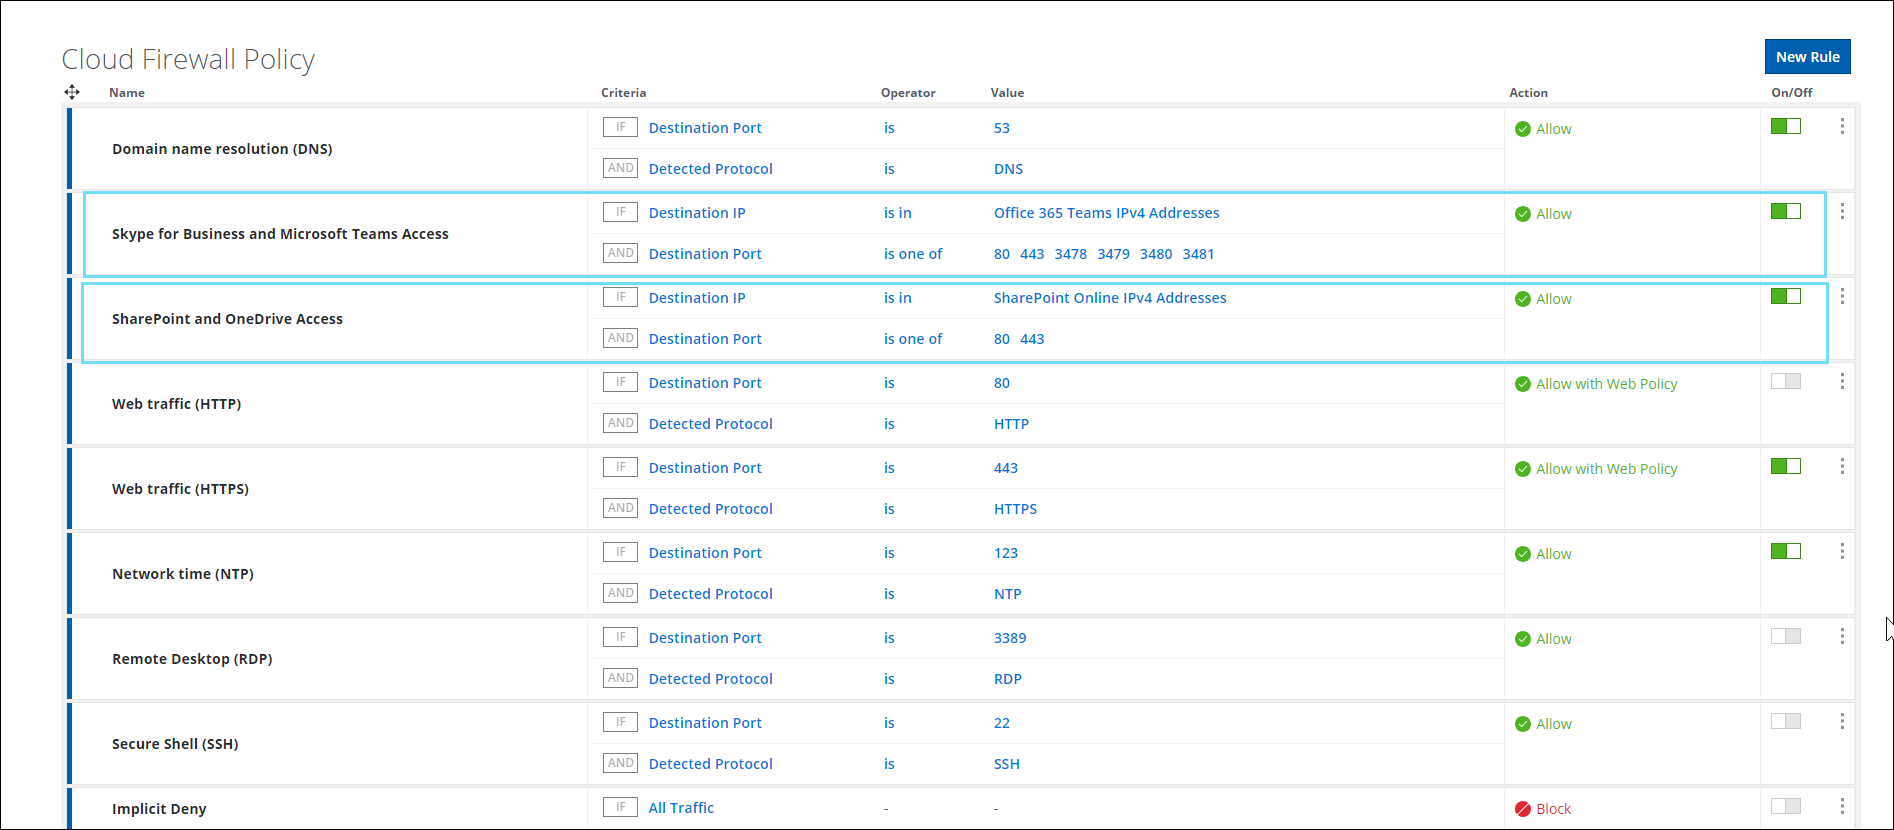
The following default policies are enabled on the Cloud Firewall policy page when provisioning the new tenant.
-
SharePoint and OneDrive Access
-
Domain name resolution (DNS)
-
Skype for Business and Microsoft Teams Access
-
Web traffic (HTTPS)
- Network time (NTP)
-
- When provisioning a new tenant, the following default policies are disabled in the Cloud Firewall policy page.
-
Web traffic (HTTP) off
-
Remote Desktop (RDP)
-
Secure Shell (SSH)
-
Implicit Deny
-
- Microsoft O365 Access — Cloud Firewall supports enabling O365 Access on the Skyhigh Provided Default Policies on the Cloud Firewall Policy page when provisioning a new tenant. Existing tenants can replicate this policy using rule builders.
By adding Microsoft O365 access to the default policy, you can enable Cloud Firewall policy without impacting user access and ensure a seamless user experience from the first day of using Skyhigh Cloud Firewall.
- To configure a new Cloud Firewall policy, click New Rule.
- Complete the following fields:
- Name — Specify the name of the rule to be created.
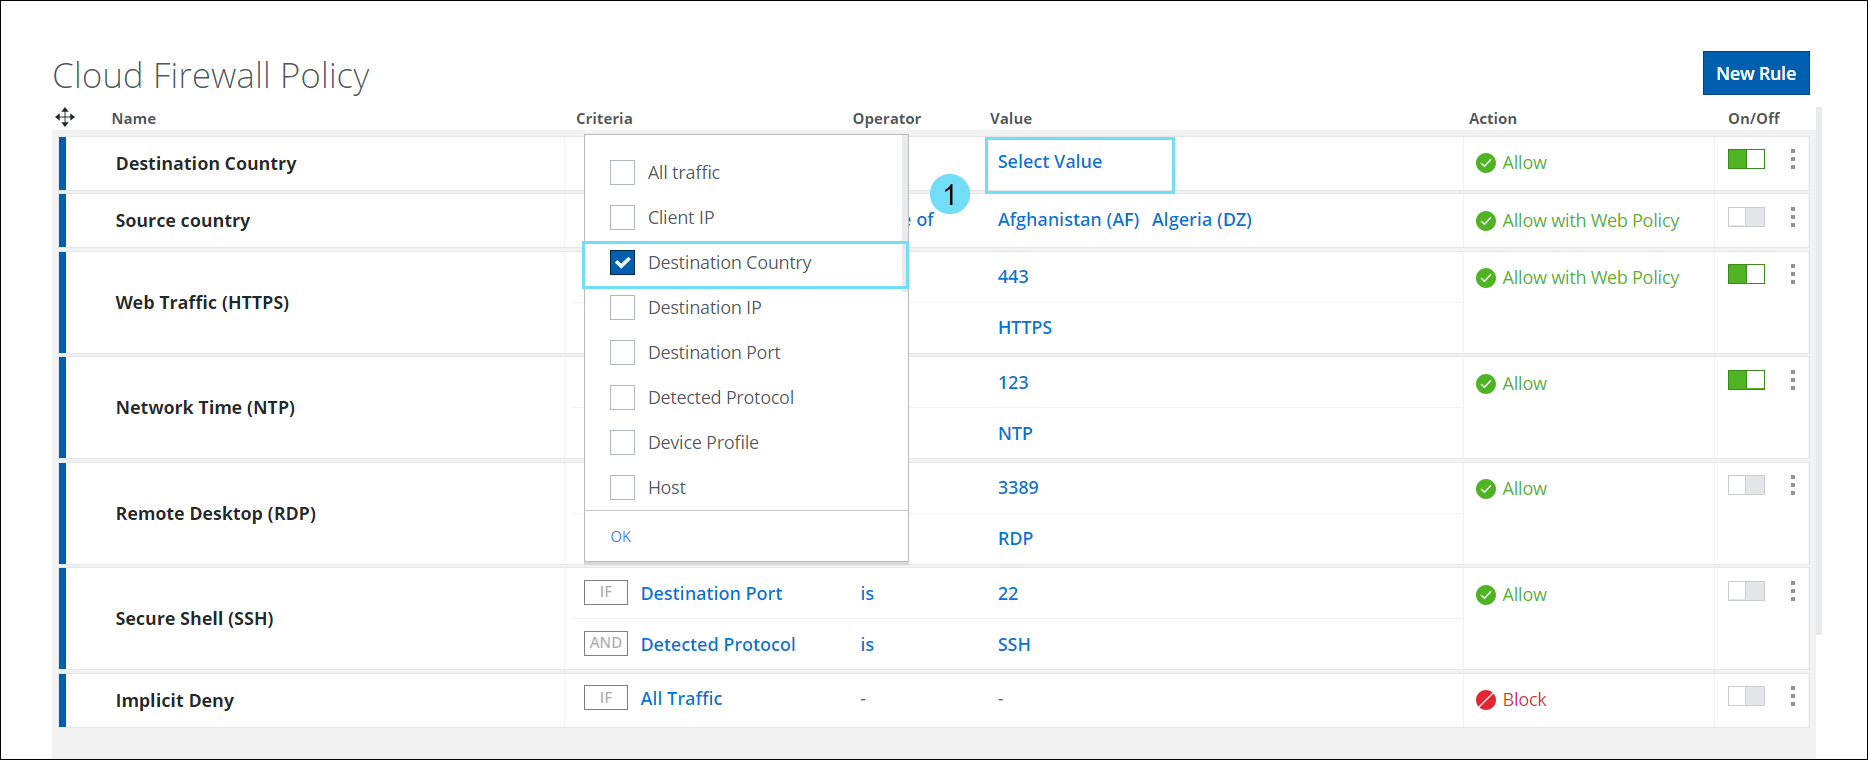
- Criteria — Select criteria to apply the firewall rule and click OK. You can also view the logic used for the selected criteria. You can specify the following multiple criteria in a single rule:
- All traffic — Applies to all traffic.
- Client IP — The IP address of the client or source that sends the traffic.
- Source IP/ Source Port — The IP address or port that sends the traffic.
- Destination IP / Destination Port — The IP address or port that receives the traffic.
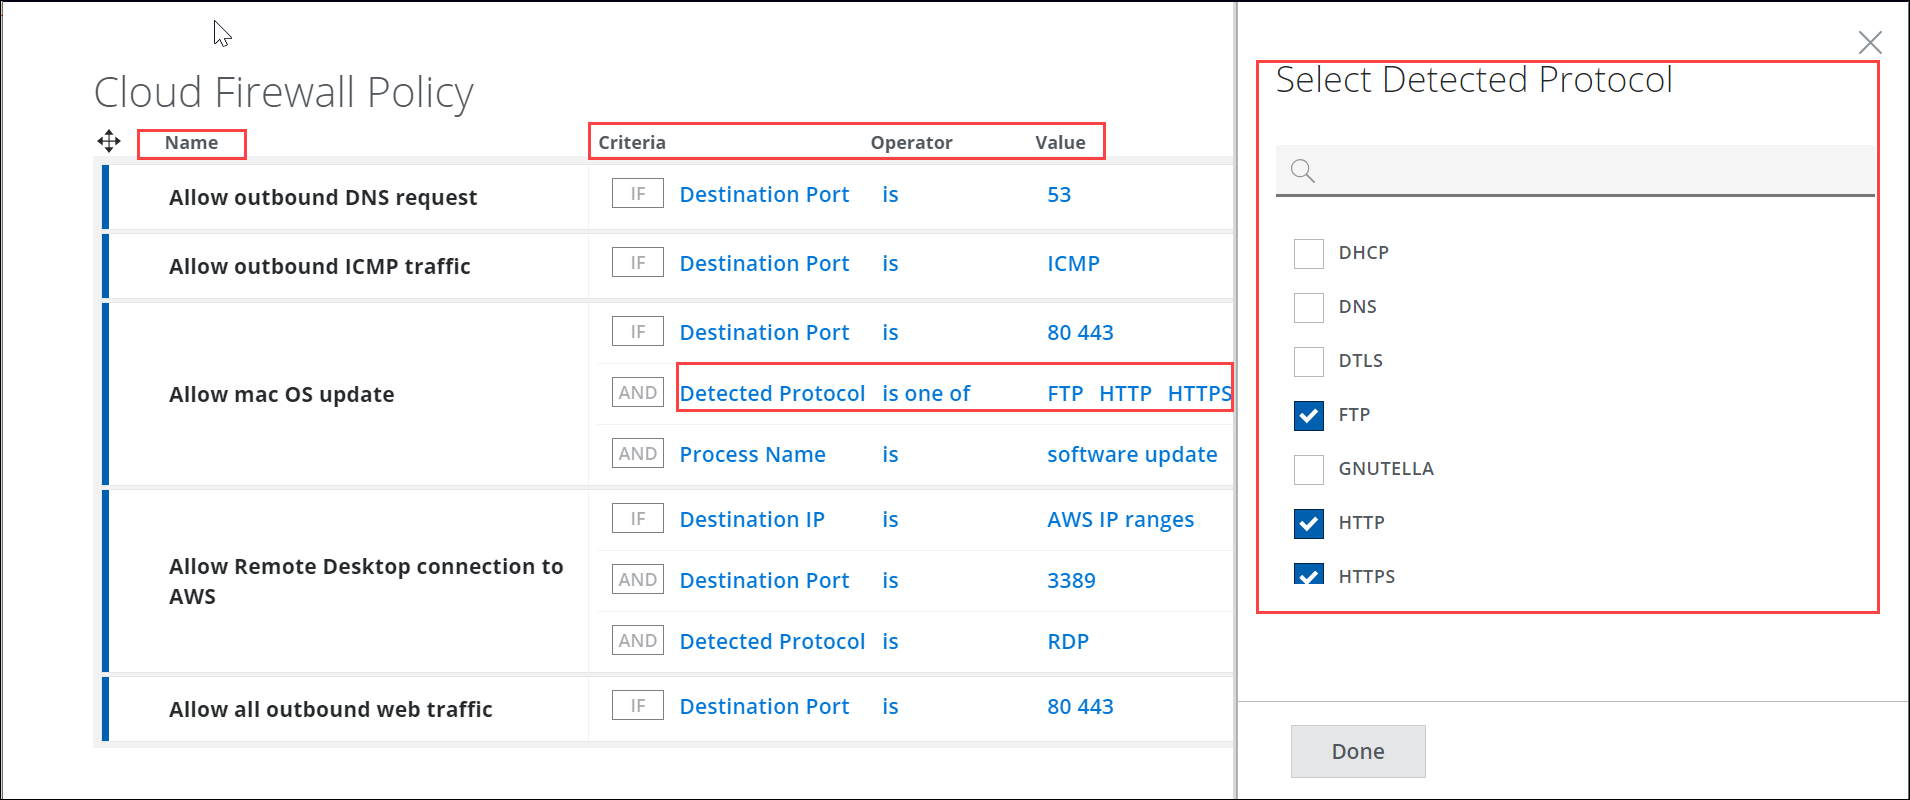
- Detected Protocol — The protocol detected in the traffic. For example, you can use this criteria to block HTTP traffic to restrict all traffic from the Internet that uses the HTTP protocol.
- The Select Detected Protocol dialog box now provides a list of supported protocols. When the Detected Protocol criteria is selected, click Value to view the Select Detected Protocol dialog box. Use the search or multi-select checkbox option to select the required Detected Protocol.
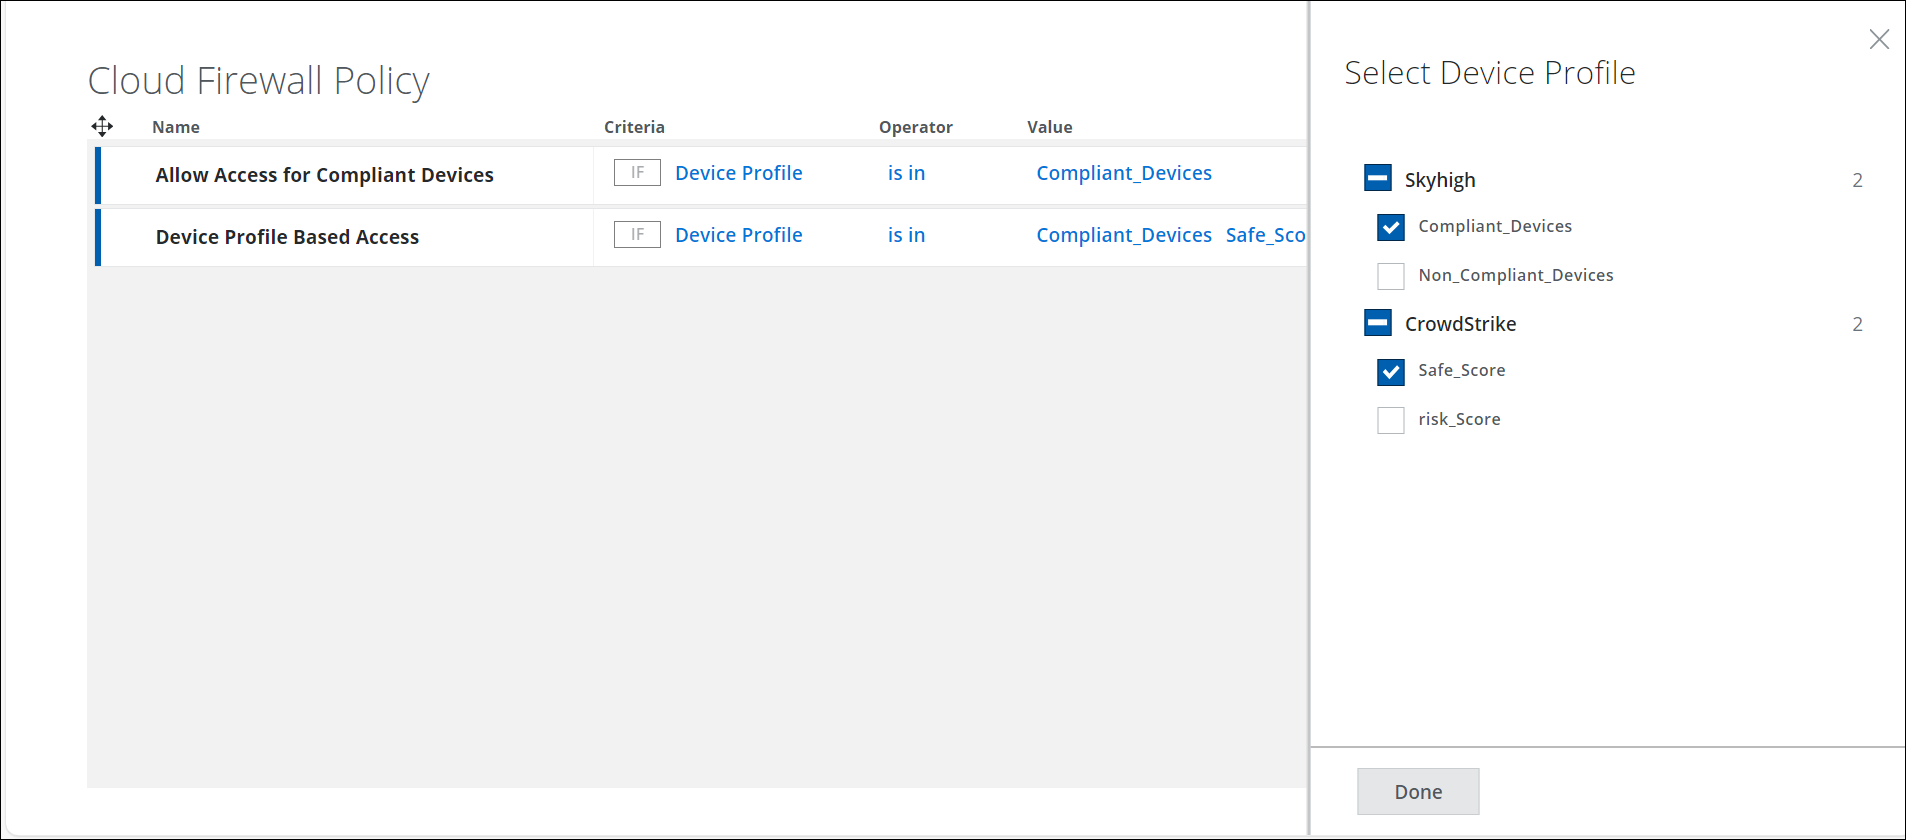
 Device Profile — The device profile criteria provide a list of configured device profiles. You can use this criteria to restrict IP traffic from non-compliant devices and allow traffic only from compliant devices.
- The Select Detected Protocol dialog box now provides a list of supported protocols. When the Detected Protocol criteria is selected, click Value to view the Select Detected Protocol dialog box. Use the search or multi-select checkbox option to select the required Detected Protocol.
- To know about configuring a device profile, see Configure Device Profiles.
- When the Device Profile criteria is selected, click Select Value to view the Select Device Profile side panel.
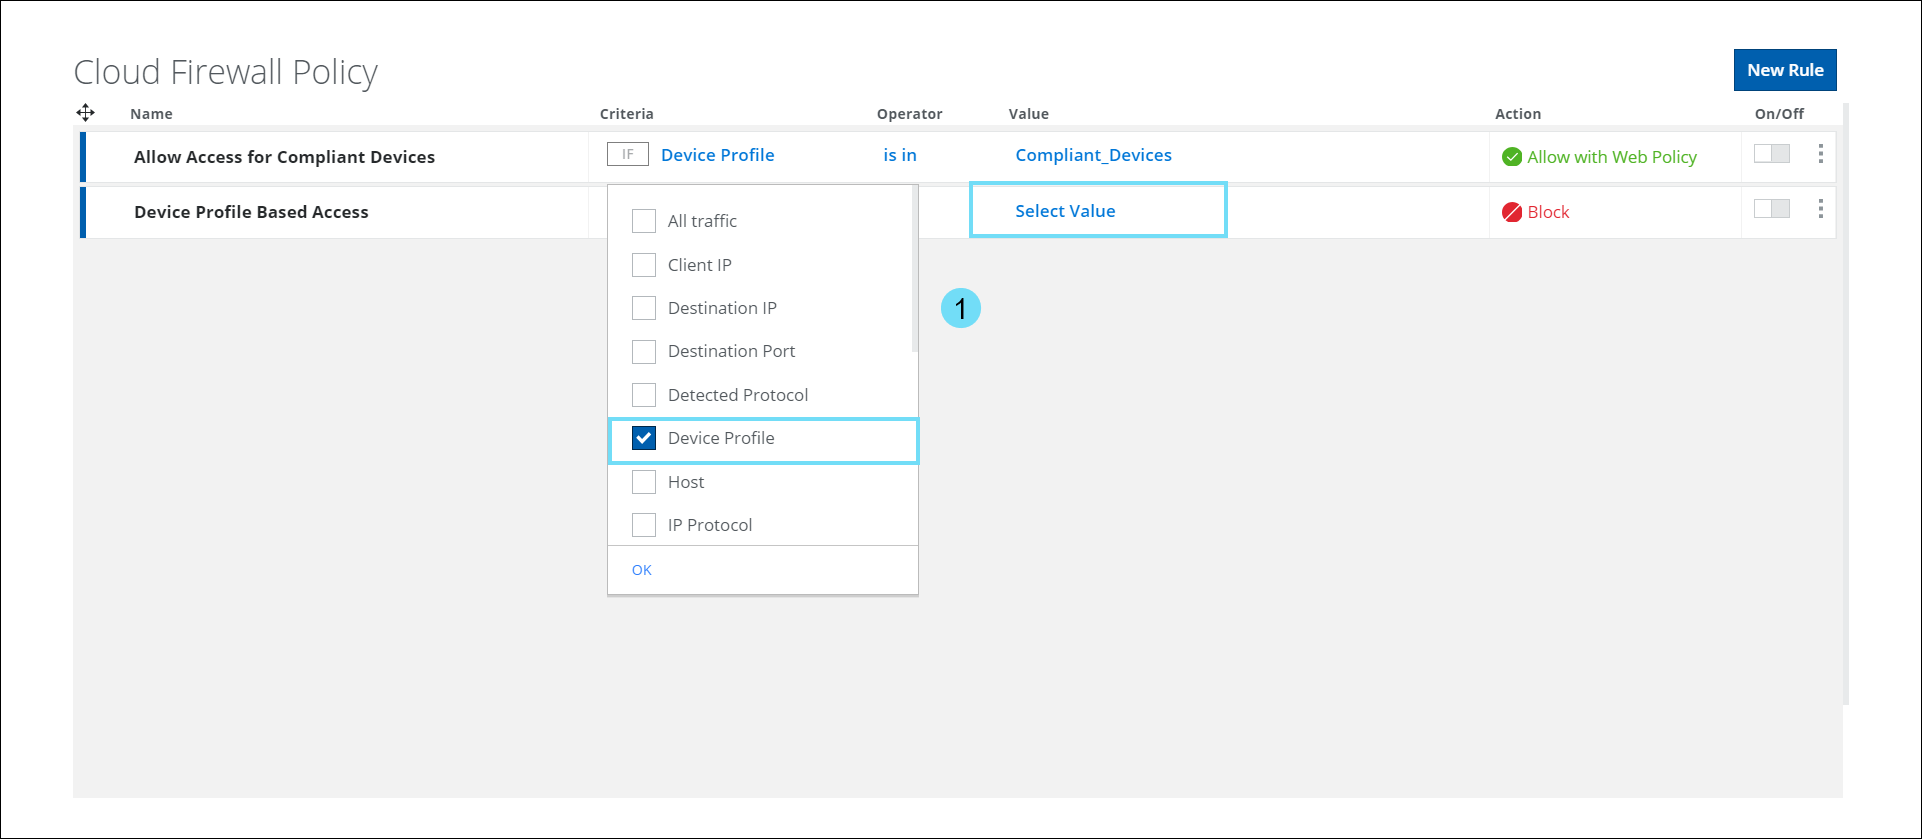
- The Select Device Profile panel displays a list of configured device profiles. Use the checkbox to select the required Device Profile in the Cloud Firewall Policy.
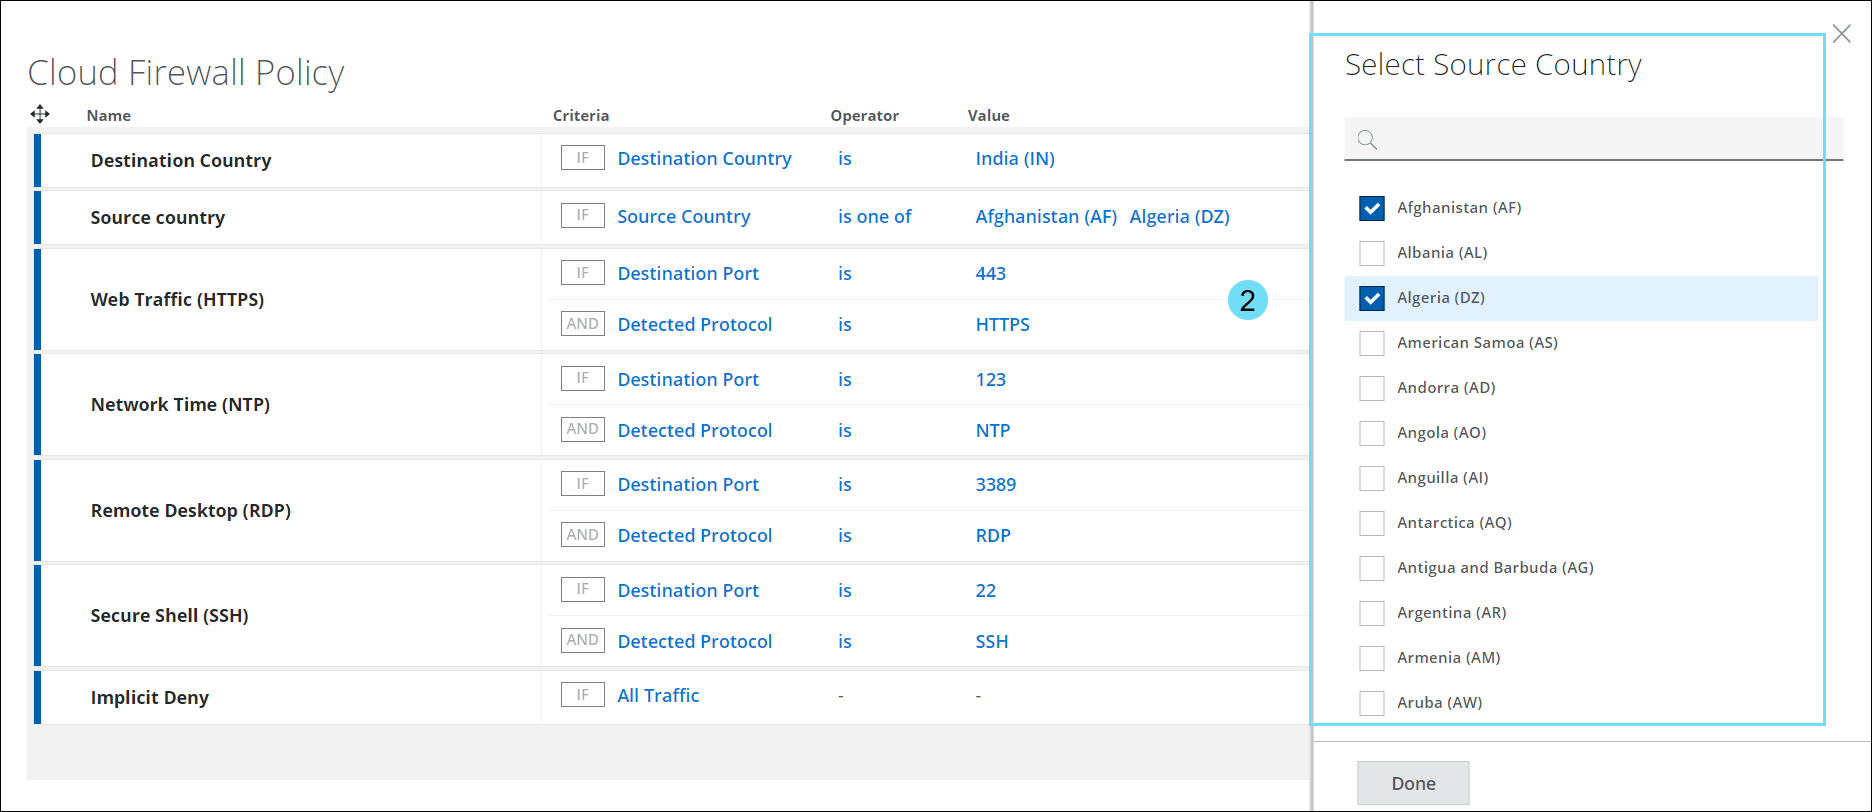
- Source Country —The Source Country criteria option in the policy allows for the restriction of traffic from specific countries (in case you do not have any offices, users, or businesses there) without the need to forward any traffic from there. You can use this criteria to Allow/Allow with Web Policy/Block/Drop all user generated traffic originating from a particular country.
- In the Criteria option, select Source Country and click Select Value to view the Select Source Country side panel.
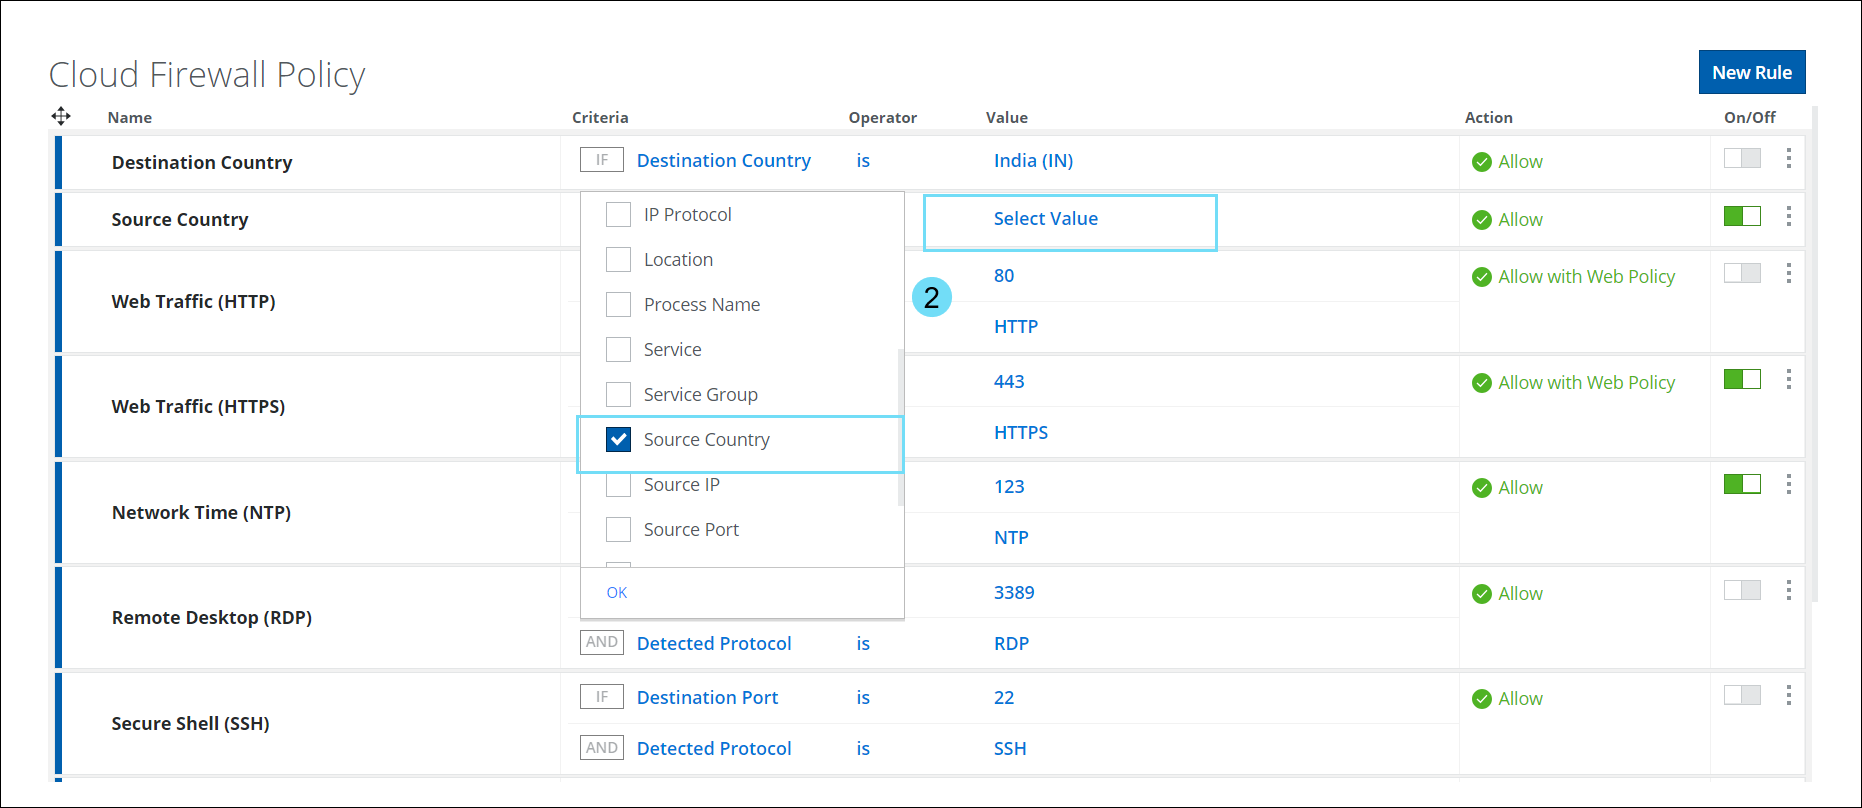
- The Select Source Country panel displays a list of countries in the world. Use the checkbox to select the required Country in the Cloud Firewall Policy.
- In the Criteria option, select Source Country and click Select Value to view the Select Source Country side panel.
- Destination Country — The Destination Country criteria option in the policy prevents users from sending any traffic to a destination server/endpoint (such as a Command and Control server) in a specific country. You can use this criteria to Allow/Allow with Web Policy/Block/Drop all traffic destined for a particular country.
- In Criteria, select Destination Country and click Select Value to view the Select Destination Country side panel.
- The Select Destination Country panel displays a list of countries in the world. Use the checkbox to select the required Country in the Cloud Firewall Policy
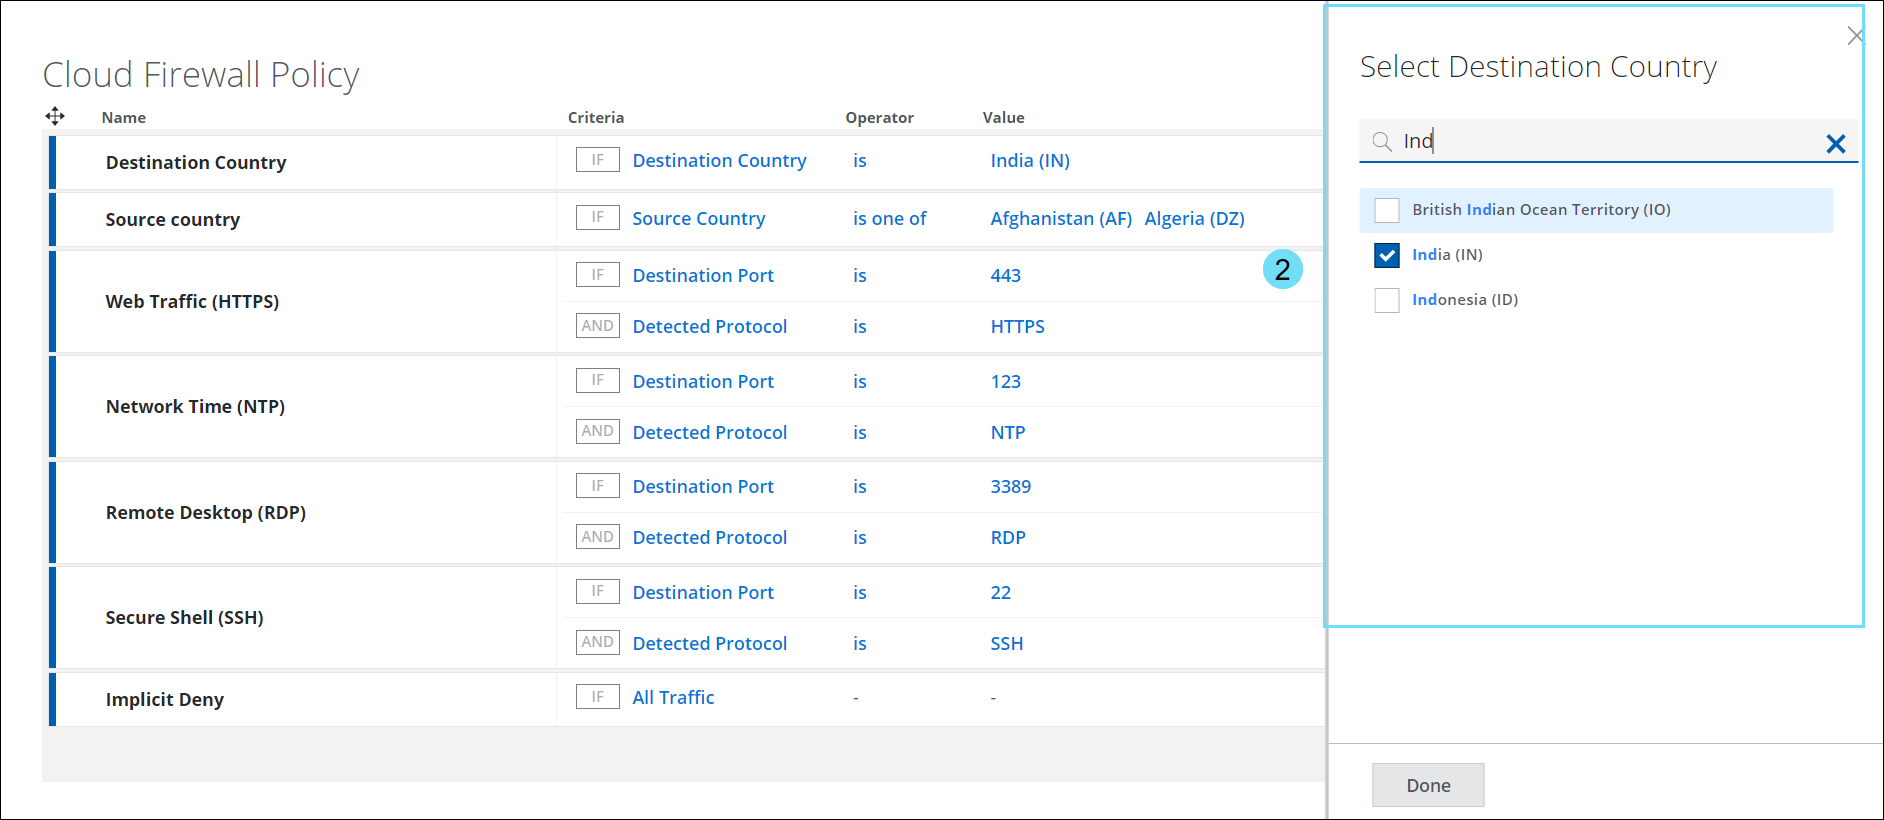
- In Criteria, select Destination Country and click Select Value to view the Select Destination Country side panel.
NOTE: To narrow your search results on the Select Source Country/Select Destination Country panel, you must enter at least three letters of the country name.
.png?revision=1)
- Microsoft O365 Access — Cloud Firewall supports enabling O365 Access on the Skyhigh Provided Default Policies on the Cloud Firewall Policy page when provisioning a new tenant. Existing tenants can replicate this policy using rule builders.
By adding Microsoft O365 access to the default policy, you can enable Cloud Firewall policy without impacting user access and ensure a seamless user experience from the first day of using Skyhigh Cloud Firewall.
- Host Name — The host part of the URL.
Note: The host name cannot be resolved from the protocol. - IP protocol — The IP protocols. For example, IP protocols like ICMP, TCP, and UDP.
- Location — The geographic location or regions.
- URL — The URL of a site. If the destination host name is not known, it is replaced by the destination IP. The path of the URL is only known for a few number of protocols (example HTTP) and might be empty (example dns://8.8.8.8:53).
- User Group — The group of users. Applies rule to all members of a group. For example, groups can be limited to specific protocols when they access the Internet
- User Name — Specific users. For example, allow internal users to access any Web server on the Internet by using HTTP or HTTPS.
- Service — The service name as identified by Skyhigh Cloud registry. For example, Zoom, Facebook.
- Service Group — The group of services. You can create a group of services and then add a firewall rule to allow or block access for all the services in the group. For more details, see Create a Service Group. For example, you can add Amazon, Target, Magneto, and emart to a service group called e-commerce.
The Service and Service Group options are supported only when you have Skyhigh CASB Shadow IT license. You can select Service and Service Groups as policy criteria that are managed in CASB Shadow IT. This enables you to apply application-based policies for more than 40000 applications under Skyhigh Cloud Registry.
- Operator — Specify the operator for the selected criteria to build a condition.
- Value — Click to specify the value based on the set criteria. For example, when you set Destination IP, the Select Destination IP dialog opens to let you specify the IP addresses or ranges. If you have configured Lists under List Catalog (Policy > Cloud Firewall > List Catalog), you can select them as well.
- Action — Specify the action to be performed when a rule is triggered.
- Allow — Allows traffic that matches the rule to pass.
- Block — Blocks traffic that matches the rule and sends a message to the client.
- Drop — Drops the traffic that matches the rule and it does not send a response back to the client.
- Allow with Web Policy — Applies the configured web policy rules to the firewall traffic. You can subject the web traffic for deep content inspection by applying both SWG with firewall policy.
To optimize your firewall performance, Skyhigh recommends applying Allow with Web Policy only for the selected traffic that should be subjected to Web Policy for deep inspection.
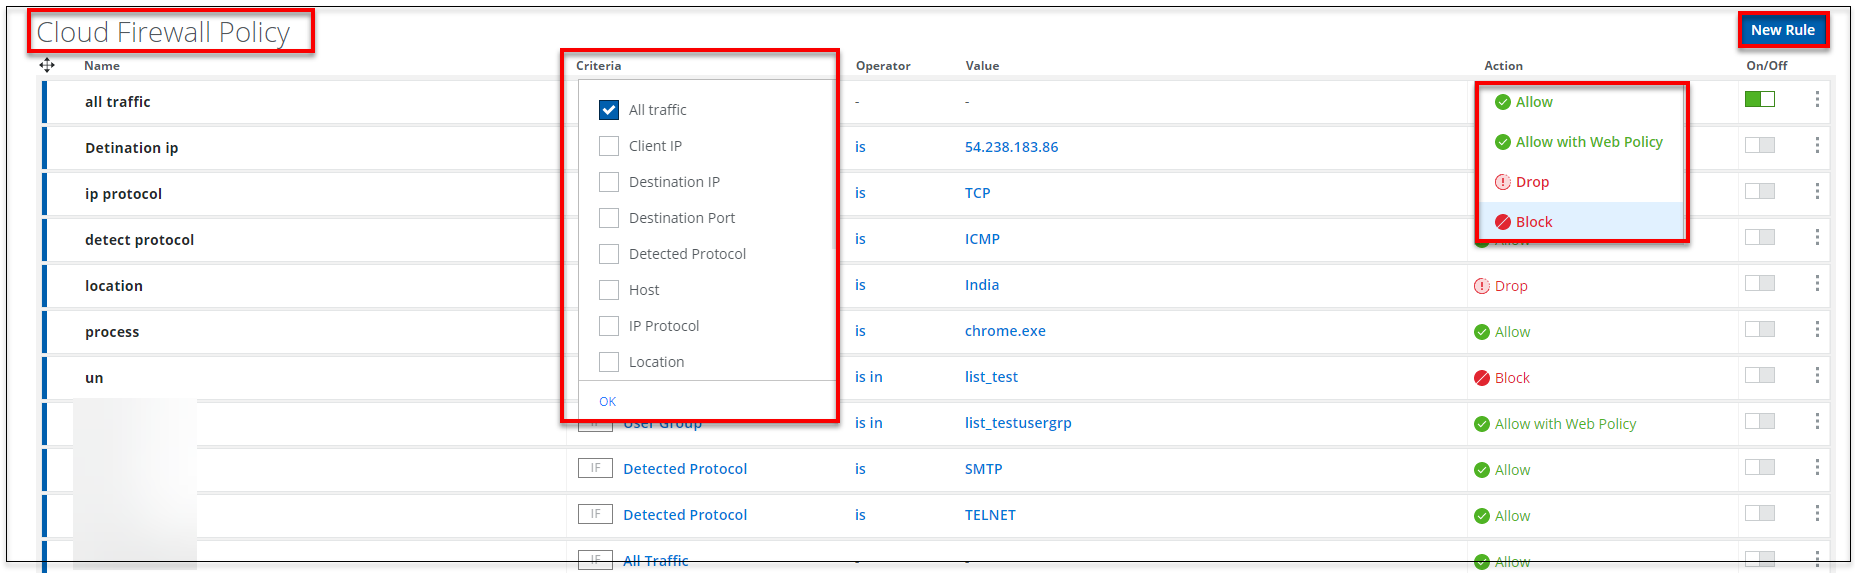
- On/Off — Select On to enable a rule and Off to disable a rule. Click
 to view options such as Add New Condition and Delete.
- Add New Condition — Adds a new condition (criteria). Select a criteria from the list and click OK. You can specify multiple criteria for a single rule. You can also view the logic used for the selected criteria.
- Delete — Deletes the selected rule.

Publish the saved changes to the cloud now or keep working and publish later.