Create an In VPC Scan for GCP
To run a DLP scan in your Google Cloud Platform (GCP) environment (instead of running it in Skyhigh CASB), you can now use a deployed POP to expand DLP control to GCP Cloud Shell in their native VPC environment. Think of In VPC Scans as in-tenant inspections of data.
A POP must be properly configured before you can run an In-VPC scan. Also, an IAM role must have permissions to allow the scan to run. An IAM role is created while adding a service account in GCP.
In-VPC scans are supported for AWS, Azure, and GCP.
Prerequisites
Make sure you have the following prerequisites in place before you configure PoP for GCP:
- Minimum of 3–4 core CPU-intensive nodes.
- Add a GCP Service Instance in Skyhigh CASB. For details, see Add a GCP Service Instance in Skyhigh CASB.
- Add a Service Account to allow Skyhigh CASB to access your GCP resources. For details, see Add a Service Account in GCP.
- A deployed GCP PoP. For details, see Deploy a GCP PoP.
Configure PoP
Configure the PoP to run the In-VPC scan for GCP and perform the following activities.
Generate SSH Key
To generate SSH key:
1. Run the ssh-keygen command.
ssh-keygen -t rsa
- The command prompts you to enter the path to the file in which you want to save the key.
- Save the base64 content of the key into a text file. This is the User Key file used in the next steps.
Upload the PoP Deployment Package
- Download the Pop Deployment package PoPPackage.tar from the GCP-managed service instance in Skyhigh CASB.
- Extract the PoPPackage.tar to get PoPDeployment.tar and Infrastructure.tar. Expand the Infrastructure.tar further to get Deploy_prereq_pop.sh file.
- Upload the following files to a bucket in GCP. For example, cwpp-micro-pop-deployments is the target bucket name.
- Infrastructure.tar
- PoPDeployment.tar
- User Key file
- Deploy_prereq_pop.sh
NOTE: Generate or upload the User Key file only once for the first time. For future deployments, you can use the same Key file.
Deployment from the GCP Cloud Shell
Copy the User key file and Deploy_prereq_pop.sh file from the GCP bucket to the user home directory. For example, /home/skyhighforgcp2
- gsutil cp gs://cwpp-micro-pop-deployments/deploy_prereq_pop.sh deploy.sh.
- gsutil cp gs://cwpp-micro-pop-deployments/gcp_key.txt key.txt
NOTE: Delete the existing file before copying it.
Configure GCP Parameters
Configure the following GCP parameters:
- Execute the command:
sudo gcloud config set project <Project - ID>
For example, sudo gcloud config set project skyhigh2. Here, you can replace skyhigh2 with the required project name.
- Execute the command:
sudo gcloud config set compute/region <Region -ID>
For example, sudo gcloud config set compute/region us-central1.Here, you can replace us-central1 with the required region.
- Execute the command:
sudo gcloud config set compute/zone <ZONE ID>
For example, sudo gcloud config set compute/zone us-central1-a. Here, you can replace us-central1-a with the required zone.
Execute the PoP Deployment Command
Execute the following POP Deployment command:
For example, sample values are given for the command below. You can replace the required values.
sudo bash deploy.sh --popname=mpop-gcp-demo  --machine-type=c2-standard-4  --storage=10.126.89.58:/cwpp_mpop_store
--zone=us-central1-a --region=us-central1 --serviceaccountname=cwpp-mpop-gcp-sa@skyhigh2.iam.gserviceaccount.com
--network=micropop-vpc --subnet=micropop-subnet-1 --popinfrapackage=gs://cwpp-micro-pop-deployments/Infrastructure.tar
--popdeploymentpackage=gs://cwpp-micro-pop-deployments/PoPDeployment.tar --numberofsecondarynodes=2
--key-sshkeylocation="/home/skyhighforgcp2/key.txt"
Once the PoP is deployed successfully, connect to the PoP master node and deploy DLP components.
Enable DLP on PoP
To connect to the PoP master node:
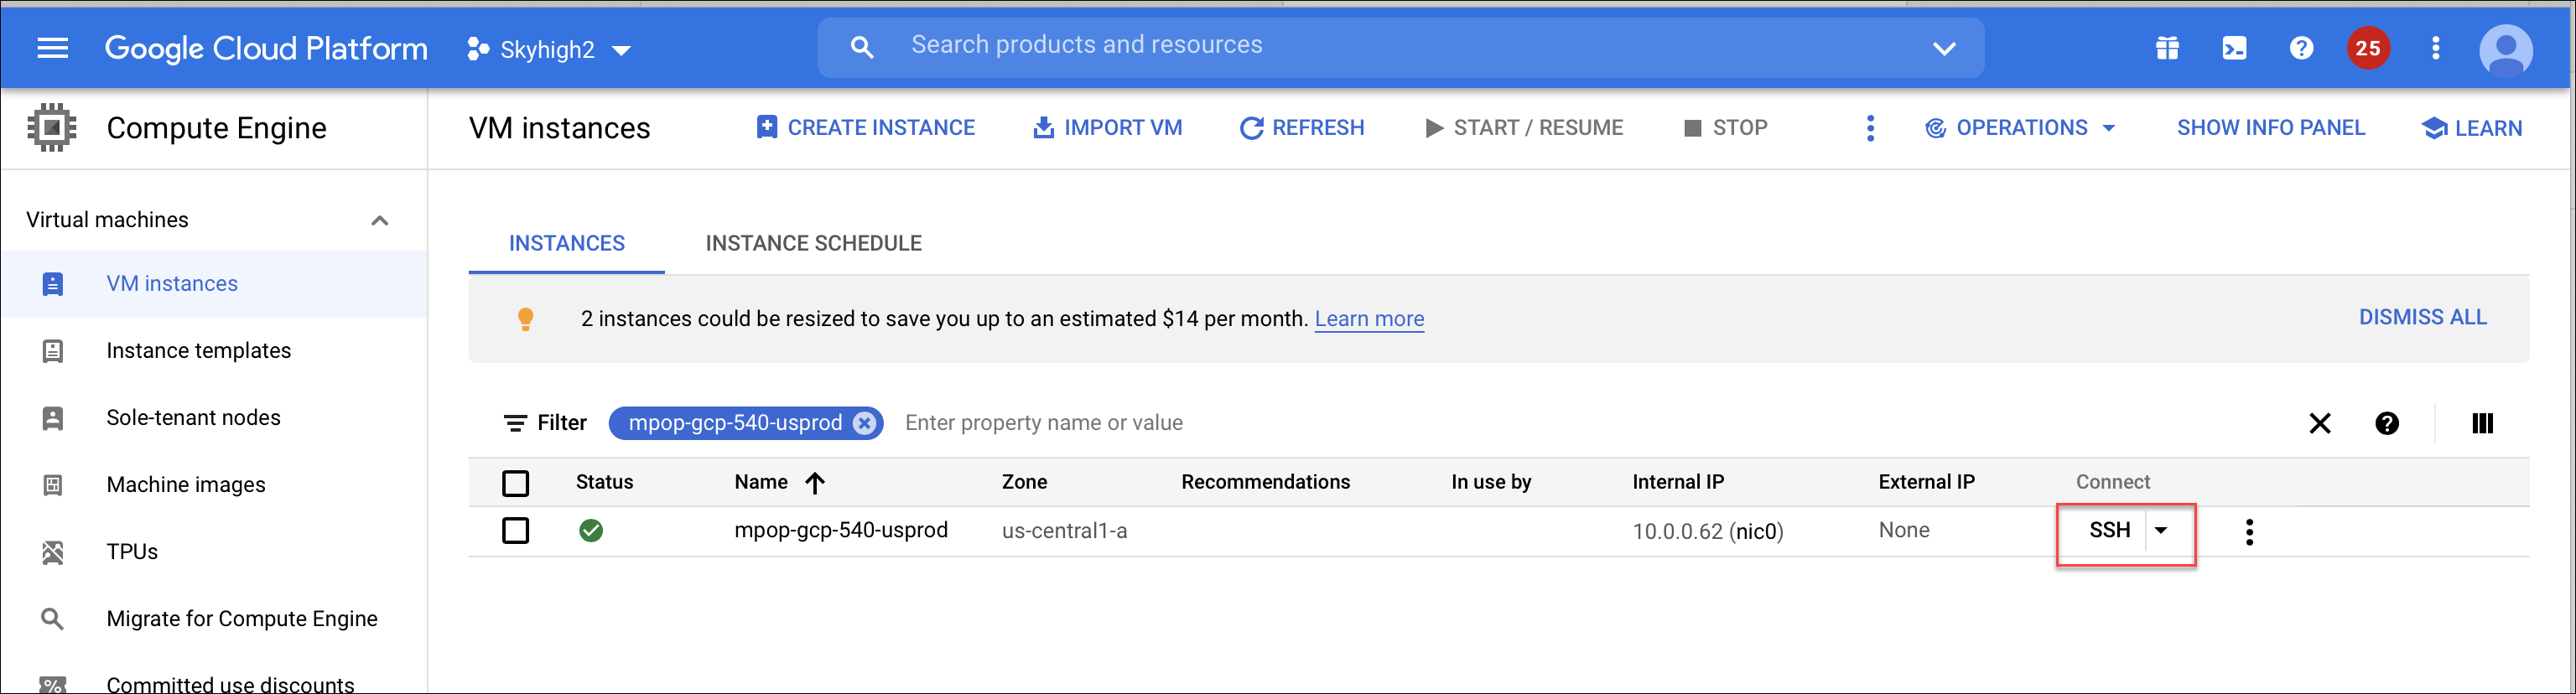
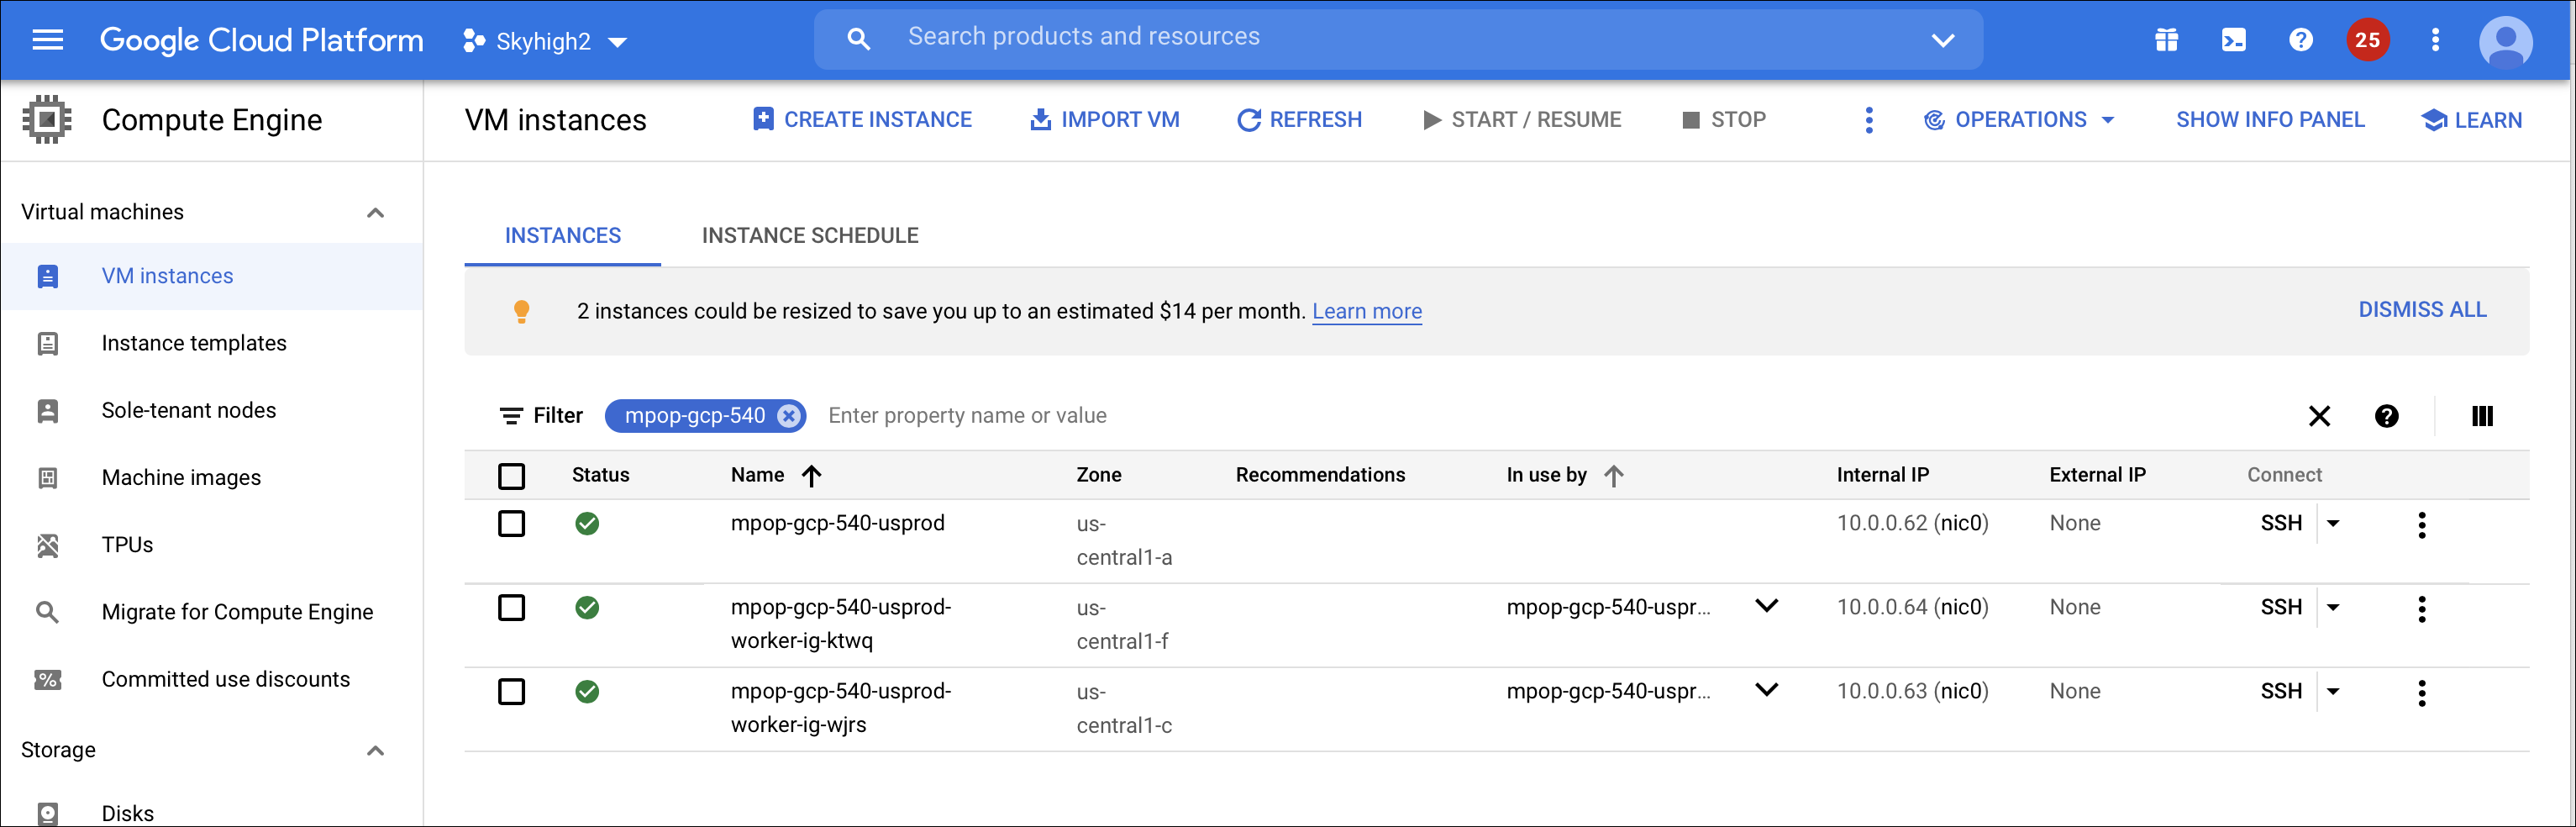
- Go to VM instances from the GCP Dashboard.
- Search for your PoP name in the Search bar. For example, mpop-gcp-demo.
- To connect to the master node, click the SSH icon.
- To validate the deployment of the CWPP component, run the basic commands such as
get podsand validate the status of CWPP whether it is up and running. Also, make sure to run the command with sudo user:sudo su - To execute the DLP components deployment command:
- The default location of setup_pop_gcp.sh file is in the path: /opt/.../cwpp/pop/PoPDeployment/PoPCreation/gcp/
- Browse the above file directory and run the command:
./setup_pop_gcp.sh --addservice dlp-pop Yes <<pop name>>
- Once the DLP components are deployed successfully, wait up to 15 minutes to view the PoP with the enabled DLP.
- To check the DLP PoP status from the main node, execute the following:
- To list the nodes, execute the command:
sudo kubectl get nodes -n cwpp
Sample Results of the nodes:

NAME STATUS ROLES AGE VERSION
10.0.0.28 Ready <none> 20d v1.18.17
10.0.0.29 Ready <none> 20d v1.18.17
micropop-gcp-pop-31-mar Ready <none> 20d v1.18.17
- To list the deployed components, execute the command:
sudo kubectl get deployments -n cwpp
Sample Results of the deployed components:

NAME READY UP-TO-DATE AVAILABLE AGE
cwpp-cicd 1/1 1 1 20d
micropop-dxl-bridge 2/2 2 2 20d
micropop-metis-agent 1/1 1 1 20d
micropop-redis 1/1 1 1 20d
micropop-scan-service 2/2 2 2 20d
- To list the pods, execute the command:
sudo kubectl get pods -n cwpp
NOTE: When the PoP is configured and no scans are executed, you might not find as many pods as listed below.
Sample results of the deployed components:

NAME READY STATUS RESTARTS AGE
cwpp-cicd-6d6b4f965f-mdsrg 1/1 Running 1 20d
cwpp-connector-hhflt 1/1 Running 1 20d
cwpp-connector-rh99z 1/1 Running 0 20d
cwpp-connector-rn6rf 1/1 Running 1 20d
cwpp-connector-vkjmf 1/1 Running 1 20d
cwpp-logging-4rm2v 1/1 Running 1 14d
cwpp-logging-6vq9h 1/1 Running 1 14d
cwpp-logging-b976p 1/1 Running 0 14d
cwpp-logging-zs86r 1/1 Running 1 14d
cwpp-pop-manager-1618900500-fhw5j 0/1 Completed 0 13m
cwpp-pop-manager-1618900800-65cf4 0/1 Completed 0 8m1s
cwpp-pop-manager-1618901100-4qn6m 0/1 Completed 0 3m1s
cwpp-update 0/1 Evicted 0 6h47m
micropop-dxl-bridge-6fb4947cd9-7pxp8 1/1 Running 1 20d
micropop-dxl-bridge-6fb4947cd9-8r7hp 1/1 Running 1 20d
micropop-metis-agent-6c855b5877-2g5sh 2/2 Running 3 12d
micropop-orion-1413355-1617269619442-dlcn8 0/1 Completed 0 18d
micropop-orion-1413355-1617269656413-fktjz 0/1 Completed 0 18d
micropop-redis-794b447c98-plb2h 1/1 Running 1 20d
micropop-scan-service-8557b8c968-d9r7w 2/2 Running 2 18d
micropop-scan-service-8557b8c968-mqjpk 2/2 Running 0 14h
Create a Scan
To create an In VPC Scan:
- Go to Policy > On-Demand Scan.
- Click Actions > Create a Scan.
- The Scan Creation Wizard is displayed. On the General Info page enter the following:
- Scan Type. Select DLP & Malware. For In VPC scans, Malware is not supported.
- Name. Enter a unique identifier so that you can rerun the scan later.
- Description. Enter an optional description for the scan.
- Service Instance. Select the GCP instance you want to scan.
- Hosted. Select In Tenant.
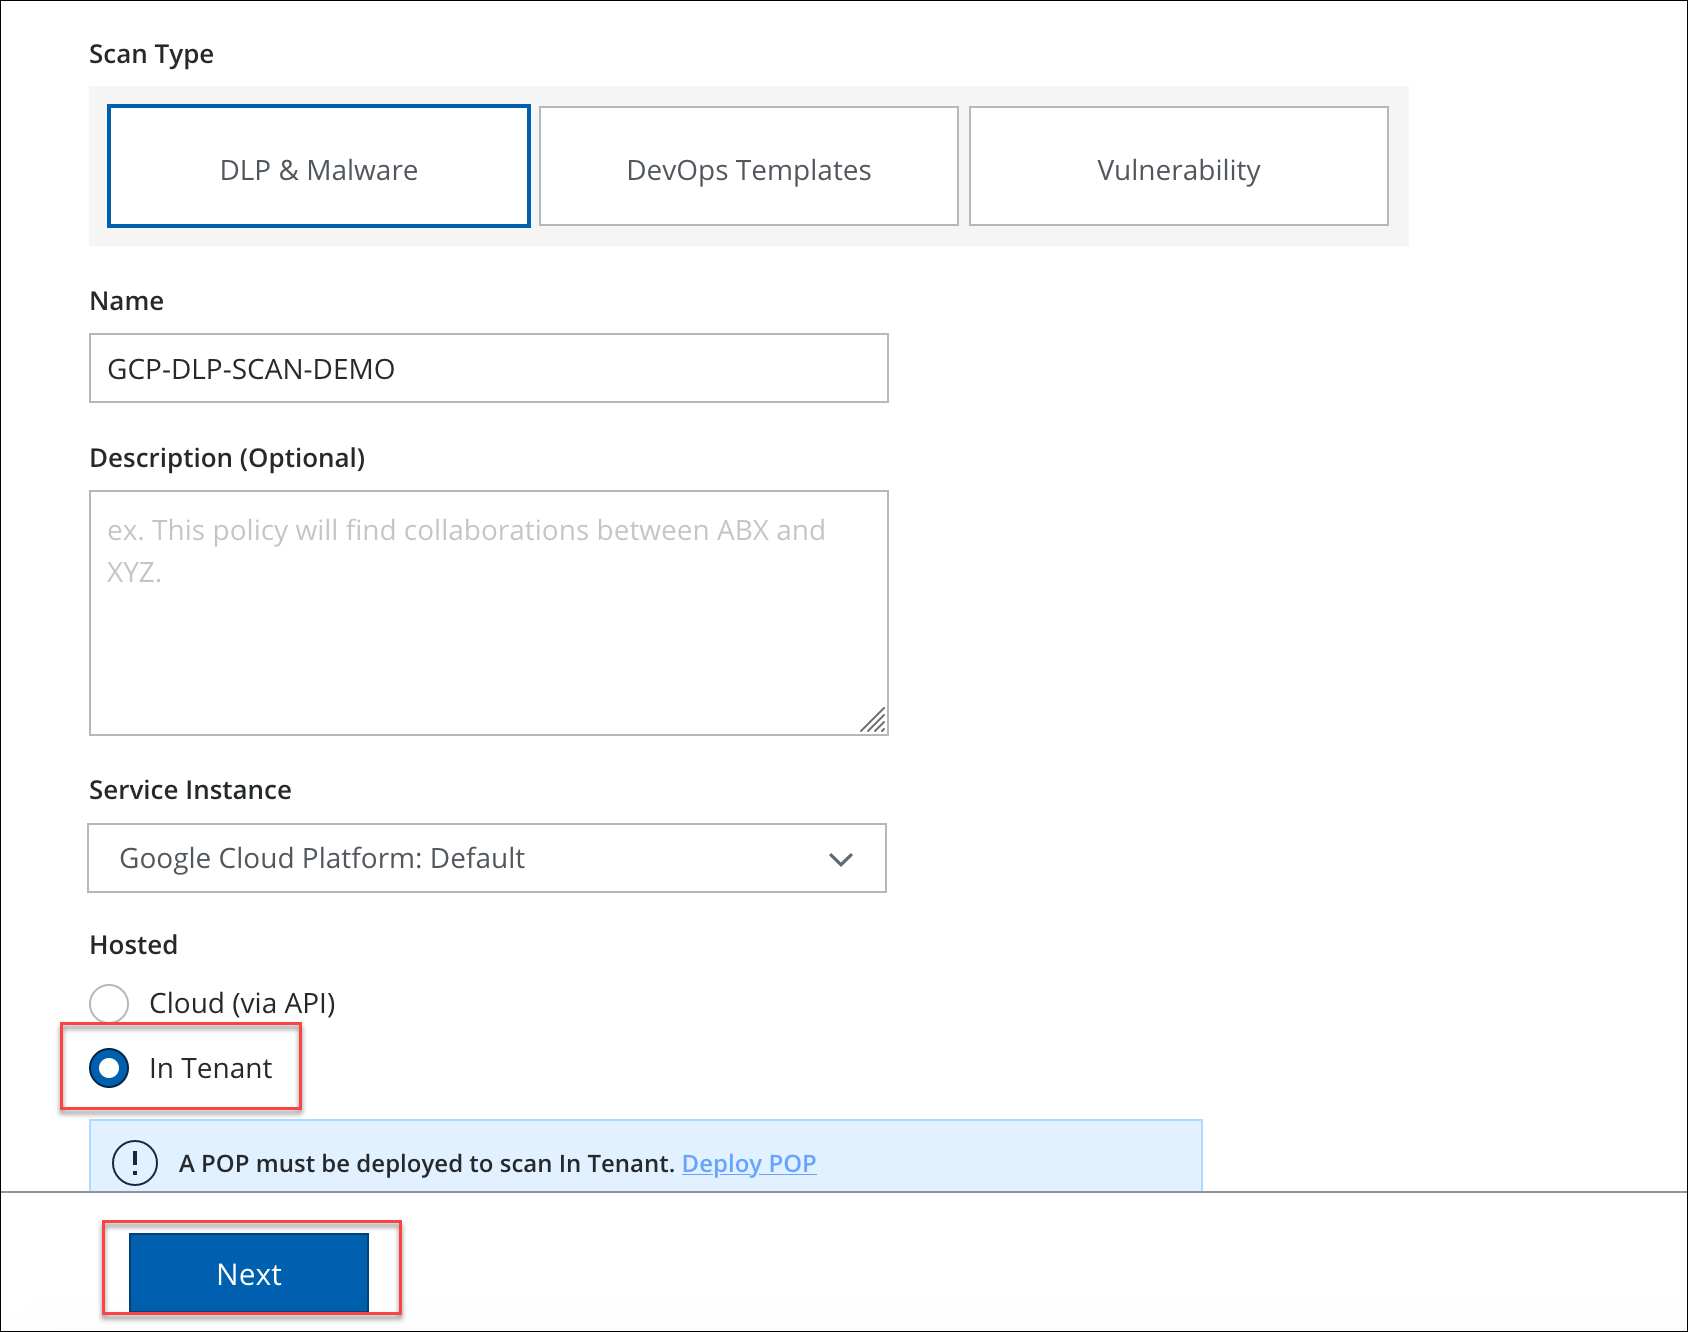
- Click Next.
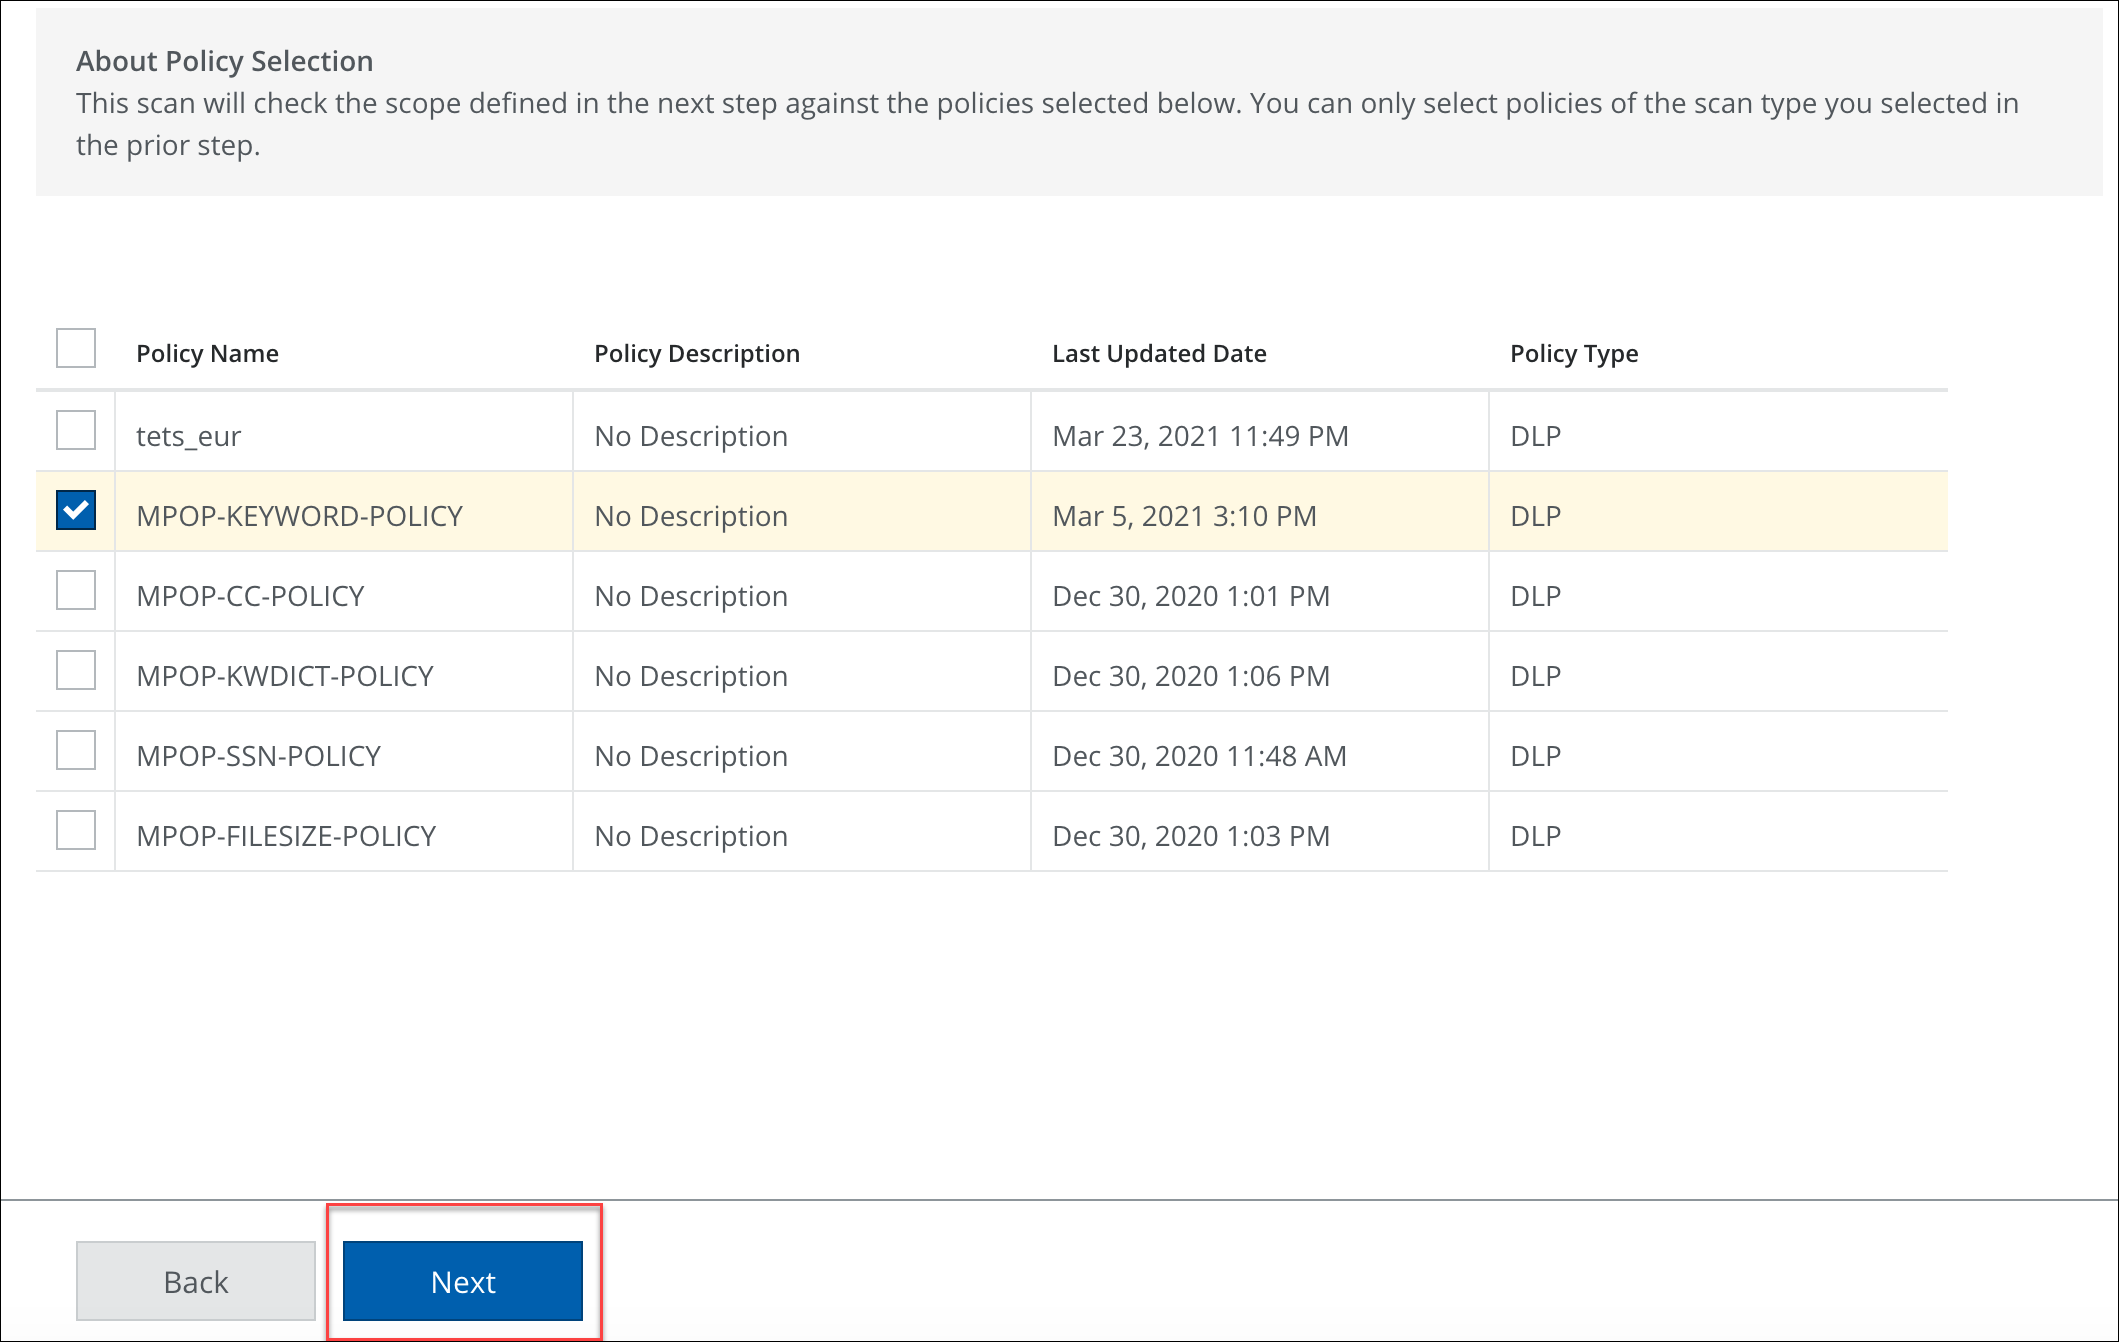
- The Select Policies page displays the active DLP policies supported for In VPC scans. Select the policies you want to use, and click Next.
- In the Configure Scan screen, set the following:
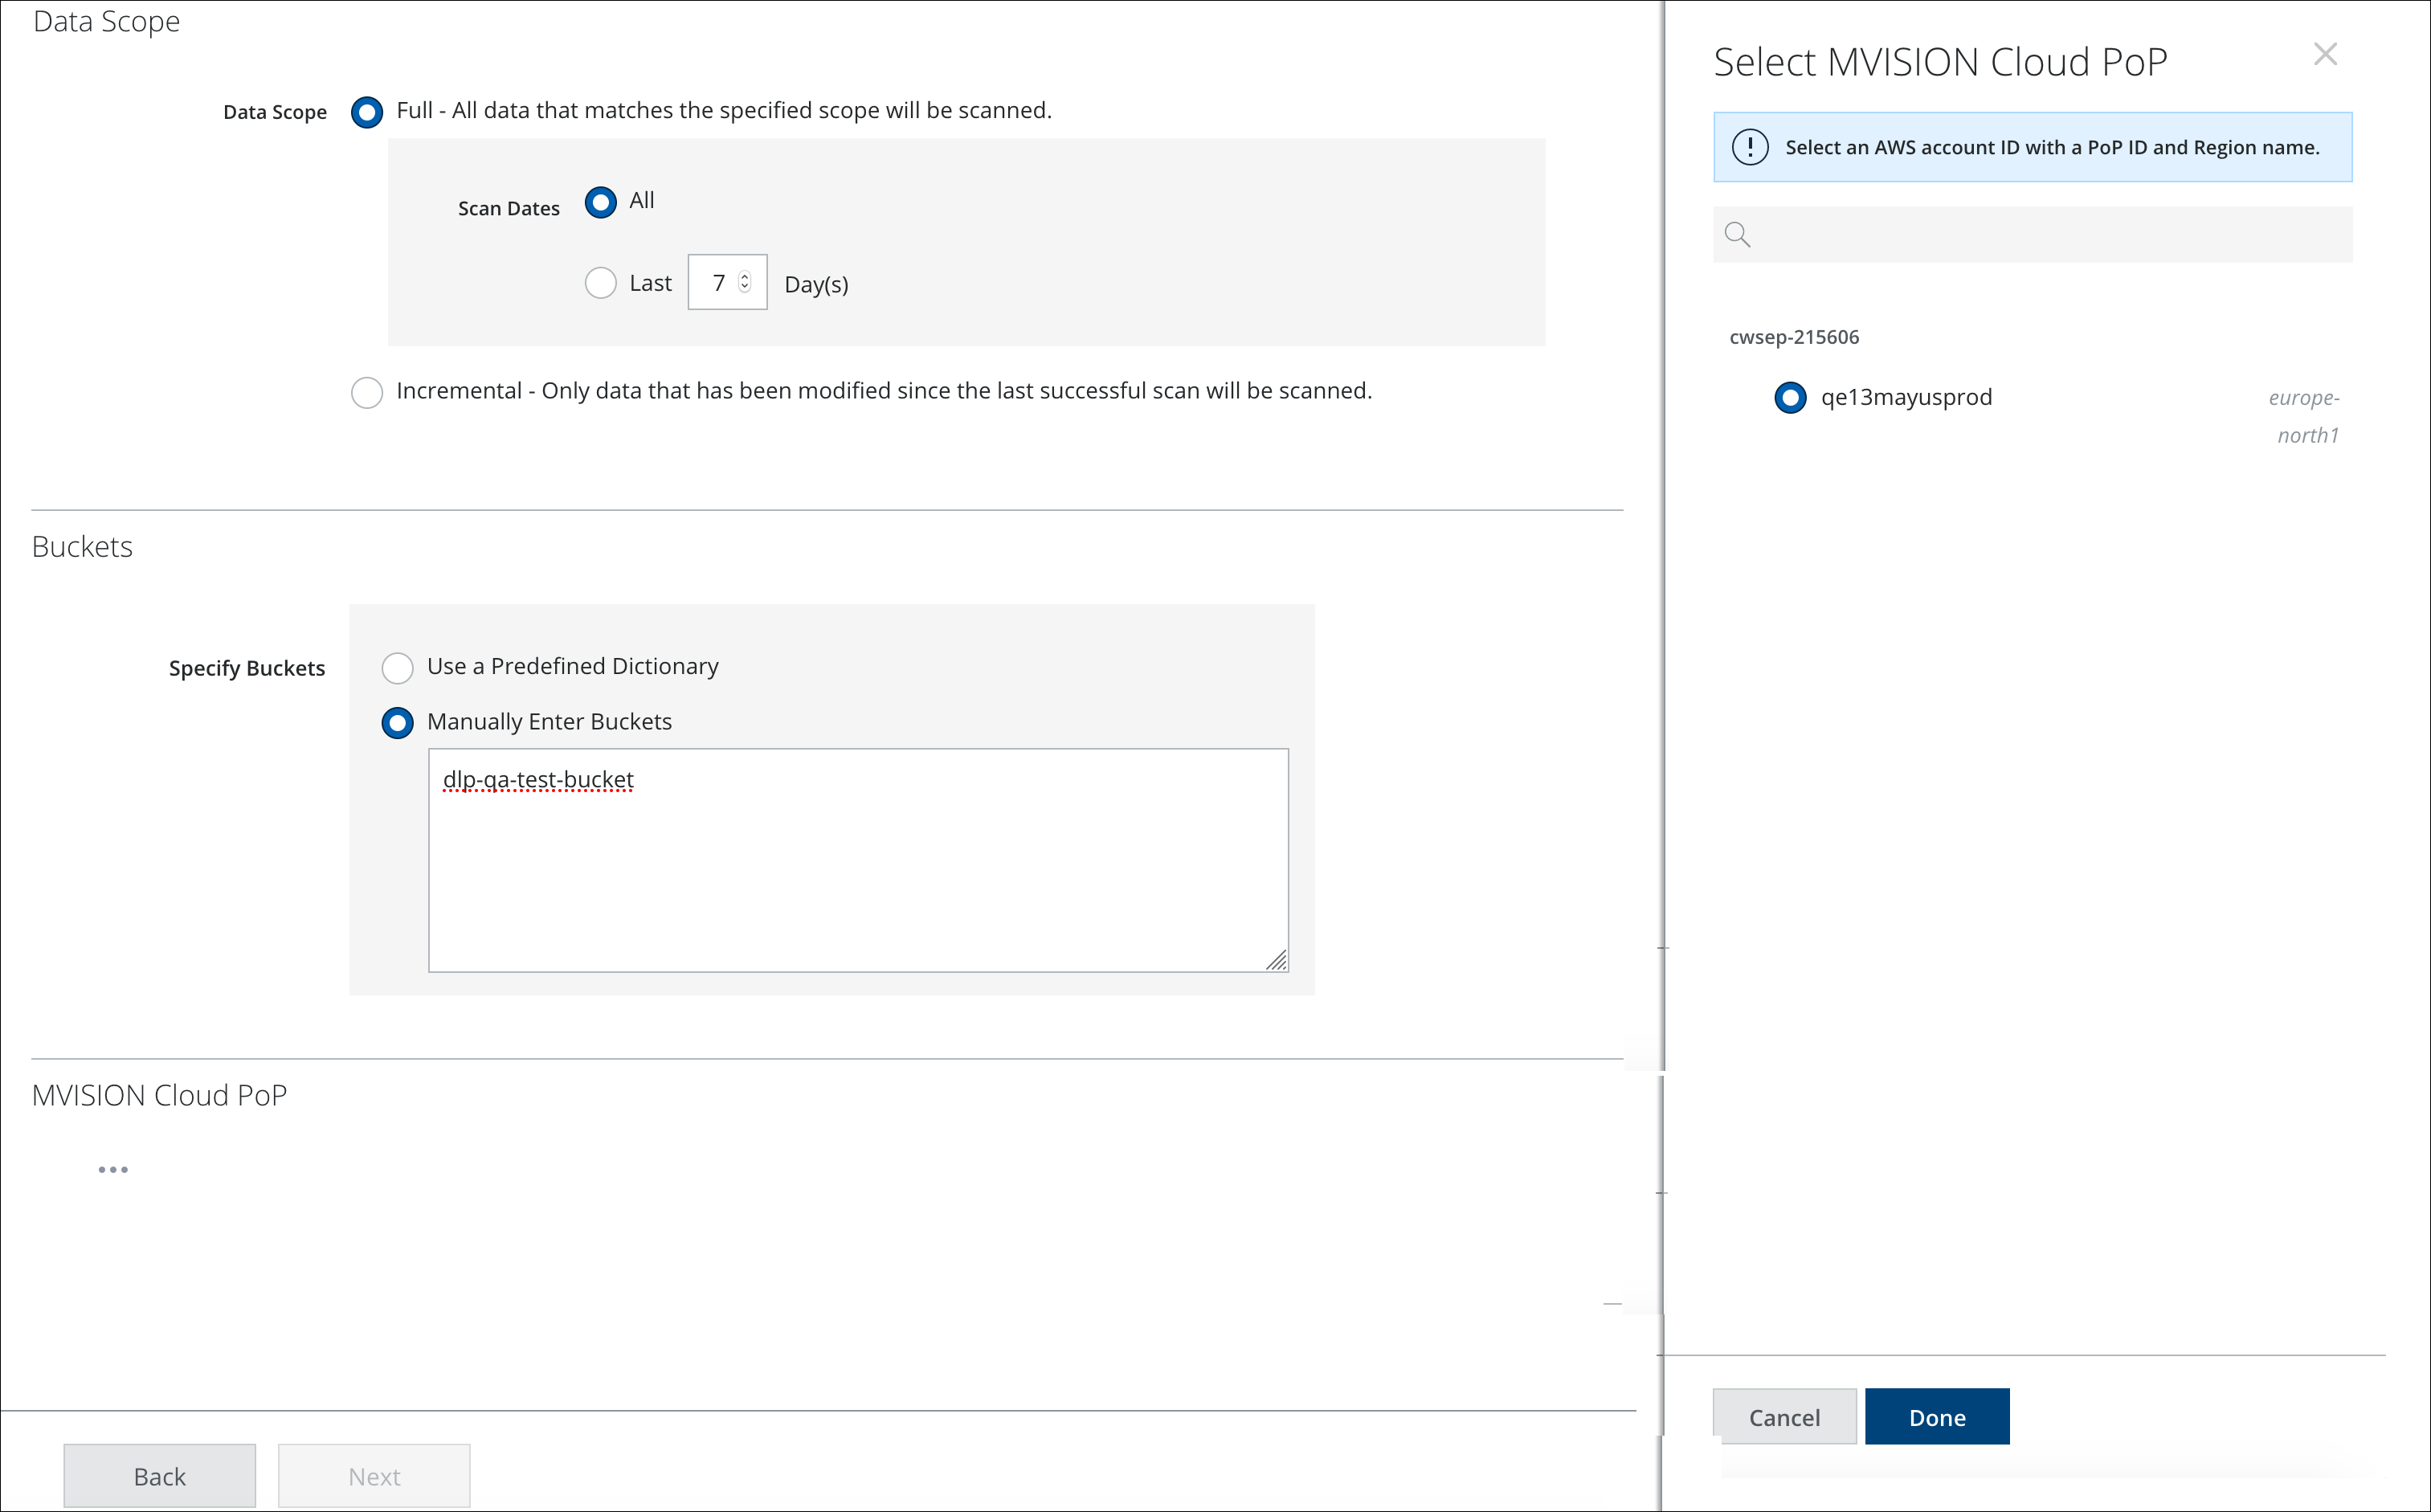
- Data Scope. Choose one of the following:
- Full. Scans all content every time the scan is run.
- Incremental. Scan only content that has changed since the last successful scan.
- Scan Dates. Select All, to scan all data. Or select Last X Days to limit the scan to the specified time period.
- Buckets:
- Specify Buckets to Scan:
- Use a Predefined Dictionary. Select a Predefined Dictionary from the menu. For more information, see Policy Dictionaries.
- Manually Enter Buckets. Enter the buckets you want to scan in the box below.
- Specify Buckets to Scan:
- For Skyhigh CASB PoP, click Select PoP and then choose an available pre-configured option from the side panel and click Done.
- Data Scope. Choose one of the following:
- Click Next.
- On the Schedule Scan page, select the schedule to run your scan and click Next:
- None (On-Demand Only). Run the scan once now.
- Daily. Run the scan once a day. Configure the time and time zone.
- Weekly. Run the scan once a week. Configure the day, time, and time zone.
- On the Review and Activate page, review your settings for the On-Demand Scan, and click Save. Click Back to make changes.