Deploy a GCP POP in New and Existing Infrastructure
Prerequisites
Before the POP Deployment, make sure that the following are completed:
- Create GCP Storage bucket with required permissions.
- Create Compute engine Service Account for POP services with storage access.
- Extract the tar and copy the below files to the GCP storage bucket. Also, copy the download paths.
- Upload ‘Infrastructure.tar’, ‘PoPDeployment.tar’, \Infrastructure\gcp\deploy_prereq_pop.sh.
- Create the Public key in a .txt format to access the POP instance which will be deployed and upload it to Google Storage. For example,
gsutil cp <path to key.txt> key.txt
Deploying a POP
Once you've finished the prerequisites, you can deploy the POP.
The following are configured as part of the POP deployment:
- VPC Network (Virtual Private Cloud Network): A virtual network dedicated to the account.
- Subnet: Subnet within Virtual Network to configure POP infrastructure.
- NAT (Network Address Translation) Gateway: GCP service to provide outbound internet connectivity for the subnet in VPC network.
- VM Instances: Virtual server to run the application with the given virtual machine size, username, and authentication type.
- Internal Load balancers: To route incoming traffic across multiple targets. Firewall rules are added.
- File Store: File storage account to store logs of POP services present in the virtual machine and Auto scaling groups within and across multiple Availability zones
- Autoscaling: To provide and manage the load-balanced secondary virtual machine instances based on Node parameters.
Step 1: Download the POP Deployment Package
- Log in to Skyhigh CASB.
- Go to Service Management > Google Cloud Platform and then choose a registered GCP account.
- In the Overview section, click Deploy New POP.
- Click Download Deployment package and download the package.
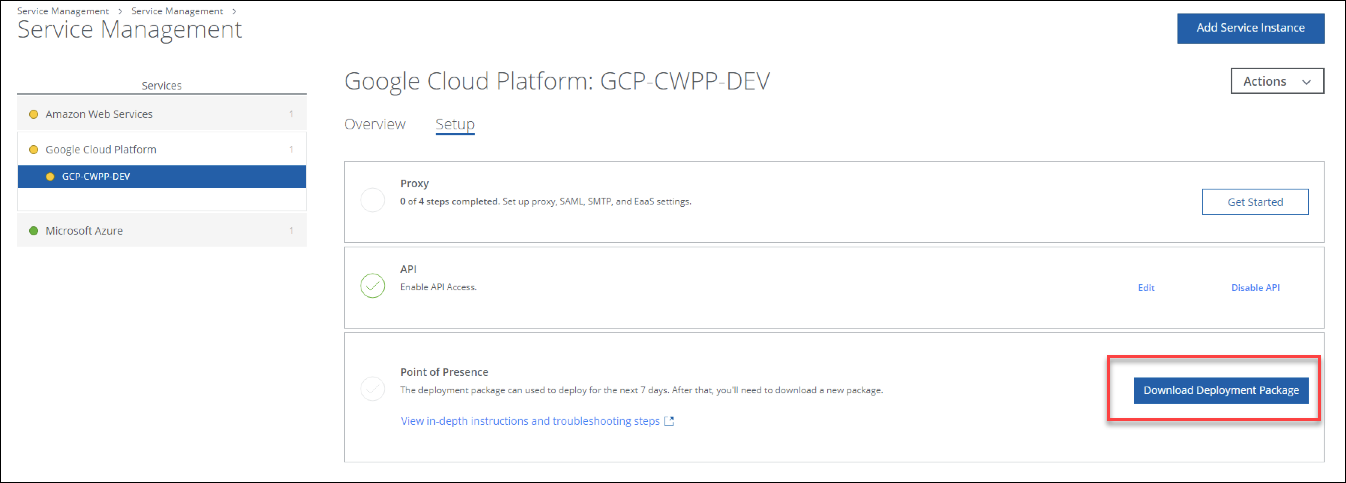
The downloaded POP Deployment package contains the installation files to deploy the POP and the required artifacts for the POP to communicate with Skyhigh CASB. The Package is valid for seven days after it is downloaded from Skyhigh CASB.
Step 2: Deploy the required Infrastructure through the Google Cloud Shell
The Infrastructure.tar is part of the POP Deployment Package (PopDeployment.tar), and contains the deployment script (‘deploy-prereq-pop.sh’) to deploy the POP.
Deploy the PoP using New Infra Setup
To deploy the PoP using new Infra Setup:
- Execute the following command:
sudo gcloud config set project <PROJECT-ID>
- Create a dedicated folder and copy the deployment script located in Infrastructure.tar using the following command:
gsutil cp <path to deploy-prereq-pop.sh> deploy.sh
- Execute the following command with the respective values:
sudo bash deploy.sh --popname=<PoP_Name_length less than 12 character> --zone=<ZONE> --region=<REGION> --serviceaccountname=<Service Account Email> --popinfrapackage=<Infrastructure.tar path> --popdeploymentpackage=<PoPDeployment.tar path> --numberofsecondarynodes=1 --key-sshkeylocation="publickey.txt location" --volumesize=50 <recommended> --machine-type=e2-standard-2 <recommended 8GB
For example, sudo bash deploy.sh --popname=gcpj4newinfra --zone=us-east1-b --region=us-east1 --serviceaccountname=123456789-compute@developer.gserviceaccount.com --popinfrapackage=gs://cwpp/demo/Infrastructure.tar --popdeploymentpackage=gs://cwpp/demo/PoPDeployment.tar --key-sshkeylocation="gs://cwpp/demo/GCP_userkey.txt" --volumesize=50 --machine-type=e2-standard-2
Deploy the PoP using Existing Infra Setup
To deploy the PoP using existing Infra Setup:
- Execute the following command:
sudo gcloud config set project <PROJECT-ID>
- Create a dedicated folder & copy the deployment script located in Infrastructure.tar using the following command:
gsutil cp <path to deploy-prereq-pop.sh> deploy.sh
- Execute the following command with the respective values:
sudo bash deploy.sh --popname=<PoP_Name_length less than 12 character> --storage=<storage path> --zone=<ZONE> --region=<REGION> --serviceaccountname=<Service Account Email> --network=<existing network> --subnet=<existing subnet>--popinfrapackage=<Infrastructure.tar path> --popdeploymentpackage=<PoPDeployment.tar path> --numberofsecondarynodes=1 --key-sshkeylocation="publickey.txt location" --volumesize=<50 recommended> --machine-type=e2-standard-2 <recommended 8GB>
For example, sudo bash deploy.sh --popname=gcpj4newinfra –storage= 10.175.191.167:/popstorage --zone=us-east1-b --region=us-east1 --serviceaccountname=123456789-compute@developer.gserviceaccount.com –network=cwppnetwork –subnet=cwppsubnet --popinfrapackage=gs://cwpp/demo/Infrastructure.tar --popdeploymentpackage=gs://cwpp/demo/PoPDeployment.tar --key-sshkeylocation="gs://cwpp/demo/GCP_userkey.txt" --volumesize=50 --machine-type=e2-standard-2
Validate the Deployment Status
Here, you can validate the POP deployment status for the new infra and existing infra setup.
Once the deployment is started, wait for 20 minutes to deploy the POP.
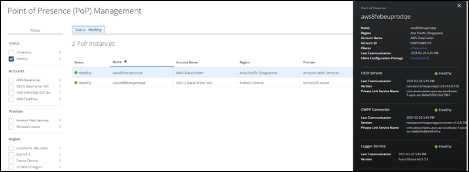
After the POP Deployment, the POP deployed in your account updates the status to Skyhigh CASB, and you can check the POP details on the POP Management page.