Create a Fingerprint
You can create and use fingerprints for structured data or unstructured data. Structured, or Exact Data Matching (EDM) fingerprints, allow you to monitor your organization's documents in a row and column format typically extracted from a database in CSV format. Unstructured or Index Document Matching (IDM) fingerprints work by content-matching indexed documents and images. Once your data is fingerprinted, and you generate an index file, you can add a DLP Policy rule to leverage that indexed data.
Create Structured Fingerprint
To create a Structured Fingerprint, select the required options:
Create Fingerprint (Legacy)
Create a Structured Data Fingerprint (Legacy Fingerprint) for data in CSV format. These fingerprints are evaluated per DLP policy to match against sensitive content in the cloud. You can only use Legacy Fingerprints with Skyhigh CASB.
- Go to Policy > DLP Policies > Fingerprints.
- On the Fingerprints page, go to Create Fingerprint > Structured Fingerprint > Create Fingerprint.
- On the Create a Structured Fingerprint (Legacy) page, configure the following information:
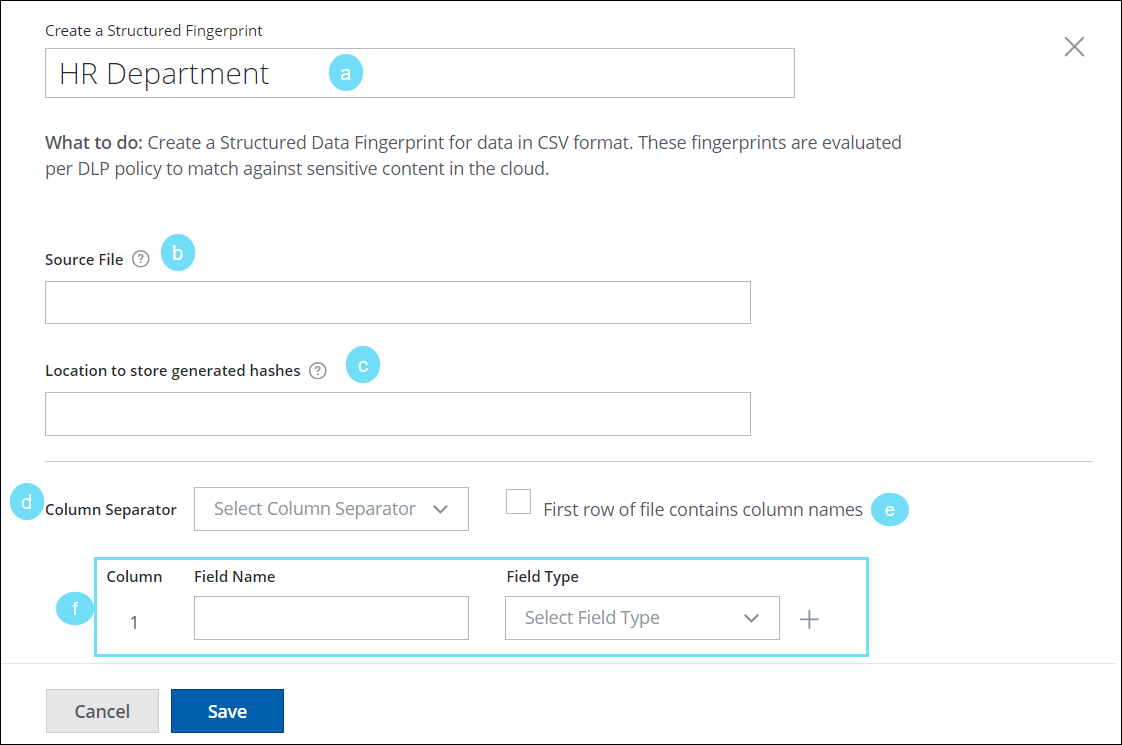
- Fingerprint Name. Enter a name for the Legacy Fingerprint.
- Source File. Enter the path to the source file that holds the data you want to fingerprint. For example:
- Unix. file://localhost/etc/folderA/file.csv
- Unix. file:///folder/fileNameWithoutExtension
- Windows. file:///c:/WINDOWS/file.csv
- Windows. file:///WINDOWS/file.csv
- Windows. file://localhost/WINDOWS/file.csv
- Windows. file://myhostname/D$/file.csv
- Location to store generated hashes. Enter the path to the folder where your locally generated hashed files are stored. Space allocated for this should be about 10–20% of the data size to be fingerprinted. For example:
- Unix. file://localhost/etc/folderA
- Unix. file:///etc/folderB
- Windows. file:///c:/WINDOWS/folderA
- Windows. file:///WINDOWS/folderB
- Windows. file://localhost/WINDOWS/folderC
- Windows. file://myhostname/D$/folderA
- Column Separator. Select the delimiter that separates the columns of your source file: either Comma, Tab, or Pipe.
- First row of file contains column names. Activate this checkbox if the first row of your source file contains column names.
- Column. If the field names aren't automatically detected:
- Enter the first Field Name for your source file.
- Select the Field Type from the menu. Selections include:
- Alphabetic. Alphabetic characters.
- Number. Numbers supported with decimals.
- Alphanumeric. Alphanumeric characters.
- Zip Code. ##### or #####-####
- Email. LOCAL_SUBPART ('.' LOCAL_SUBPART)* '@' DOMAIN_SUBPART ('.' DOMAIN_SUBPART)*;
- Date. ##/##/#### or ##-##-####
- Phone. (###)###-#### or ###-###-####
- Credit Card Number. CCNs formatted with decimals, spaces, or underscores, separated by pipes or semicolons.
- Social Security Number. ###-##-####, or ### ## ####, or ###.##.###, separated by pipes or semicolons.
- Identifier. Letters and numbers with hyphens and decimals.
- Generic. Used for exact cell match.
- Do Not Index. Select this Field Type to mark the column as Do Not Index. (This option is available with DLP Integrator 4.1 and later.)
- Click + to add as many Columns as required.
- Click Save.
The new Legacy Fingerprint is created and appears on the Fingerprint page. You must now generate an index of the fingerprint to use it in a DLP Policy.
Create Enhanced Fingerprint
Create a Structured, or Exact Data Match (EDM) Enhanced Fingerprint for data in CSV format. You must then generate a structured index of the Fingerprint, and use it in a DLP policy to match against sensitive content to prevent sensitive information from leaving the organization. You can only use Enhanced Fingerprints with Web Gateway.
- Go to Policy > DLP Policies > Fingerprints.
- On the Fingerprints page, go to Create Fingerprint > Structured Fingerprint > Create Enhanced Fingerprint.
- On the Create an Enhanced Structured Fingerprint page, configure the following information:
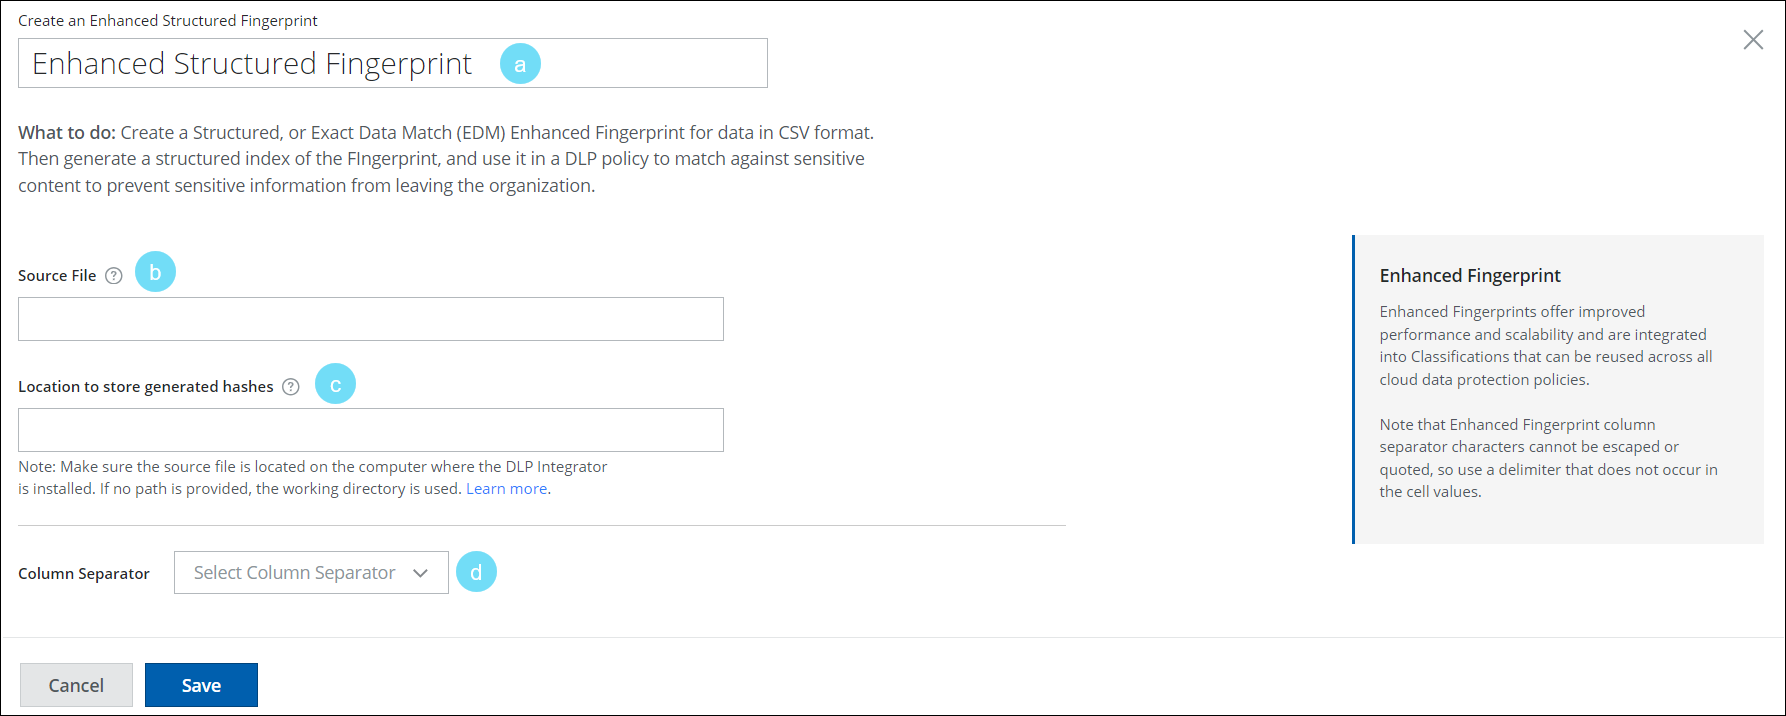
- Fingerprint Name. Enter a name for the Enhanced Fingerprint.
- Source File. Enter the path to the source file that holds the data you want to fingerprint. For example:
- Unix. file://localhost/etc/folderA/file.csv
- Unix. file:///folder/fileNameWithoutExtension
- Windows. file:///c:/WINDOWS/file.csv
- Windows. file:///WINDOWS/file.csv
- Windows. file://localhost/WINDOWS/file.csv
- Location to store generated hashes. Enter the path to the folder where your locally generated hashed files are stored. Space allocated for this should be about 10–20% of the data size to be fingerprinted. For example:
- Unix. file://localhost/etc/folderA
- Unix. file:///etc/folderB
- Windows. file:///c:/WINDOWS/file.doc
- Windows. file:///WINDOWS/file.doc
- Windows. file://localhost/WINDOWS/file.doc
- Column Separator. Select the delimiter that separates the columns of your source file: either Comma, Tab, or Pipe.
- Click Save.
The new Enhanced Fingerprint is created and appears on the Fingerprint page. You must now generate an index of the fingerprint to use it in a DLP Policy.
Create an Unstructured Fingerprint
Create an Unstructured Data Fingerprint for files in one or more folders. These fingerprints are evaluated per DLP policy to match against sensitive content in the cloud.
- Go to Policy > DLP Policies > Fingerprints.
- On the Fingerprints page, go to Create Fingerprint > Unstructured Data Fingerprint > Create Fingerprint and select the type of fingerprint you wish to create:
NOTE: Only one Enhanced Fingerprint can be created. The option becomes grayed out when one is present.
Create Fingerprint (Legacy)
You can only use Legacy Fingerprints with Skyhigh CASB.
- Go to Policy > DLP Policies > Fingerprints.
- On the Fingerprints page, go to Create Fingerprint > Unstructured Data Fingerprint > Create Fingerprint.
- On the Create an Unstructured Fingerprint page, configure the following options:
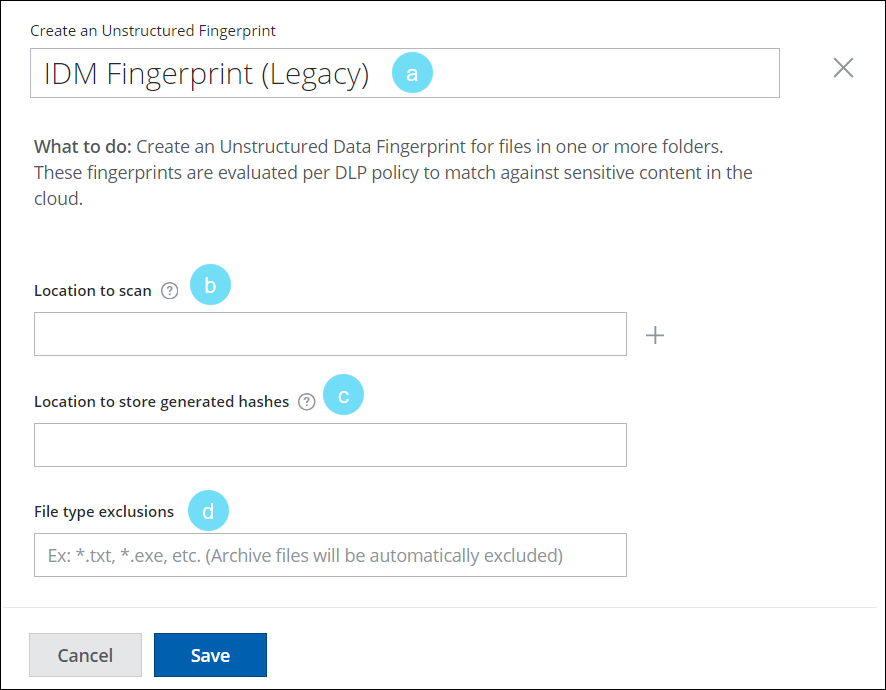
- Fingerprint Name. Enter a name for the Unstructured Fingerprint.
- Location to scan. Enter the path to the computer that holds the files you want to fingerprint. Click + to add more paths, if necessary. For example:
- Unix. file://localhost/etc/folderA
- Unix. file:///etc/folderB
- Windows. file:///c:/WINDOWS/file.doc
- Windows. file:///WINDOWS/file.doc
- Windows. file://localhost/WINDOWS/file.doc
- Windows. file://myhostname/D$/file.csv
- Location to store generated hashes. Enter the path to the folder where your locally generated hashed files are stored. Space allocated for this should be about 10–20% of the size of input paths/folders. For example:
- Unix. file://localhost/etc/folderA
- Unix. file:///etc/folderB
- Windows. file:///c:/WINDOWS/folderA
- Windows. file:///WINDOWS/folderB
- Windows. file://localhost/WINDOWS/folderC
- Windows. file://myhostname/D$/folderA
- File type exclusions. Enter any file types to be excluded. (Archive files such as ZIP files are automatically excluded.)
- Click Save.
The new Unstructured Fingerprint is created and appears on the Fingerprint page. You must now generate an index of the fingerprint to use it in a DLP Policy.
Create Enhanced Fingerprint
Create an Unstructured Data Fingerprint for files in one or more folders. These fingerprints are evaluated per DLP policy to match against sensitive content in the cloud.
NOTE: Only one Enhanced Fingerprint can be created. The option becomes grayed out when one is present.
- Go to Policy > DLP Policies > Fingerprints.
- On the Fingerprints page, go to Create Fingerprint > Unstructured Data Fingerprint > Create Enhanced Fingerprint.
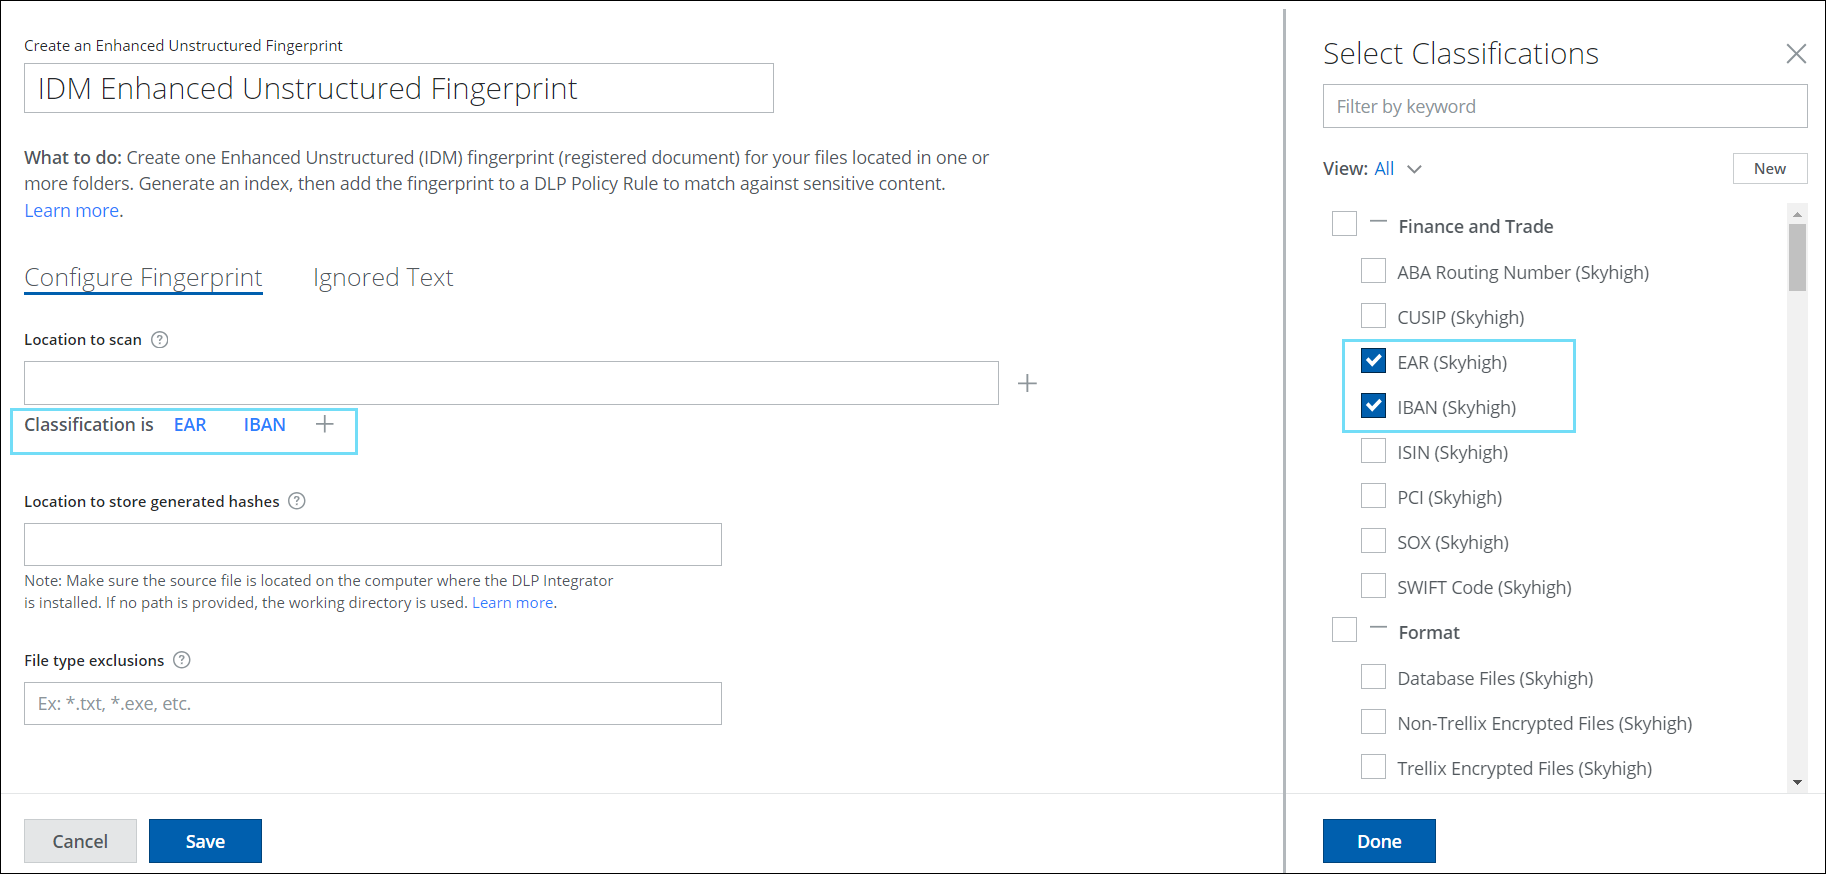
- On the Create an Enhanced Unstructured Fingerprint page, configure the following options:
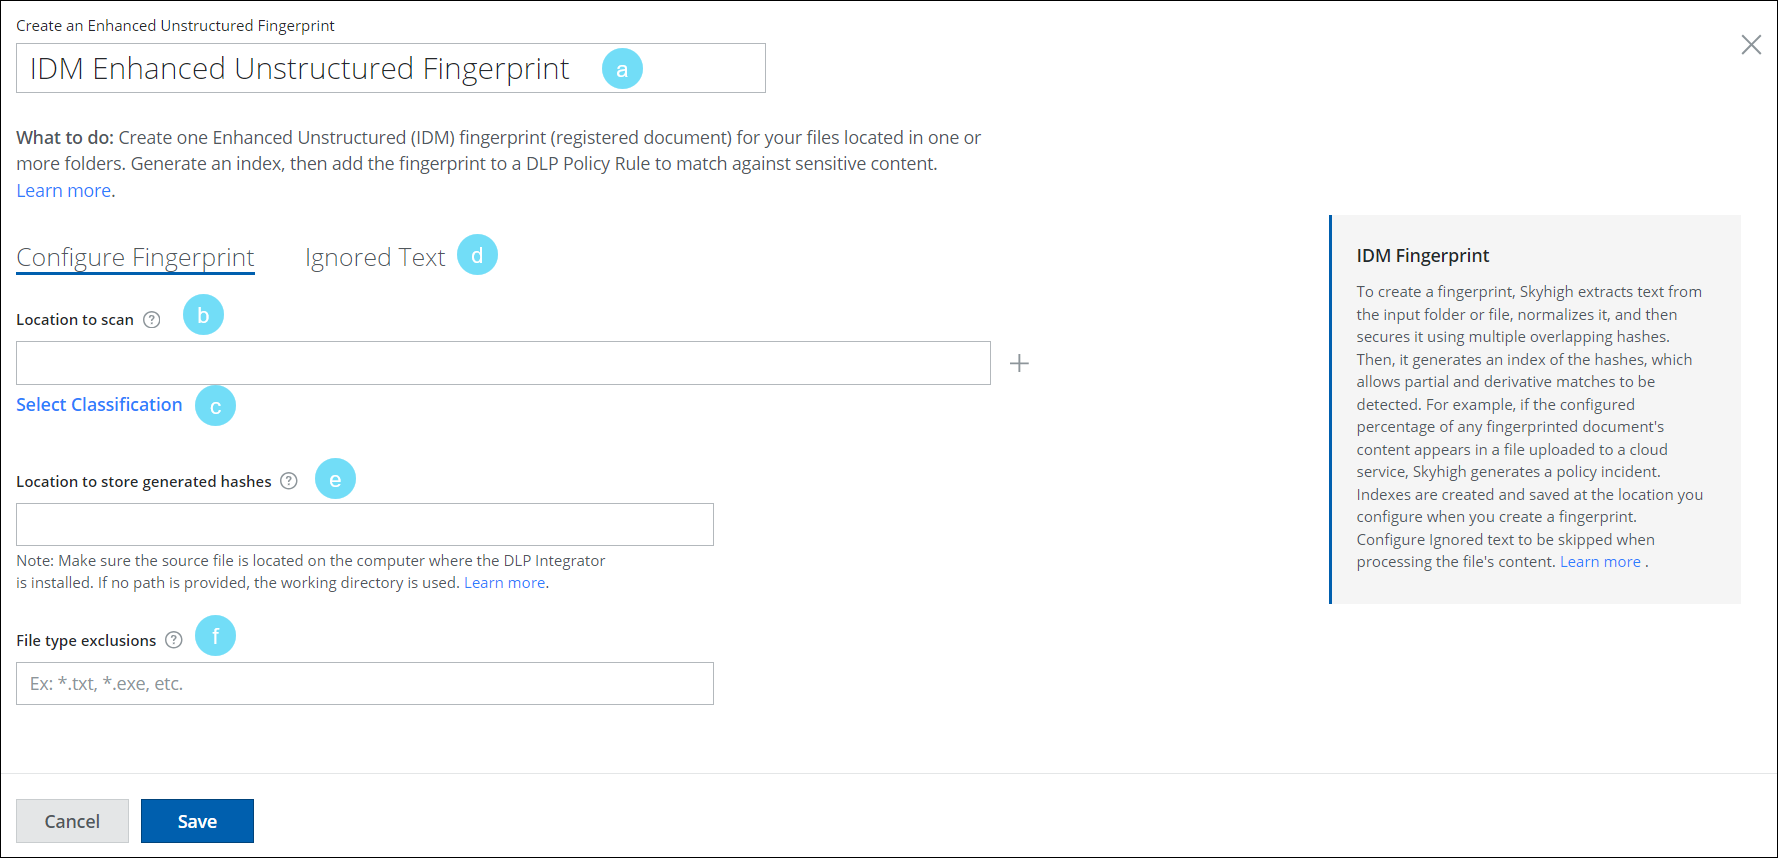
- Fingerprint Name. Enter a name for the Enhanced Fingerprint.
- Location to scan. Enter the path to the computer that holds the files you want to fingerprint. Click + to add more paths, if necessary. For example:
- Unix. file://localhost/etc/folderA
- Unix. file:///etc/folderB
- Windows. file:///c:/WINDOWS/file.doc
- Windows. file:///WINDOWS/file.doc
- Windows. file://localhost/WINDOWS/file.doc
- Select Classification. Configure the classification for your fingerprint file.
- Ignored Text. Configure text to ignore/skip when processing file content, such as boilerplate, legal disclaimers, and copyright information.
- Ignored text path located here. Enter the path to the file that includes the Ignored Text to skip during the file processing.
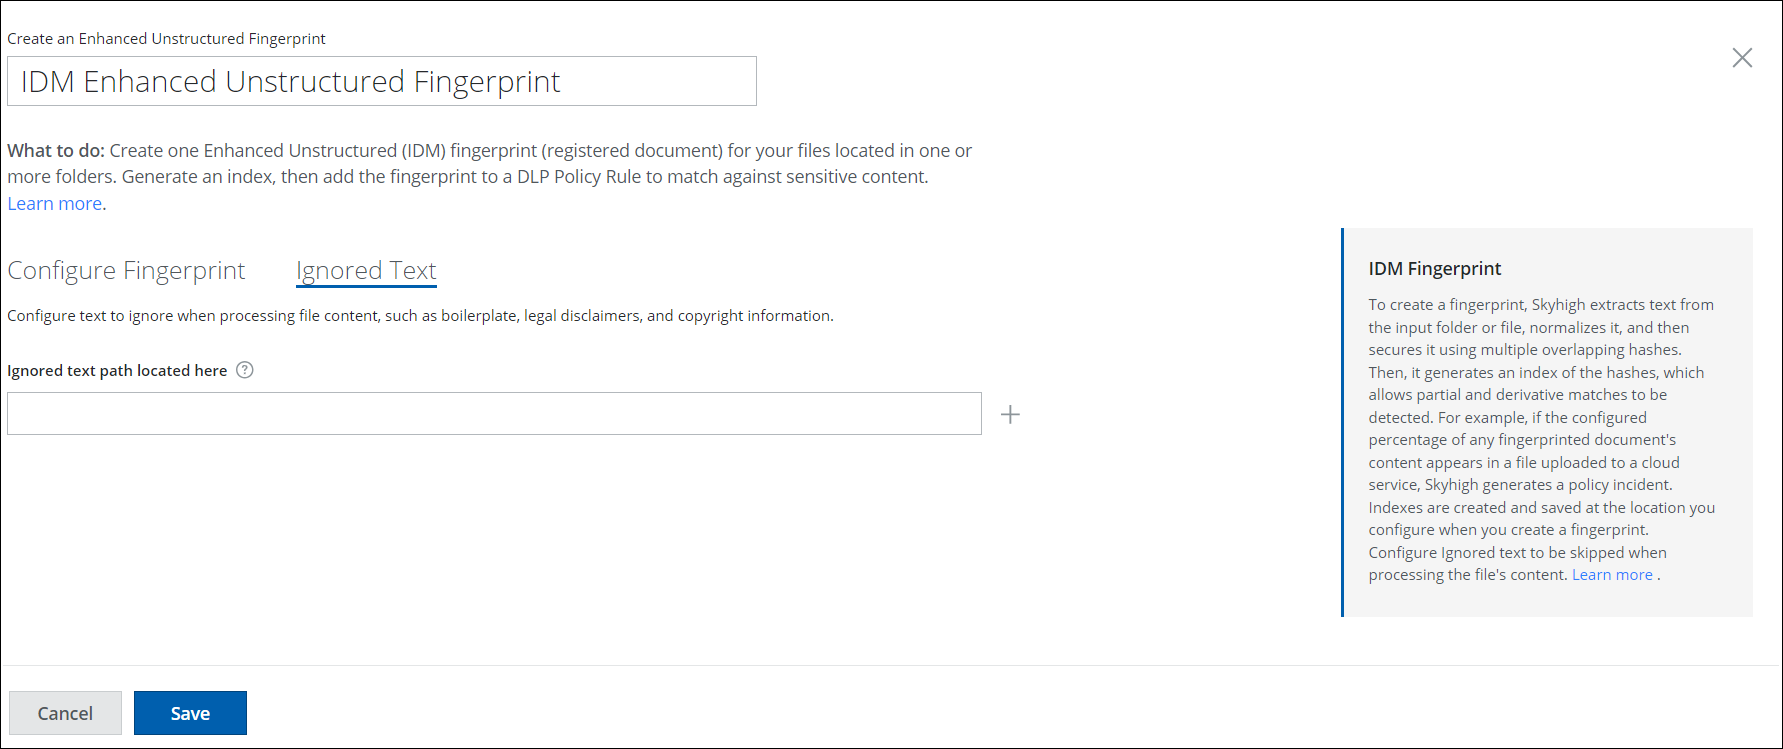
- Ignored text path located here. Enter the path to the file that includes the Ignored Text to skip during the file processing.
- Location to store generated hashes. Enter the path to the folder where your locally generated hashed files are stored. Space allocated for this should be about 10–20% of the size of input paths/folders. For example:
- Unix. file://localhost/etc/folderA
- Unix. file:///etc/folderB
- Windows. file:///c:/WINDOWS/file.doc
- Windows. file:///WINDOWS/file.doc
- Windows. file://localhost/WINDOWS/file.doc
-
File type exclusions. Enter any file types to be excluded. (Archive files such as ZIP files are not automatically excluded.)
- Click Save.
The new Unstructured Fingerprint is created and appears on the Fingerprint page. You must now generate an index of the fingerprint to use it in a DLP Policy.
Select Classification
You can define classification criteria for the document or file you want to fingerprint.
- Click Select Classification to open the Select Classifications cloud card.
- On the Select Classifications cloud card, select the required classification for the fingerprint file or document.
NOTE: If you update the classification criteria for your fingerprint file, you must re-generate an index of the fingerprint with the updated classification criteria on the Fingerprints page.