End User Remediation
When a DLP Policy is violated, a SOC administrator is required to investigate each incident. Often, the admin does not have the context to resolve the incident immediately, and the admin must contact the user for more information. End User Remediation allows admins to involve users in the remediation process via email so they can provide information directly, which reduces the number of incidents that admins must investigate, and also educates the user on corporate DLP policies.
The End User Remediation email sent to the user includes information about the file and the location where the violation occurred. It provides buttons that allow the user to respond directly. From the email, the user is logged into the End User Remediation application via SSO. On the Data Security Violation page, the user can provide information about the violation, mark it as a false positive, delete the offending file, or enter a business justification for the incident, all without admin intervention. On this page, the user can also view their Open Incidents and Resolved incidents on separate tabs.
After the incident is remediated, the admin can log into Skyhigh CASB and review end-user responses for the remediated incidents in the Policy Incident Cloud Card.
Prerequisites
To use End User Remediation, make sure the following prerequisites are configured:
- Enable SSO SAML. You can enable SSO and configure SAML for Skyhigh Security Cloud or for End-Users.
- Skyhigh Security Cloud Administrators. For details, see Configure SAML and SSO for Skyhigh Security Cloud Administrators. For End User Remediation, make sure to authorize all users, not just admin users. If you only have basic authentication for the Skyhigh CASB dashboard, End User Remediation cannot be enabled.
- End-Users. Enable SSO and configure SAML for end users if you have enabled End User Input for Policy Incidents.
- Configure data storage for remediation. (Skyhigh Security data storage cannot be used for End User Remediation.). This is required because users can leave justification notes in free text with each incident. All data on the data storage is encrypted. For details, see Data Storage.
- In Policy Settings > Policy Incident Remediation, make sure End-User Input is enabled.
- Create or Edit a DLP Policy with the Response of Default End User Remediation. (See example in the following sections.)
- Configure an Email Template to be sent to the user from the category End User Remediation.
- Do not enable Tokenization with End User Remediation.
End User Remediation Workflow
Enable End-User Response
To enable end-user response, make sure your Policy Settings > Policy Incident Remediation > End-User Input selections are configured as below:
- Minor Severity incidents set to Change Status to Resolved.
- Major Severity incidents set to Change Status to Opened.
- Critical Severity incidents set to Don't Update Status.
Create or Edit a DLP Policy
To create or edit a sanctioned DLP policy:
- In Skyhigh CASB go to Policy > DLP Policies.
- Click Actions > Sanctioned Policy > Create New Policy. (See Create a Policy from a Template for information about templates.)
- On the Description page, name the policy and describe its status and scope:
- Name. Enter a descriptive name to help identify the policy.
- Description. (Optional) Enter a description for your DLP Policy.
- Deployment Type. Select an integration method. Some user actions and response actions depend on the Type you choose. Choose from:
- API
- Lightning Link
- Reverse Proxy
- Services. Click Select Service Instances, then select the instances you want the policy to apply to from the list. For example, select OneDrive.
- Click Done.
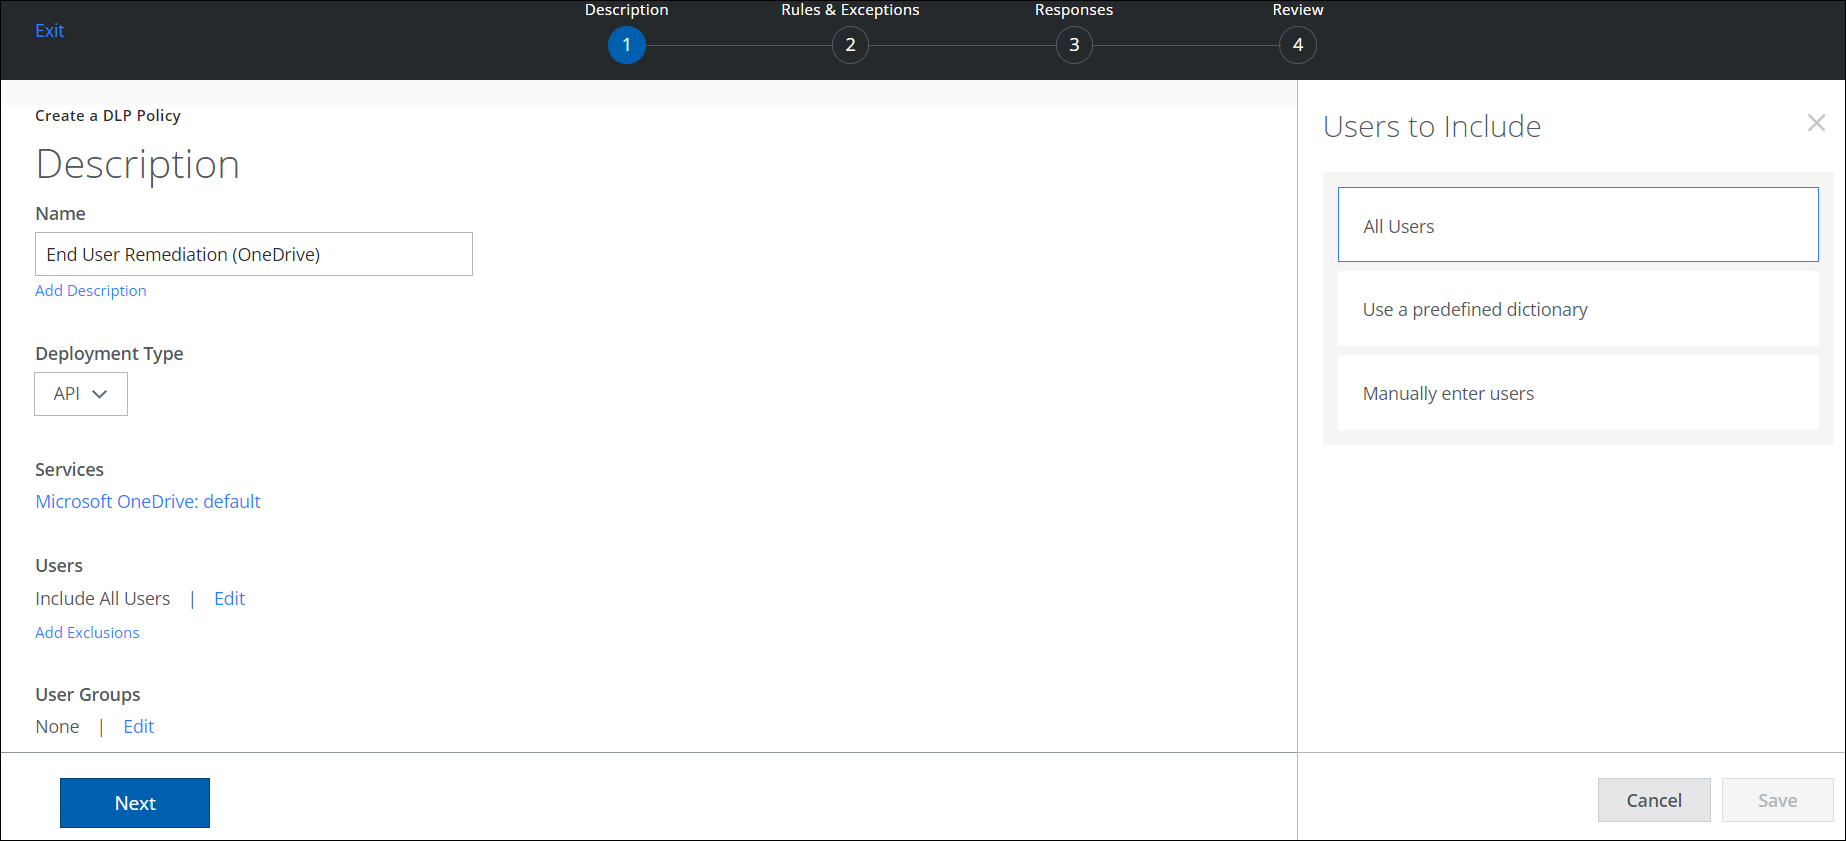
- Users. Click Edit to select one of the options for Users to Include in the policy.
- All Users. Apply the policy to all users.
- Use a predefined dictionary. Apply the policy to users in a predefined dictionary.
- Manually enter users. Manually enter user emails in a list. Use a comma to separate email addresses.
- Click Save.
- Add Exclusions. Select any Users to Exclude from the policy.
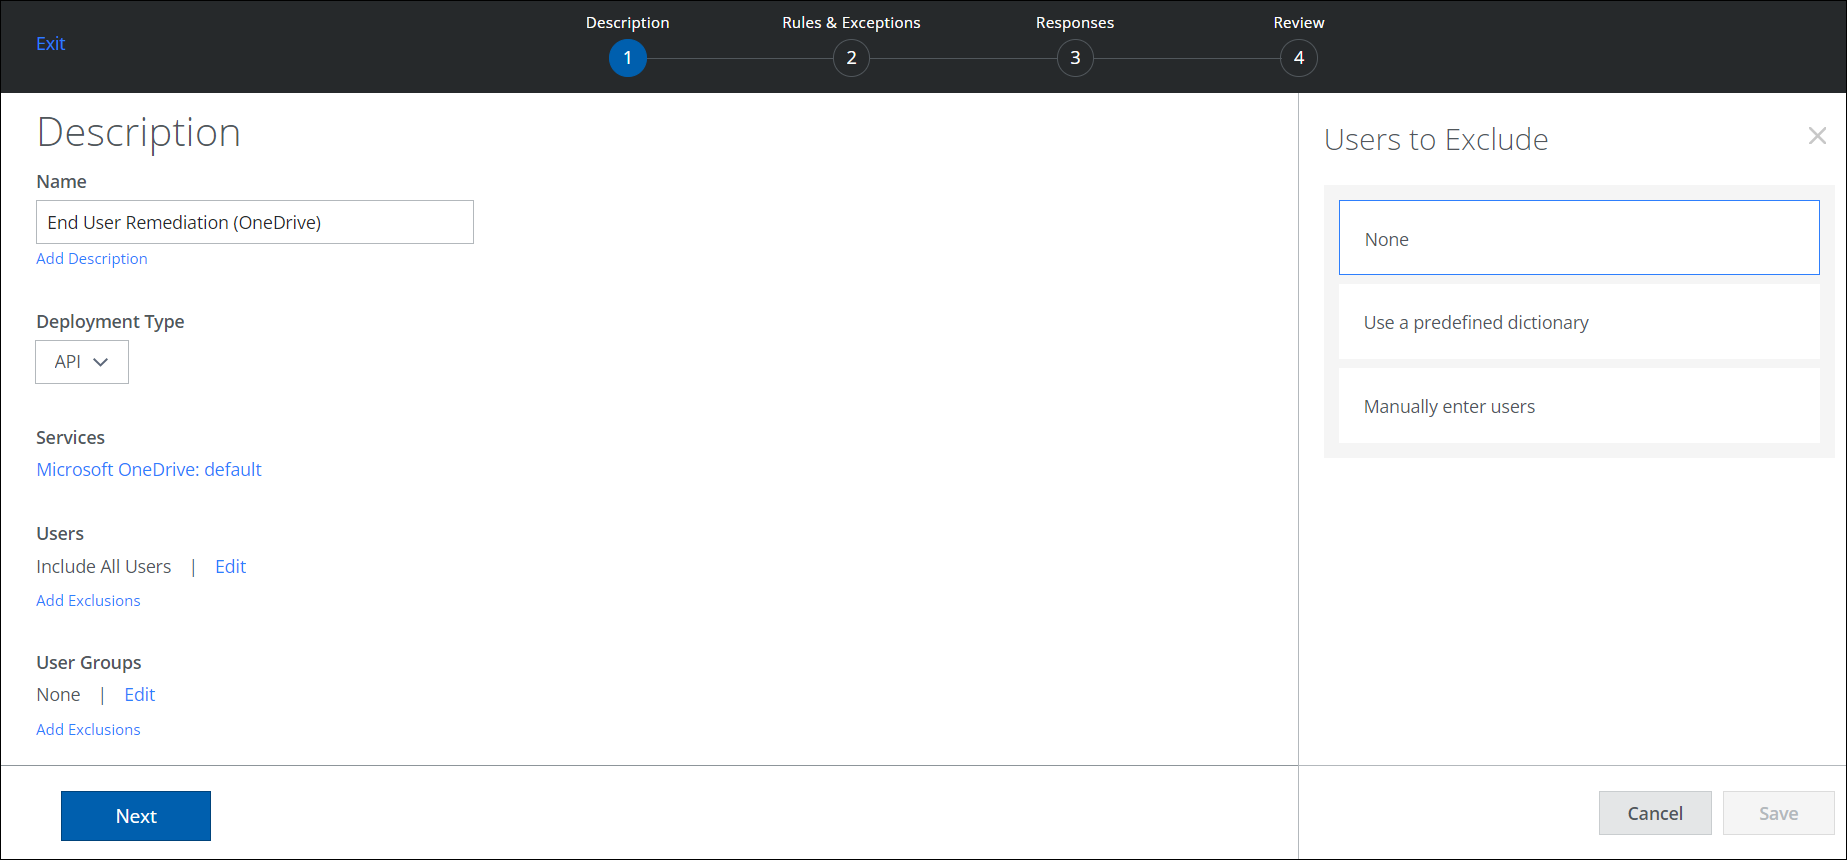
- None. Do not exclude any users from the policy.
- Use a predefined dictionary. Apply the policy to users in a predefined dictionary.
- Manually enter users. Manually enter user emails in a list. Use a comma to separate email addresses.
- Click Save.
- User Groups. If your tenant has User Data (Active Directory) configured, click Edit to select the User Groups to include in the policy.
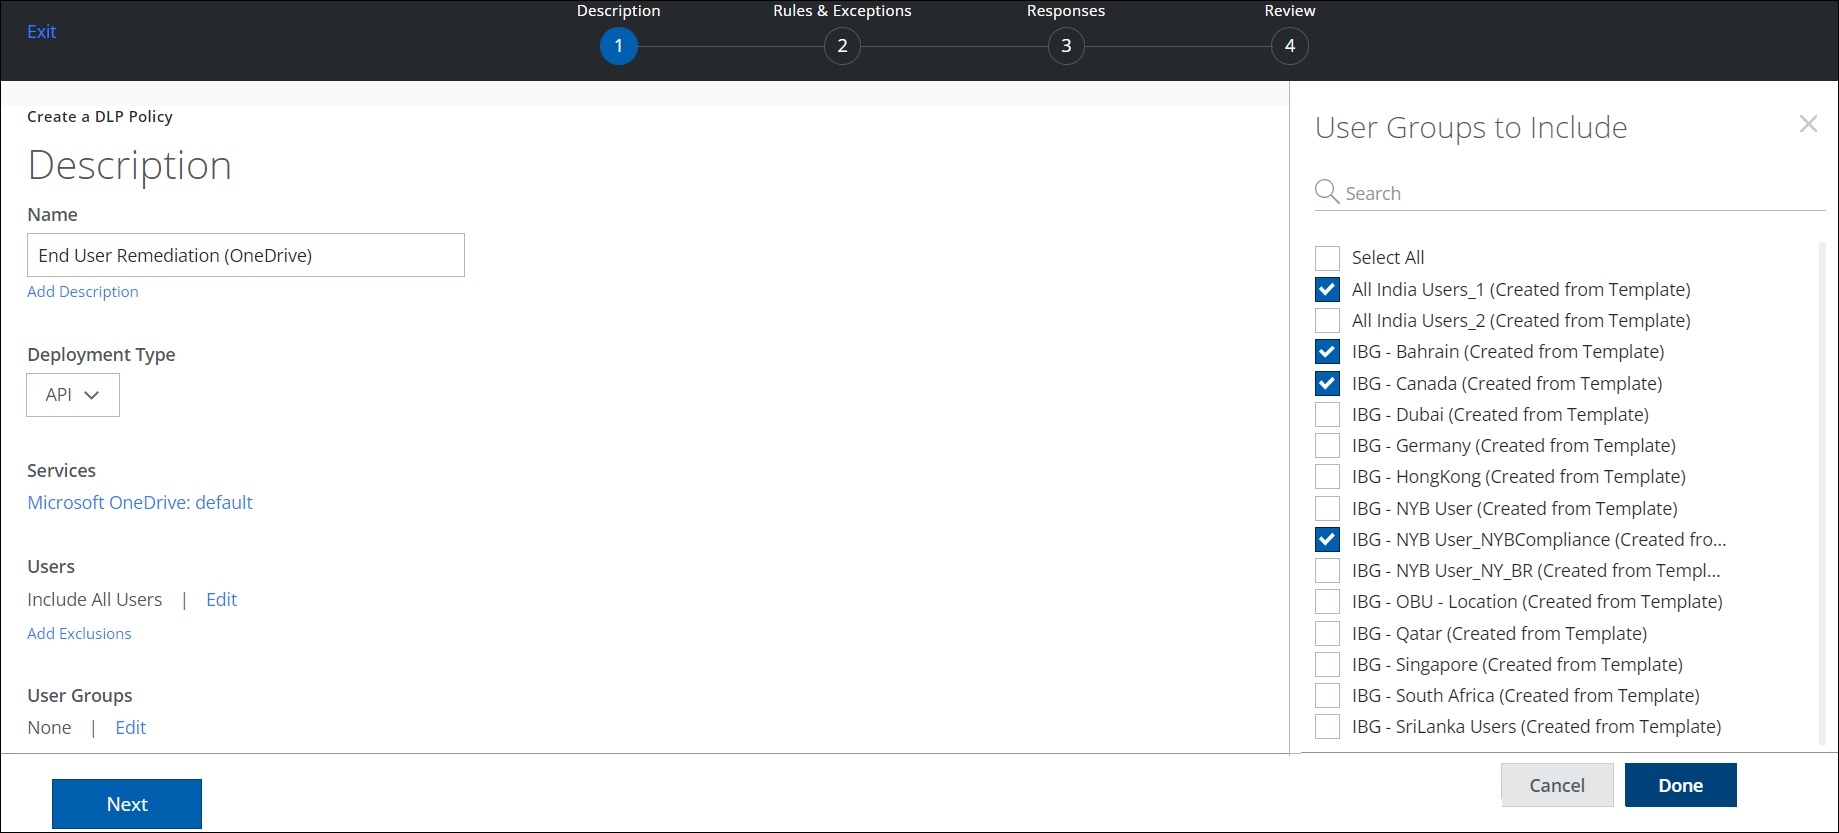
- Click Done.
- Add Exclusions. Select any User Groups to exclude from the policy.
- Click Done.
- Name. Enter a descriptive name to help identify the policy.
- Click Next.
- On the Rules & Exceptions page, enter the following information:
- Rules. Specify the rules that the policy enforces. You can specify one or more rules or rule groups. You can also delete the rule group. Deleting the rule group removes the included rules in that set.
When the rule is defined, the rule group name is automatically generated. You can edit and provide a new name for each rule group.
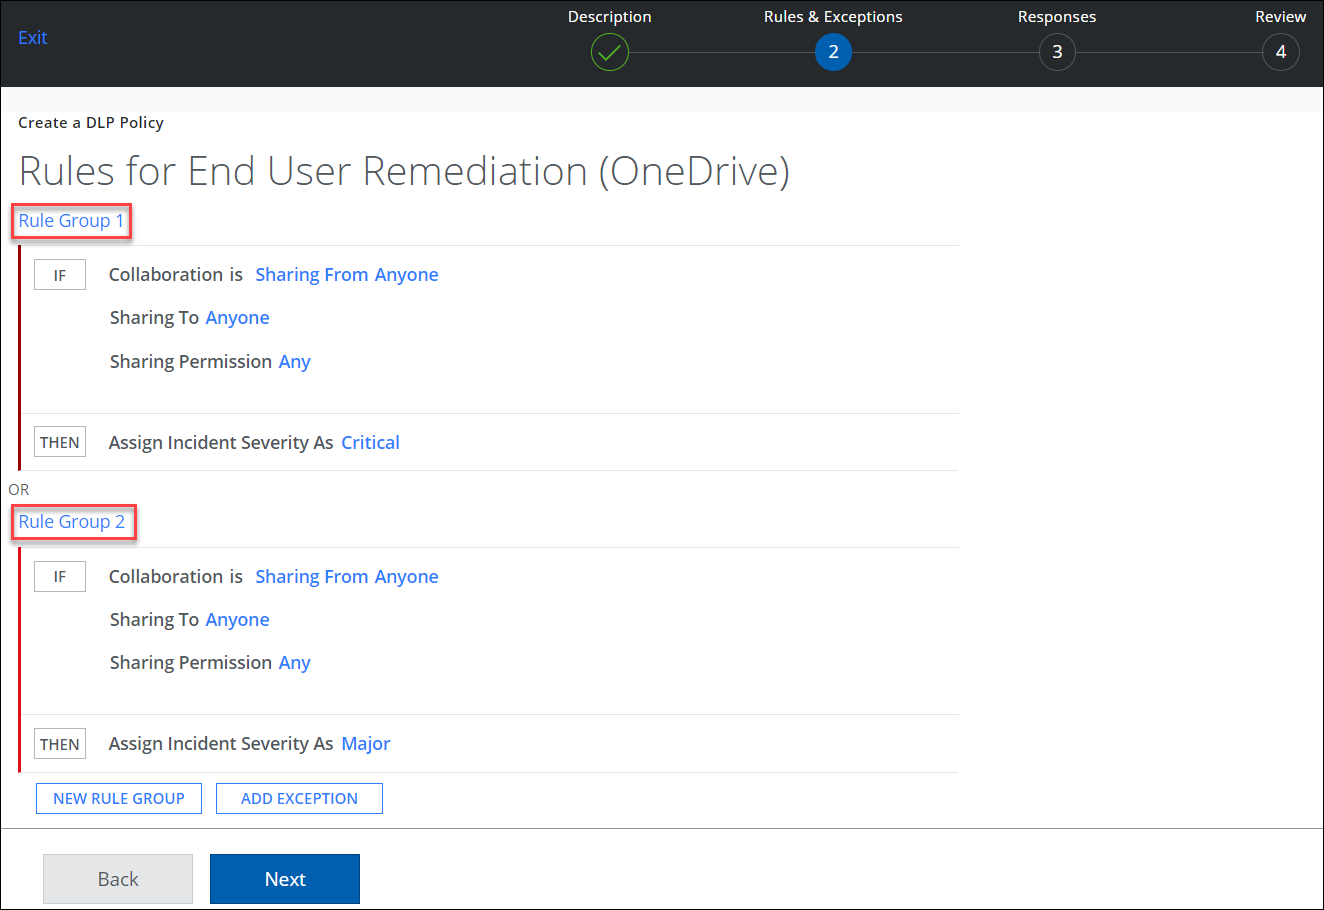
- Click AND to add another rule, if needed.
- Click THEN to add a severity: Critical, Major, Minor, Warning, or Info.
- For Create An Incident, from each option drop-down you can select:
- Incident Status
- Incident Owner
- Resolution Action
- Rules. Specify the rules that the policy enforces. You can specify one or more rules or rule groups. You can also delete the rule group. Deleting the rule group removes the included rules in that set.
- Click New Rule Group to add more, if needed.
- Click Add Exception. Add one or more exceptions, if needed. A DLP policy ignores any exception group within the policy. An exception group is ignored when ALL exceptions within the group match.
- Click Add Exception Group to add more.
- Click Next.
- On the Responses page:
- Responses. Select the response actions that are triggered when the policy rules are matched. By default, all DLP policies create an incident.
- Click AND to select a response action for the rule group.
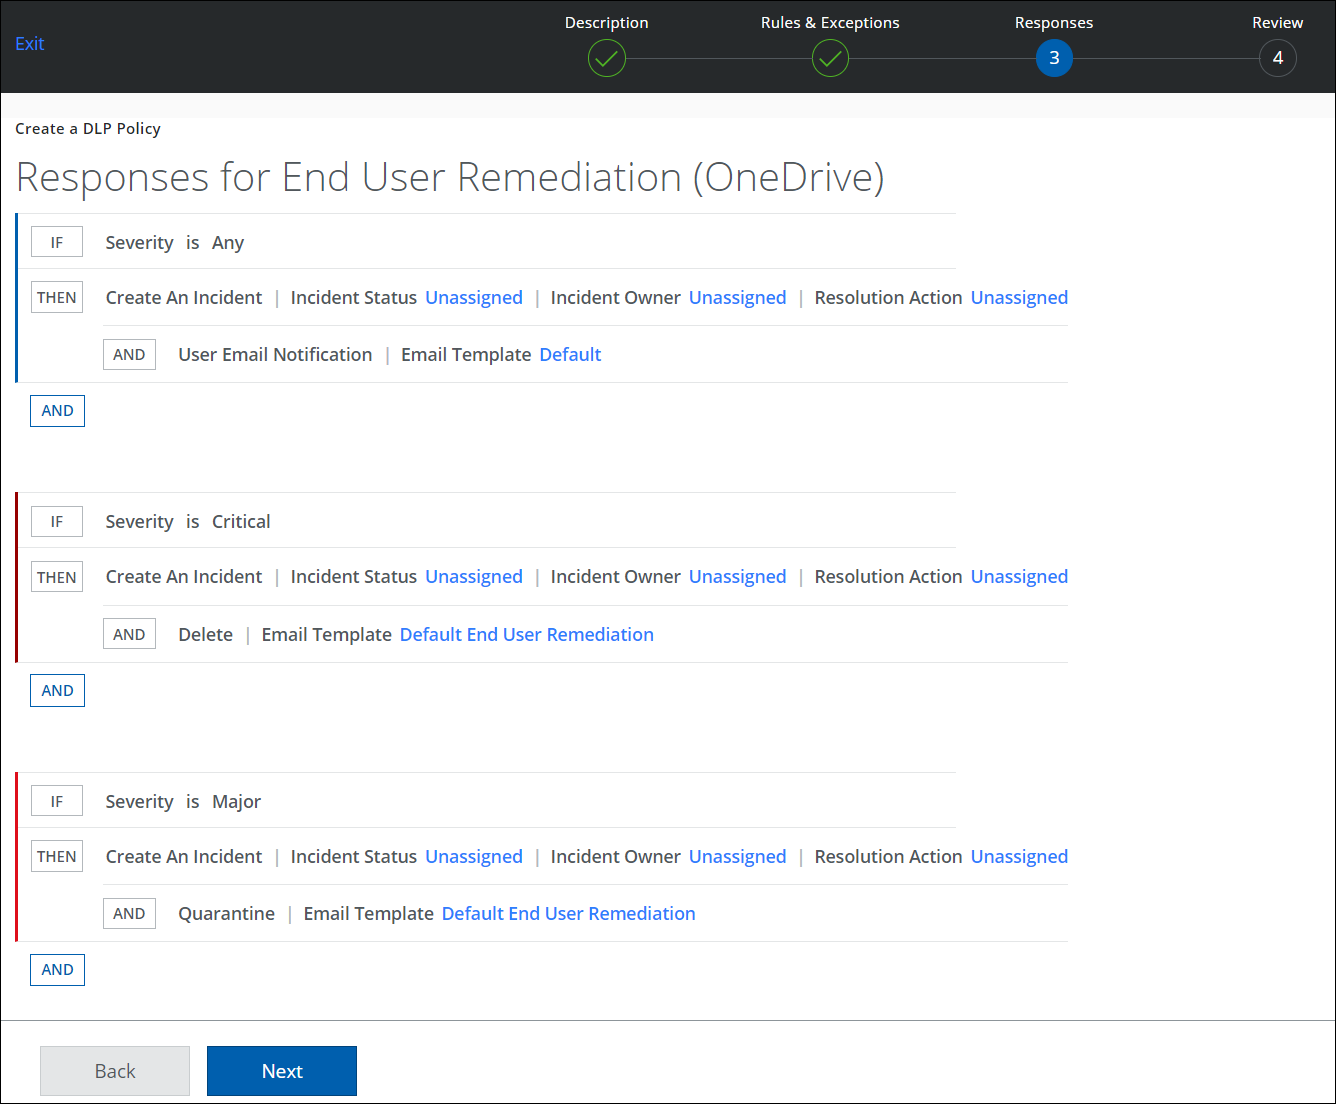
- For Email Template, select Default End User Remediation.
- Click Done.
- Click Next.
- Click Save.
After you create or edit a DLP policy for End User Remediation, you can test the End User Remediation workflow.
Test End User Remediation
To test End User Remediation:
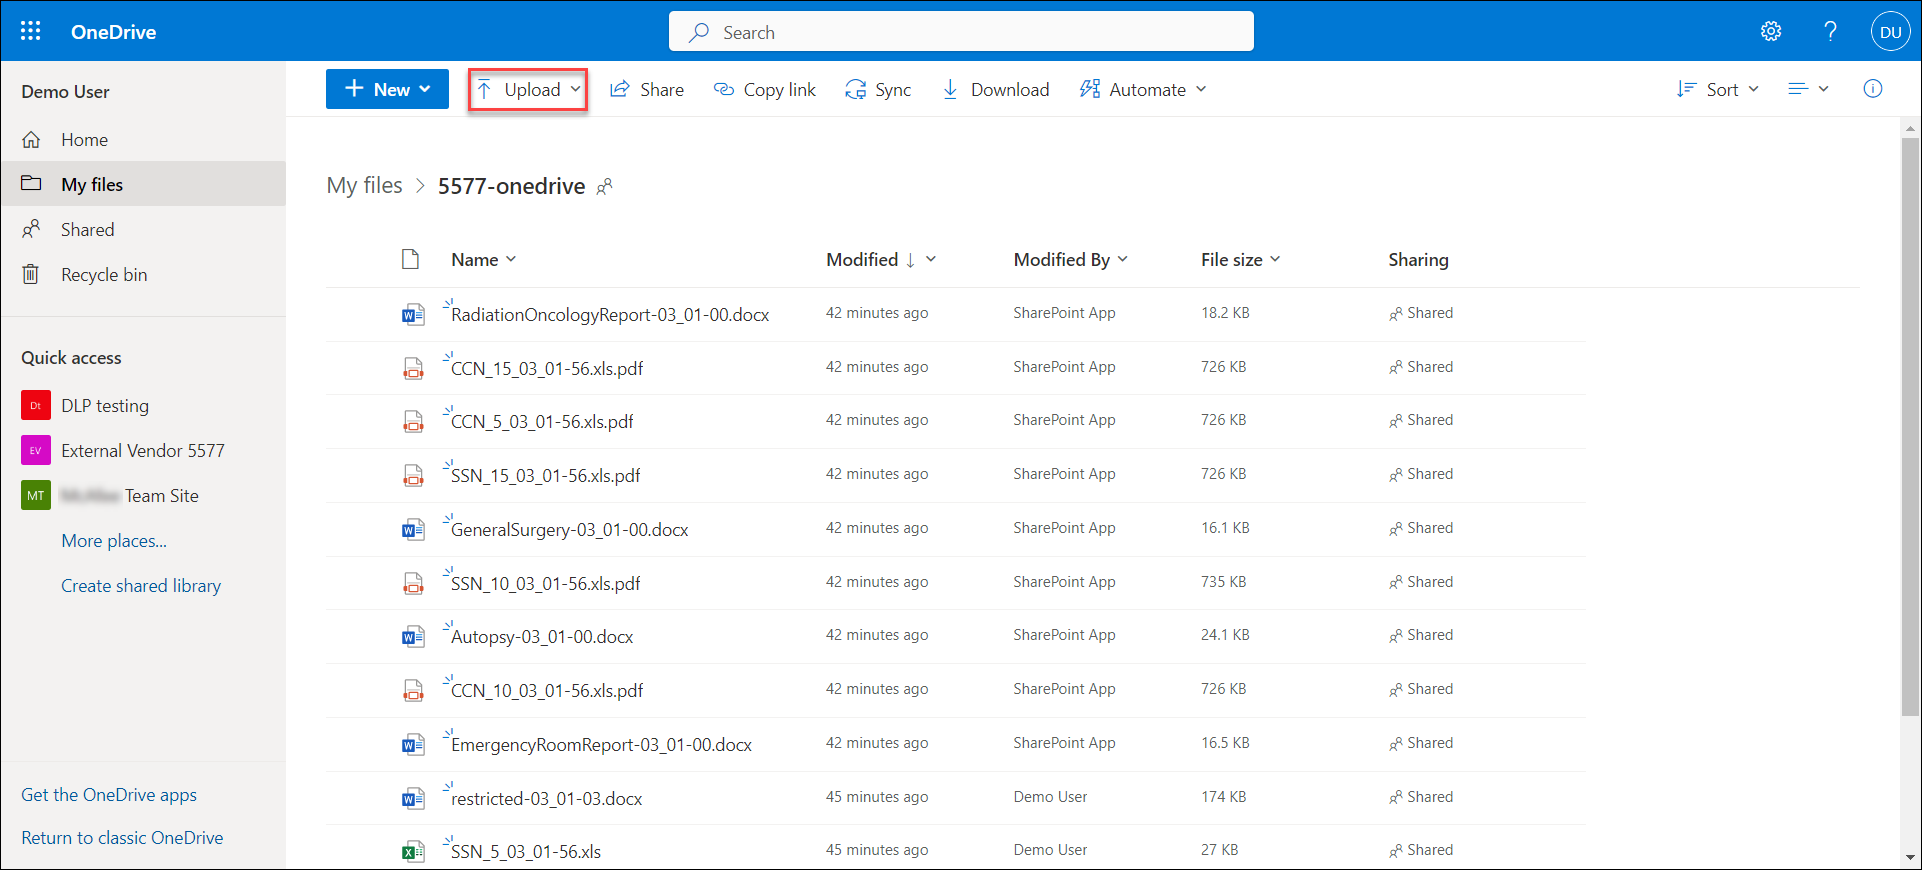
- Use the end user (demo user) account to upload a sensitive document to the sanctioned cloud application (OneDrive).
This policy violation triggers an email to the end user, which includes information about the violation, instructions, and buttons for the end user to respond in Skyhigh CASB.
NOTE: Make sure that the end user is assigned with SSO in your IdP app (Okta) to test SSO login for Skyhigh CASB.
- In the End User Remediation policy violation email, select Provide Business Justification.
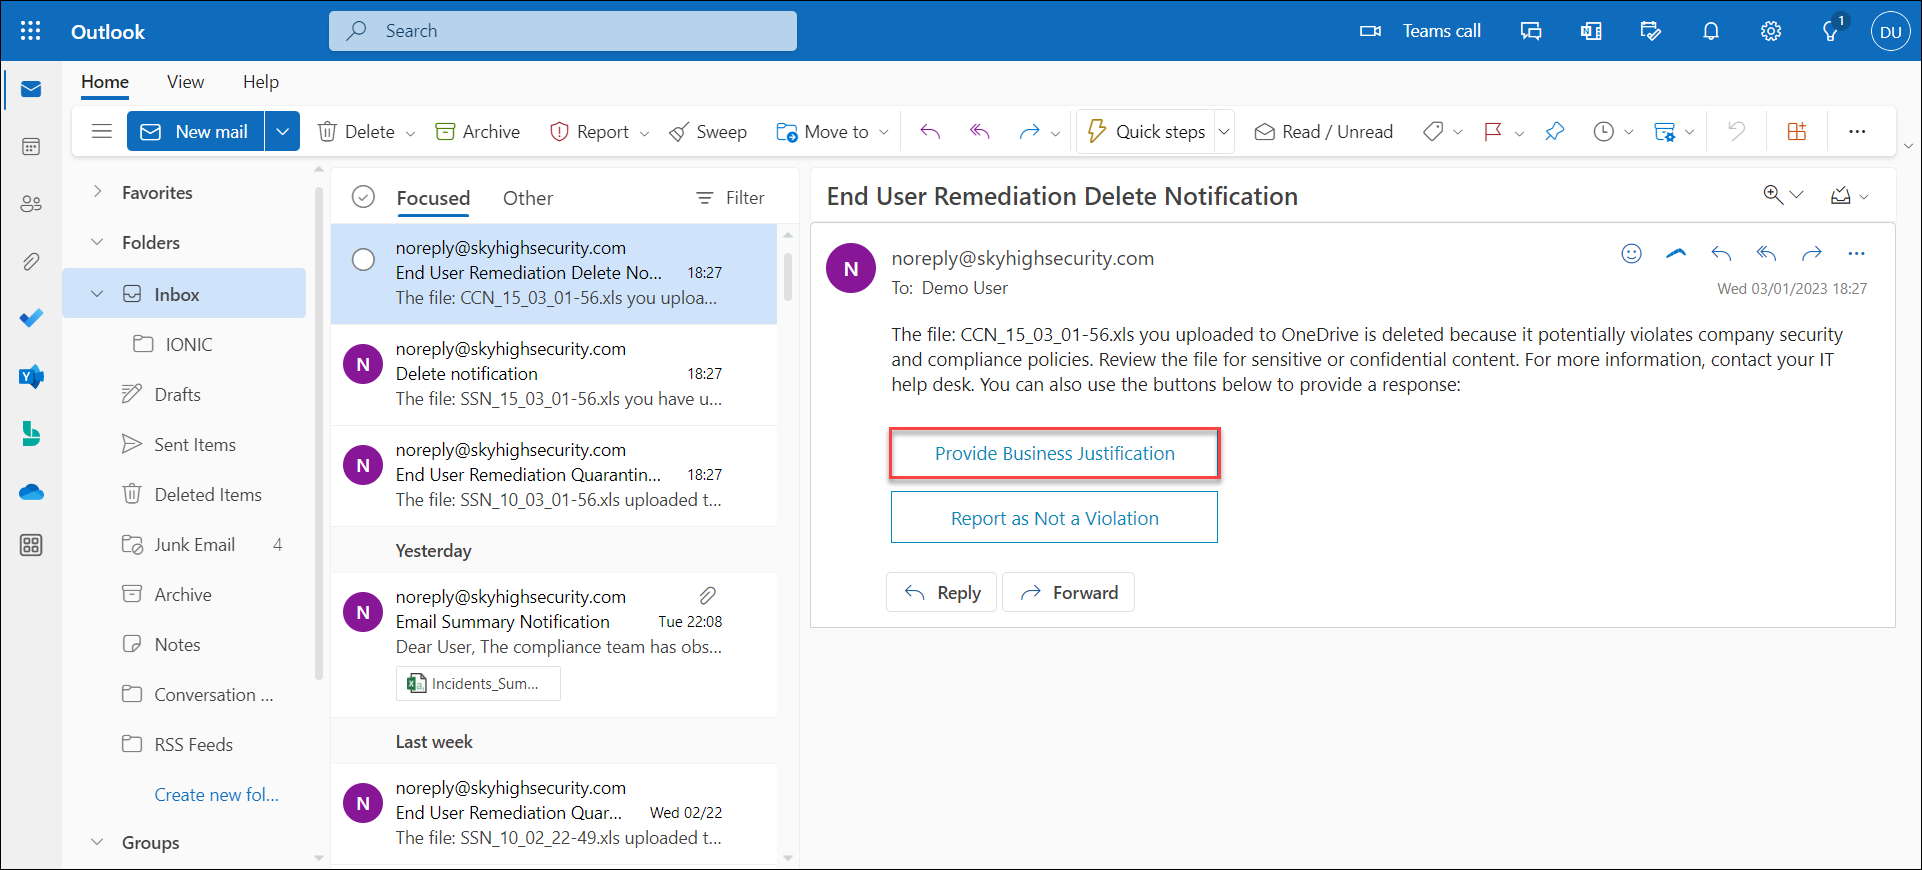
You are redirected to the Data Security Violation page.
NOTE: If you are not redirected to the Data Security Violation page, check the SAML settings of your IdP app, or delete the app, and add the IdP app again.
- On the Data Security Violation page, under the Open Incidents tab, enter a response for Response Justification.
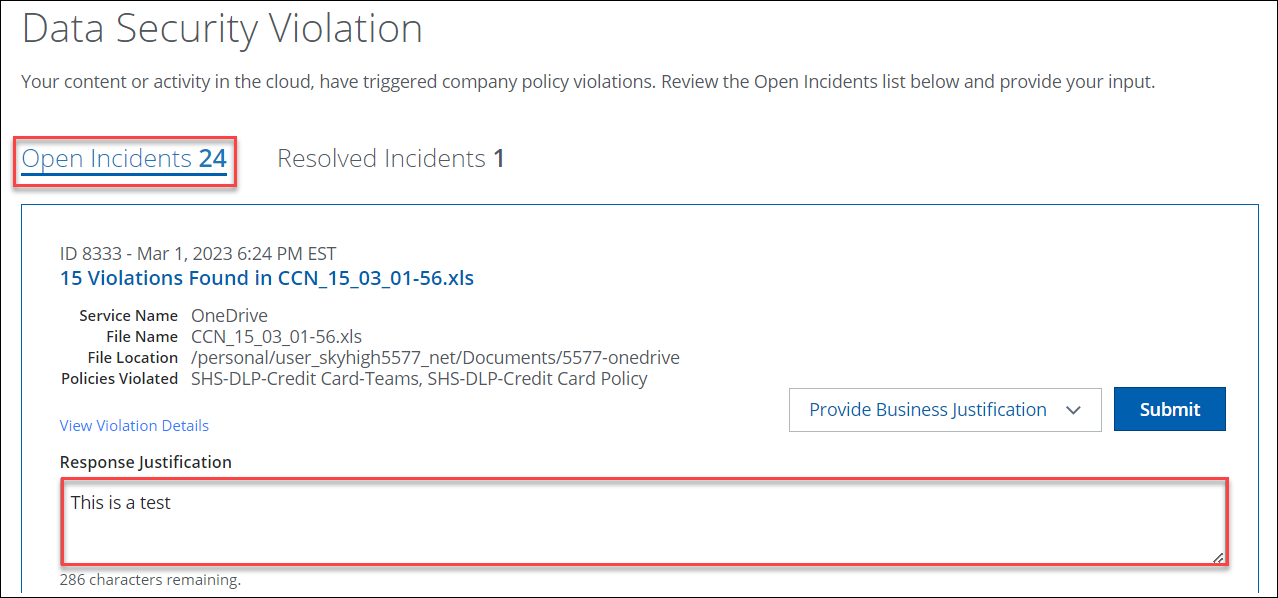
- Click Submit.
- Click Continue.
View End User Responses in Skyhigh CASB
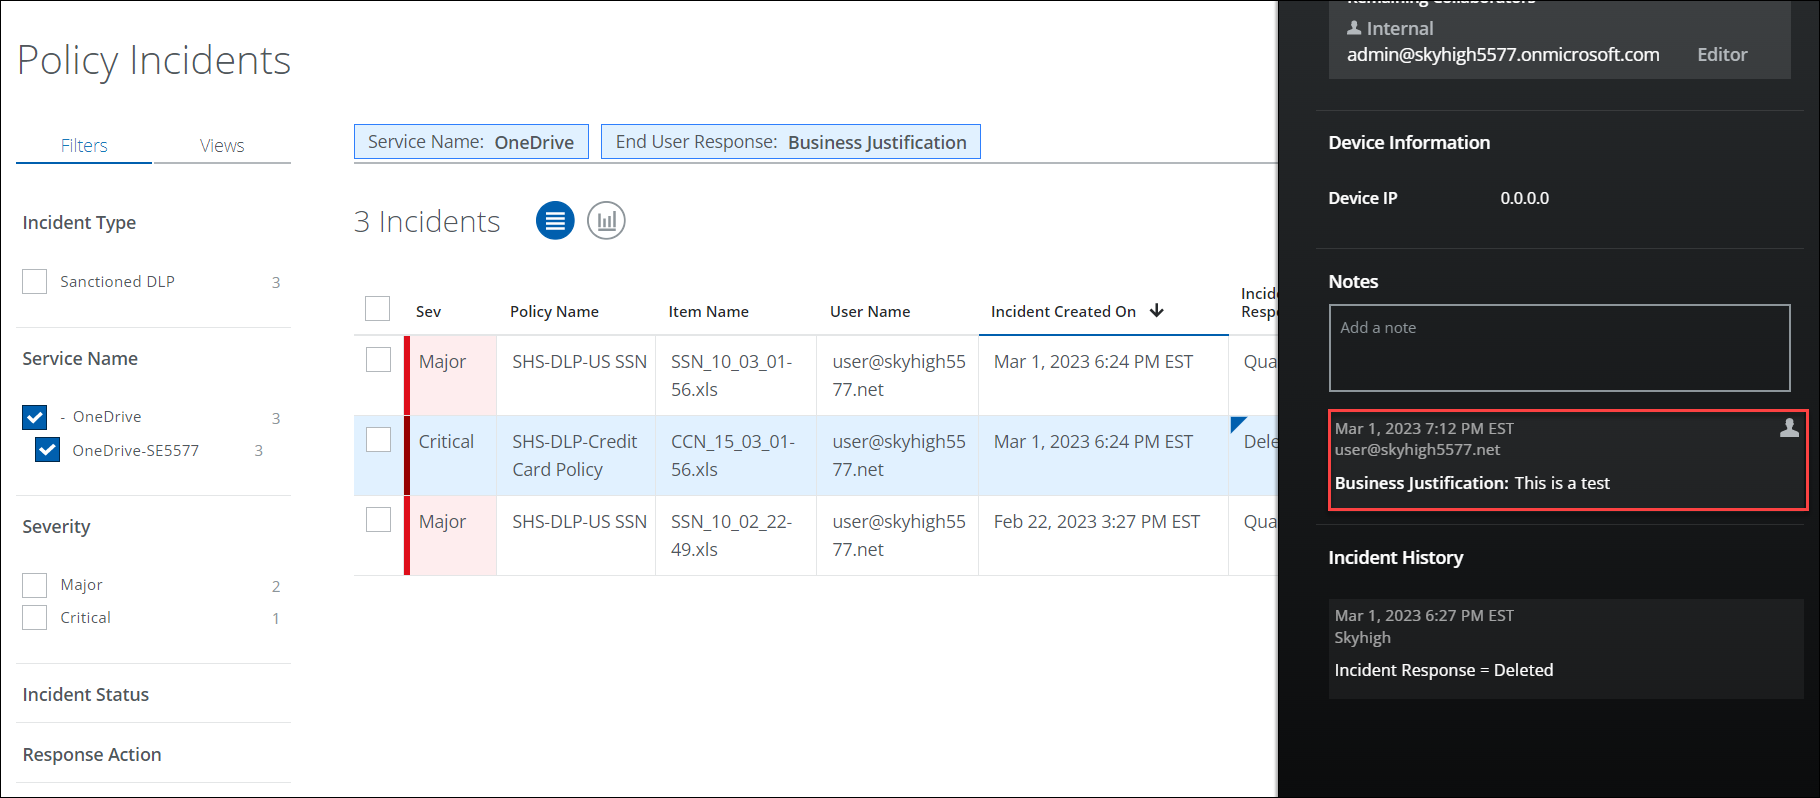
Once the end-user responds to the policy violation email, admins can view their responses for the violated incidents on the Policy Incidents page.
- In Skyhigh CASB, go to Incidents > Policy Incidents.
- Filters. Select options on the Filters tab to find the incidents. For example, select OneDrive as the Service Name and Business Justification as the End User Response.
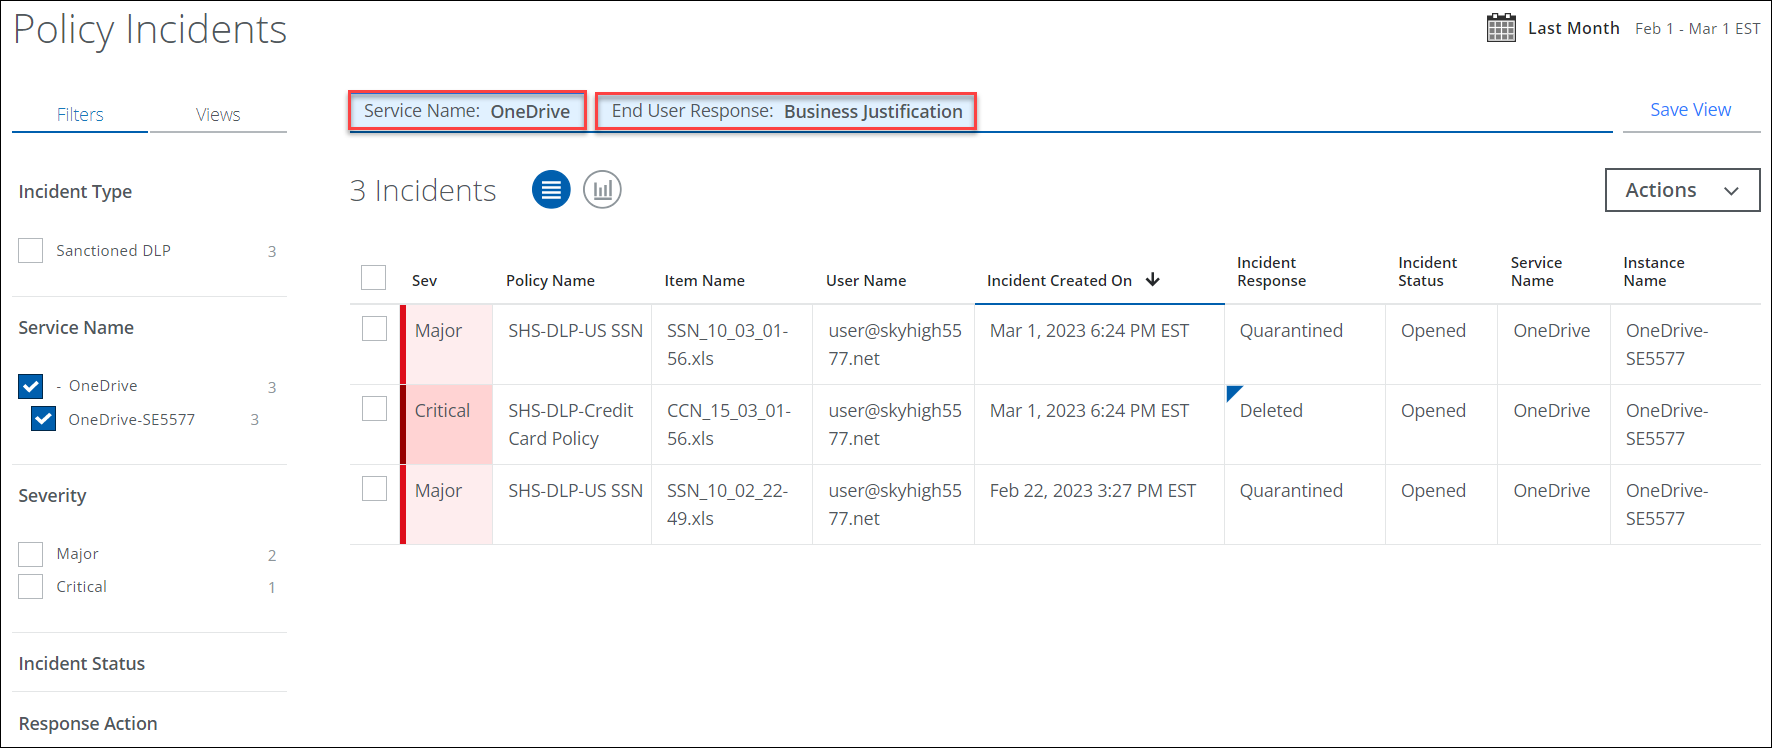
- Select the incident for which the end user (demo user) has provided justification.
- In the Policy Incidents Cloud Card, you can review the Business Justification provided by the end user.