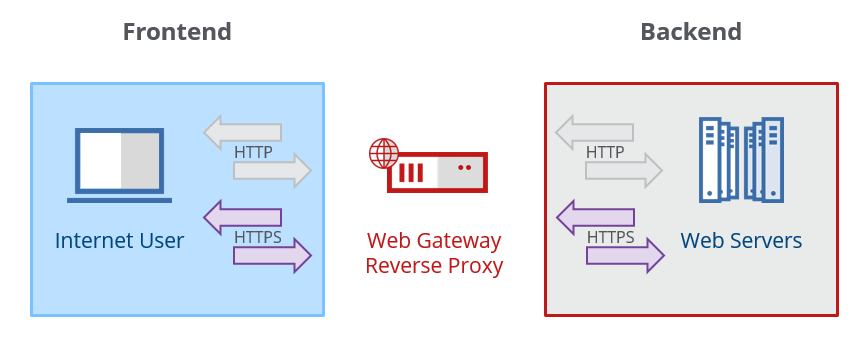
Understanding a Reverse Proxy
The idea behind setting up a reverse proxy with Secure Web Gateway is to make internal resources available to the Internet without compromising security. The added benefits are load balancing, caching, SSL encryption for servers that otherwise would not be encrypted, as well as malware scanning and threat protection.
This documentation provides a simple framework that can be expanded on to get a reverse proxy using Secure Web Gateway up and running.
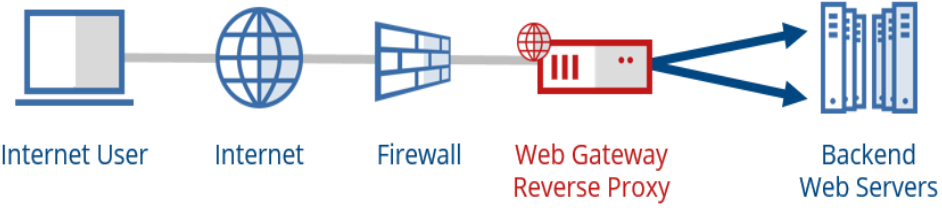
Here is a diagram showing the basic concept of a reverse proxy.
Prerequisites
The following needs to be considered before you set up a reverse proxy with Secure Web Gateway.
How do I get traffic to my reverse proxy?
The first choice that has to be made is how to get traffic that is directed to a web server to your proxy. There are a several options for this. You can:
-
Modify the DNS record for the server to point to Secure Web Gateway. This is the preferred method.
- Use a firewall to port-forward traffic that is directed tp the server over to Secure Web Gateway for proxying.
-
Deploy Secure Web Gateway in Transparent Bridge mode to intercept and proxy the traffic originally directed to the server. For more information about setting Secure Web Gateway up in this mode, see Understanding the Transparent Bridge Mode.
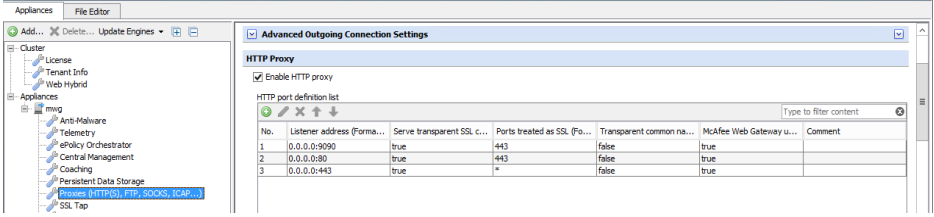
Proxy Port Configuration
Two ports typically need to be enabled and listening to intercept web traffic — ports 80 and 443. Port 80 needs to be enabled to listen for HTTP traffic and port 443 is for HTTPS traffic.
It is important that you enter an asterisk under Ports treated as SSL on the relevant page of the user interface for Secure Web Gateway when configuring port 443, as we want all traffic that comes in on port 443 to be treated as SSL encrypted traffic.
Server Certificate(s)
A server certificate needs to be created that will be used to encrypt all traffic between the proxy and the end user.
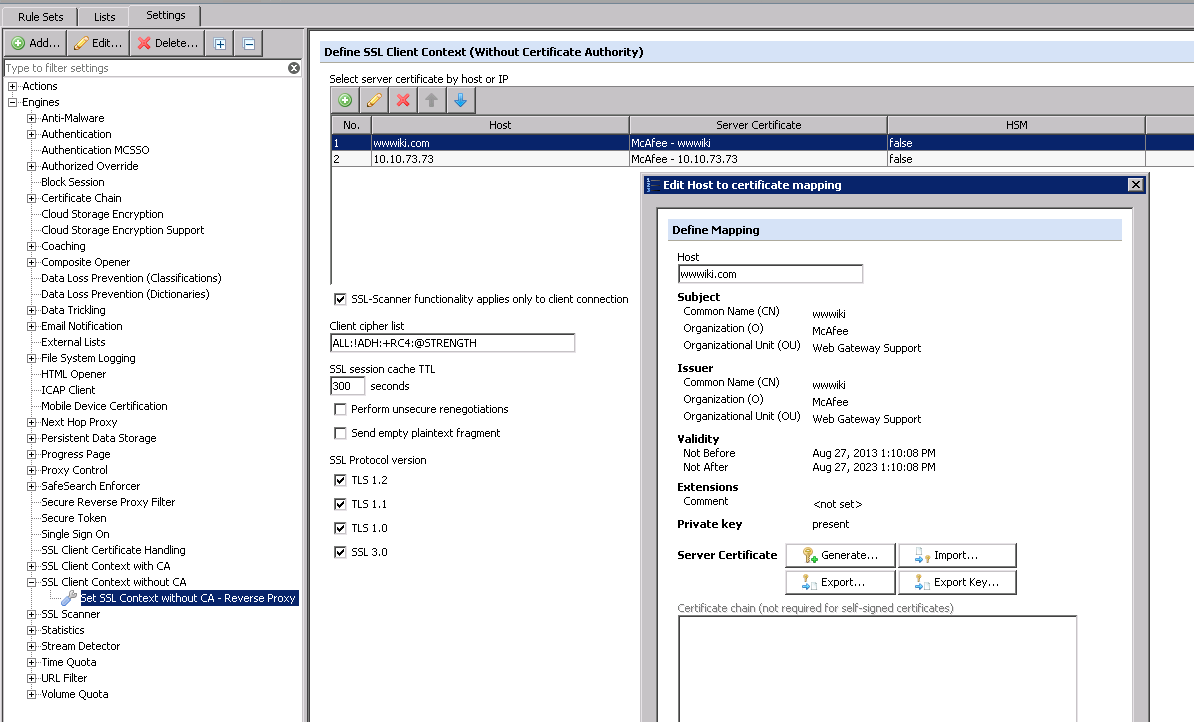
This certificate can be created right on the Web Gateway under
Policy > Settings > Engines > SSL Client Context without CA.
You could also import the certificate obtained from a certificate issuer or another source in the same location.
Obtaining one from a trusted Certificate Authority would have the advantage that your end-user browsers would automatically accept and trust this certificate.
Note that you can import multiple certificates, one for each server that clients would be accessing (i.e intranet.company.local and webmail.company.local). In most cases where multiple hostnames would be proxied through the web gateway, it would be beneficial to use a wildcard certificate instead (i.e. *.company.local).
Also consider that clients might be accessing resources directly via their IP address and that might result in certificate name mismatches. This is a very unlikely scenario though.
You will need the certificate, private key and password if you wish to import the certificates.
The certificates are created/imported under Policy > Settings > Engines > SSL Client Context without CA.
Here you can see that I have a certificate for both the hostname and the IP.
Note: It is important to enable the option "SSL-Scanner functionality applies only to client connection"! Enabling this setting allows the Web Gateway to immediately perform the SSL handshake with the client.
Reverse Proxy Rules(Framework)
Reverse Proxy rules require a few standard components that we will introduce here as a framework. A rule set to get you started is attached at the end of this article. Keep in mind that especially for reverse proxy deployments, rules and functionality will vary widely depending or your individual needs. The standard components explained below are meant to give you a starting point and guidance but not a complete reverse proxy setup.
Top Level Criteria
You'll want to add criteria on to the top level of the Reverse Proxy rule set so that it only applies to requests that come in to the reverse proxy ports. You'll want to do the same for your Forward Proxy rule set if your Web Gateway is serving both functions. For this example, We have created a list called 'Reverse Proxy Ports' and put the ports 80 and 443 in that list. The list is used as criteria for both the forward and reverse proxy rule set. Note the difference in operators used below ('is in' vs 'is not in').

Redirection to HTTPS
One goal in this example is to always have the client talk to the Web Gateway securely using an SSL tunnel so that the traffic cannot be intercepted. We can do this by creating a rule that redirects all HTTP requests on port 80 to the original requested URL but this time using https:// rather than http://

Client Context with Server Certificate and Content Inspection
This rule set will allow the Web Gateway to terminate the SSL Connection and issue the web server's certificate to the client. This is where we're going to use the certificates that were imported as a pre-requisite.
This rule set has two parts:
- Set Client Context: The rule is using the criteria 'Command.Name equals "CONNECT"'so that it only applies to the initial connection negotiation. We're restricting it to the CONNECT because the action is going to be 'Stop Cycle'. 'Stop Cycle' is used to allow the CONNECT to occur and establish Content Inspection so that we can see inside the tunnel. The Web Gateway will be the "web server" from the clients perspective.
- Enable Content Inspection: We need to have this rule to basically remind the proxy to continue the Content Inspection for all SSL traffic past the CONNECT phase.
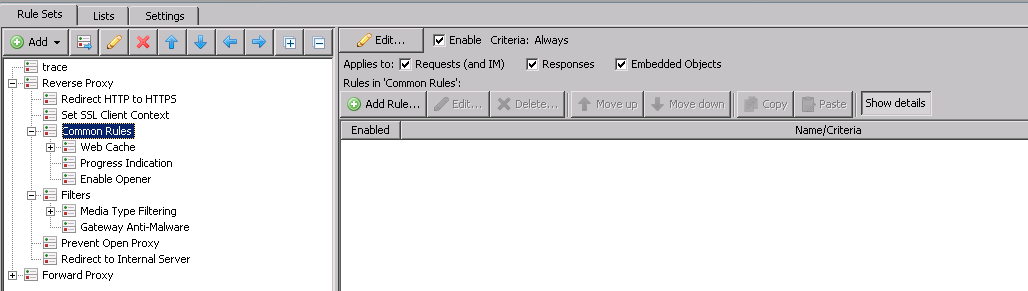
Common Rules and Filters
This section is where you can define the same types of Common Rules and Filters as you would normally with a forward proxy configuration such as Progress Indication, Caching,Malware Scanning, etc. These settings are all optional and customizable to your preferences.
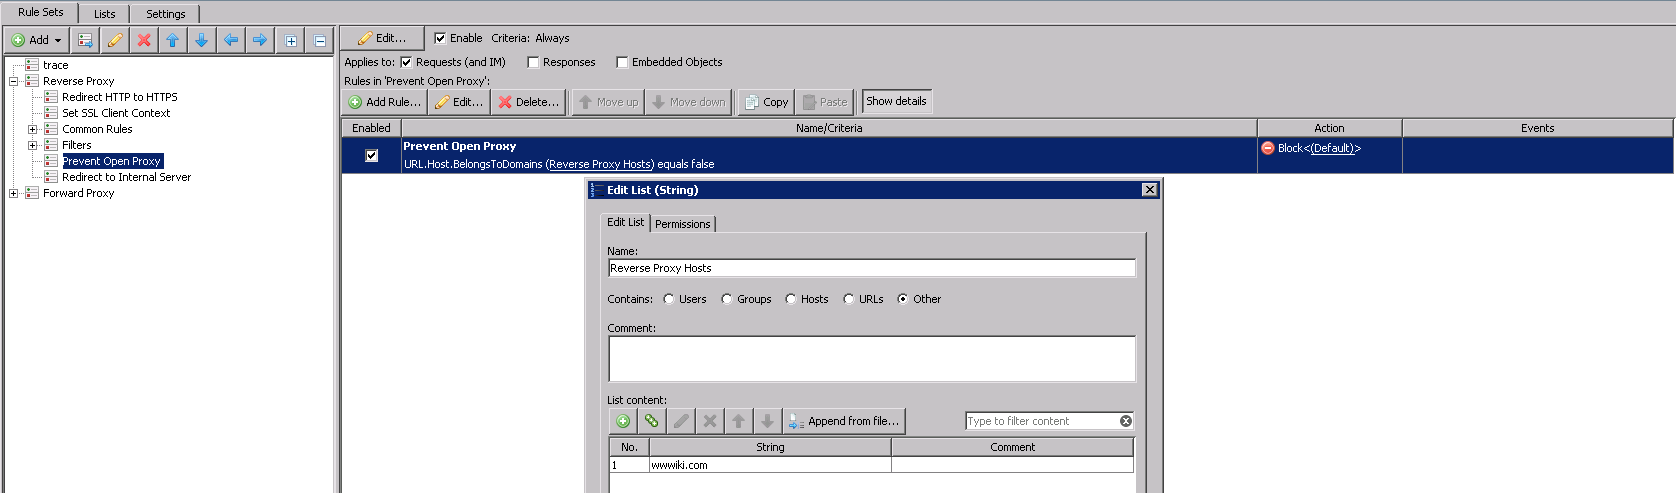
Prevent Open Proxy
It is very important to restrict access to your reverse proxy to prevent any internet user from using it as an open forward proxy. We can do this with a simple rule that checks to see if the request is for a resource that needs to be reverse proxied and if not then block that request. In this example I used the property URL.Host.BelongsToDomain.
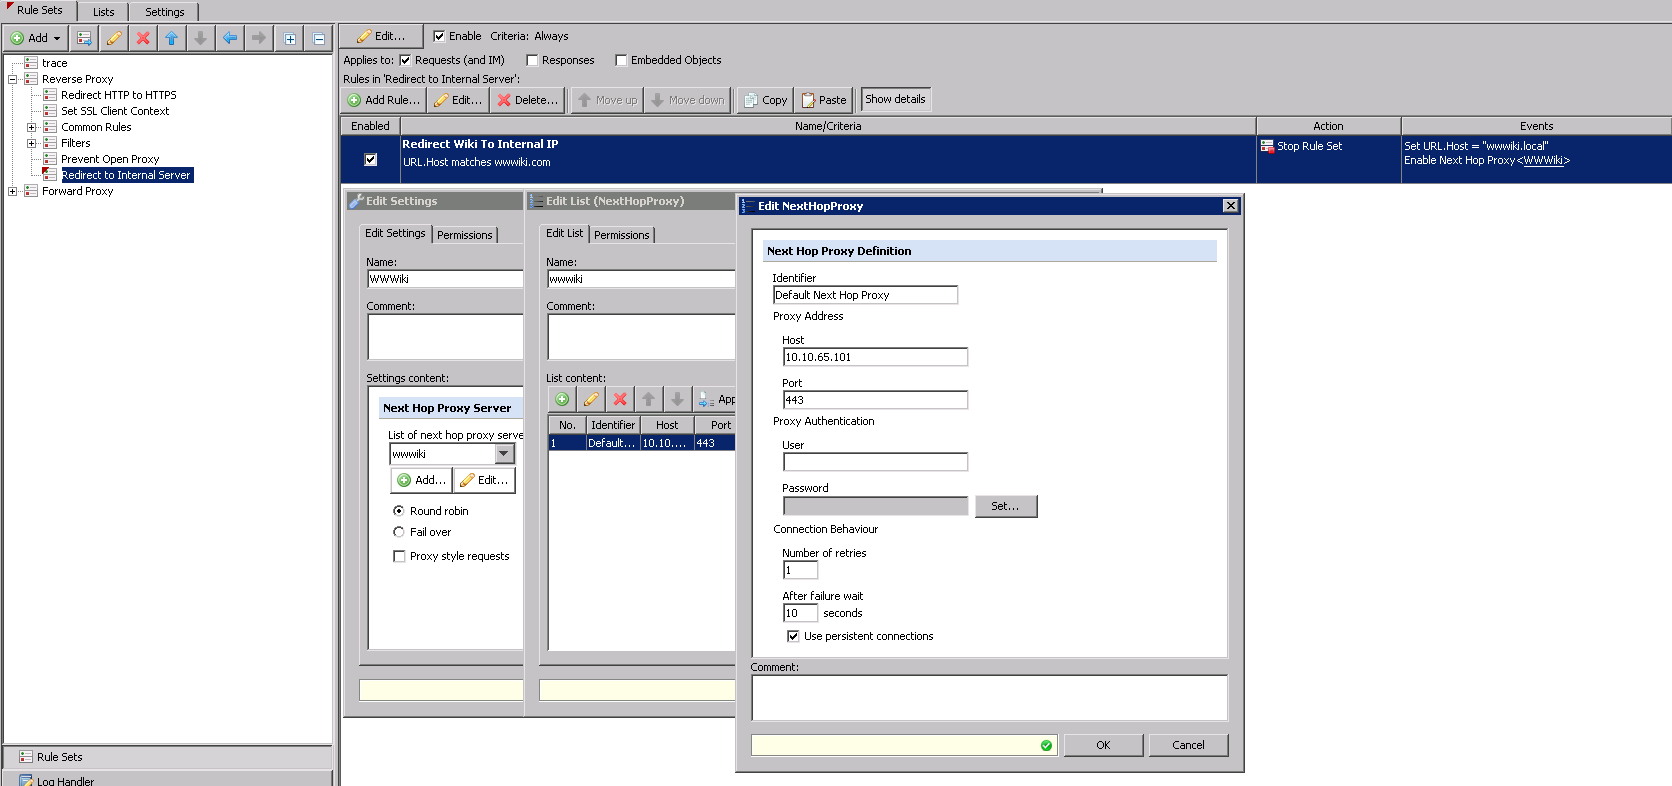
Redirect to Internal Server
All of the rules up until this point are directly tied to the frontend configuration (client-->Web Gateway) of the reverse proxy. This section focuses on the backend configuration(Web Gateway-->internal server) of the reverse proxy.
You have many options in regards to how the traffic flow is handled. The entire communication can be HTTP or it can be HTTPS. It can also be HTTPS on the frontend while HTTP only on the backend, or vice-versa. You can configure this any way that you choose.
We're going to use the Web Gateway to take a requested URL and re-write it to reflect the internal server. We'll also re-write the host header at the same time in case the internal server is used to host more than one domain or site. We can't re-direct the client to an internal resource that is not publicly accessible so we need to have a way for the proxy to retrieve it on behalf of the client. Therefore, we're using the "Next Hop Proxy" event to fulfill the request with the box for 'Proxy style requests' unchecked. This allows the reverse proxy to retrieve resources from a destination that was not the original destination sent over by the client and send it back to the client as if it was. Using the next hop proxy method also adds the benefit of load balancing and failover for the web servers if you add more than one next hop proxy definition.
HTTPS Example
This is an example where the proxy needs to connect to the internal server securely using SSL/HTTPS. Here, we are adding two events on to the rule - the first re-writes the URL Host to the internal host and the 2nd enables the next hop proxy event to fulfill the request. Note: be sure to uncheck the box for 'Proxy style requests'.
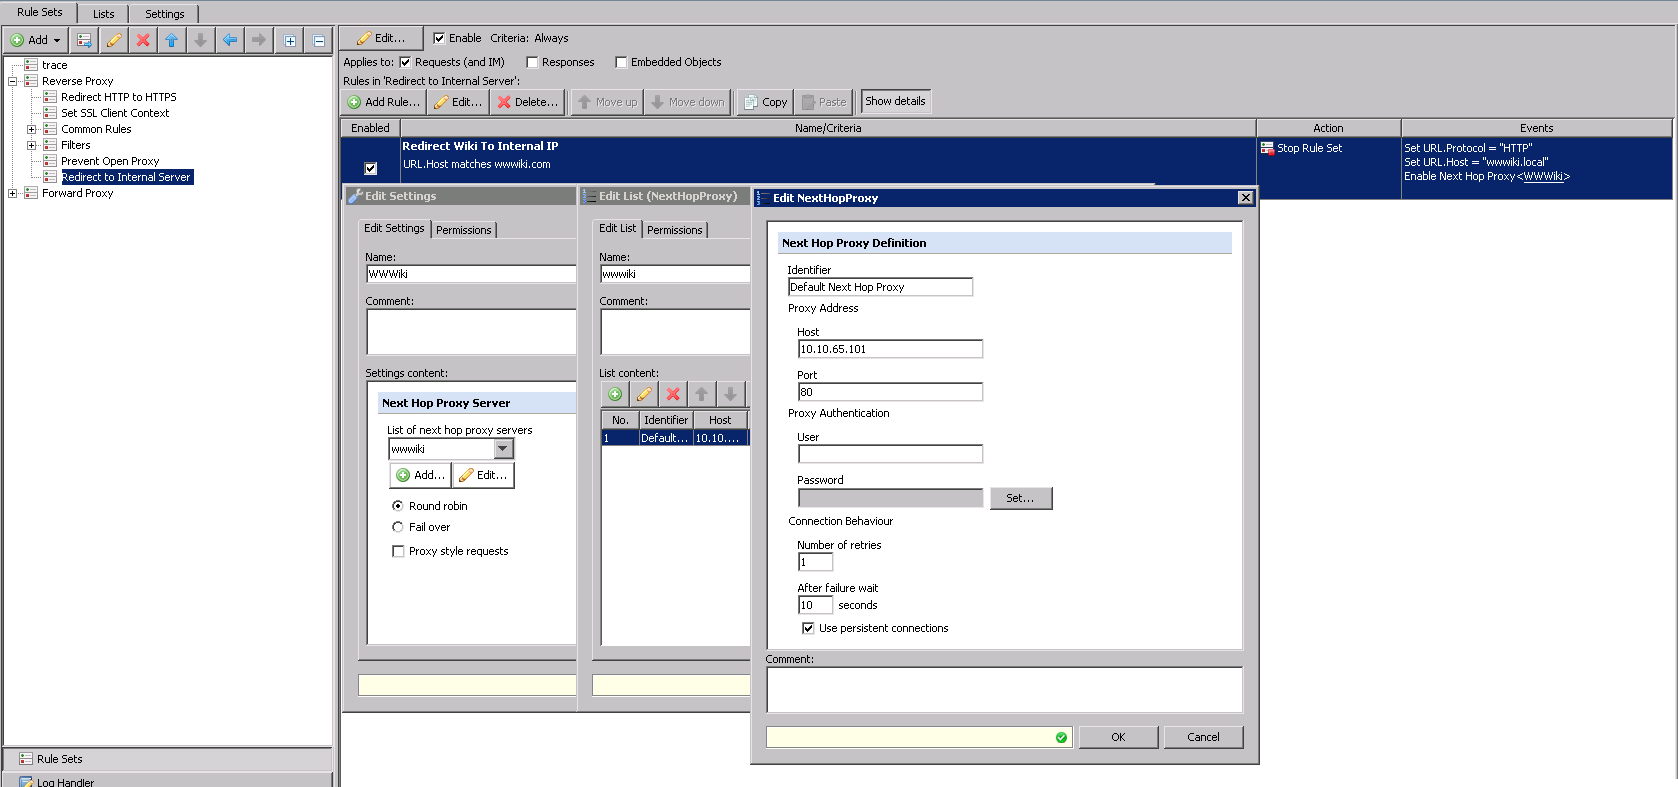
HTTP Example
This is an example of what the next hop proxy looks like when the server does not support SSL connections and the Web Gateway needs to talk to it using HTTP. Here we are switching the protocol to HTTP, re-writing the host to the internal address and fetching the content using the 'Next Hop Proxy' Event. Note: be sure to uncheck the box for 'Proxy style requests'.
Troubleshooting
We have found that most troubleshooting can be done using Rule Engine Tracing.
Please see this document for more information: Some examples of things you may have to troubleshoot are why you are receiving content from the wrong server, the SSL Handshake failing, or getting blocked by the Prevent Open Proxy rule.
- "Page Cannot Be Displayed" (IE) or " (Error code: SSL_error_rx_record_too_long)" (FF) - Client Context is most likely not set correctly or Content Inspection is not being performed.
- Web Gateway Block Page - check to ensure that you have excluded any sites to be reverse proxied from the Prevent Open Proxy rule.
Conclusion
We have now laid the foundation for a simple & secure reverse proxy rule set that should provide a framework to get you started with your own reverse proxy to suit your needs.