Configure Automatic Backups
Currently, the Skyhigh Secure Web Gateway has the ability to create automatic backups and push to a remote host using HTTP(s). Using the flexibility of the Secure Web Gateway we can create a daily backup job that has a unique filename and can be pushed off box via FTP. The reason this process was created was to give Web Gateway administrators the option to create daily backups that have unique filenames and can be transferred off box via FTP.
We will be leveraging the Secure Web Gateway log management functions to ensure the backup files have a unique filename with a timestamp as well as push these backups to an external FTP server for a better disaster recovery solution. We will use the Scheduled Jobs functionality of the Secure Web Gateway to create a daily backup of your current configuration.
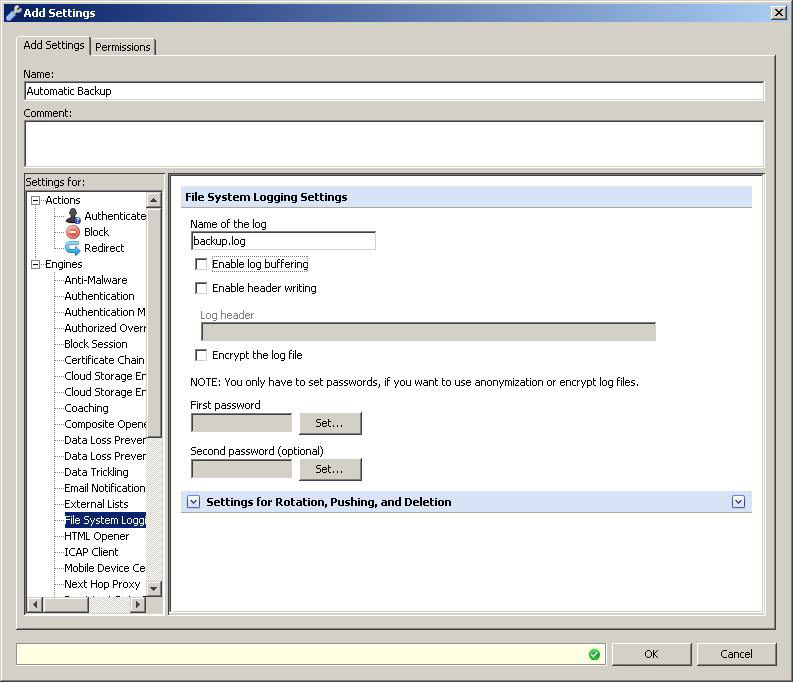
Create a new File System logging entry
The first step to accomplishing this goal is to create a new File System Logging entry.
- In your Secure Web Gateway under Policy > Settings > Engines, right-click File System Logging and select Add...
- Give this entry a name that will allow you to quickly identify it among your other logging settings, such as the example "Automatic Backup".
- Enter a log name, such as backup.log.
- Uncheck Enable log buffering and click OK to create and close this window.
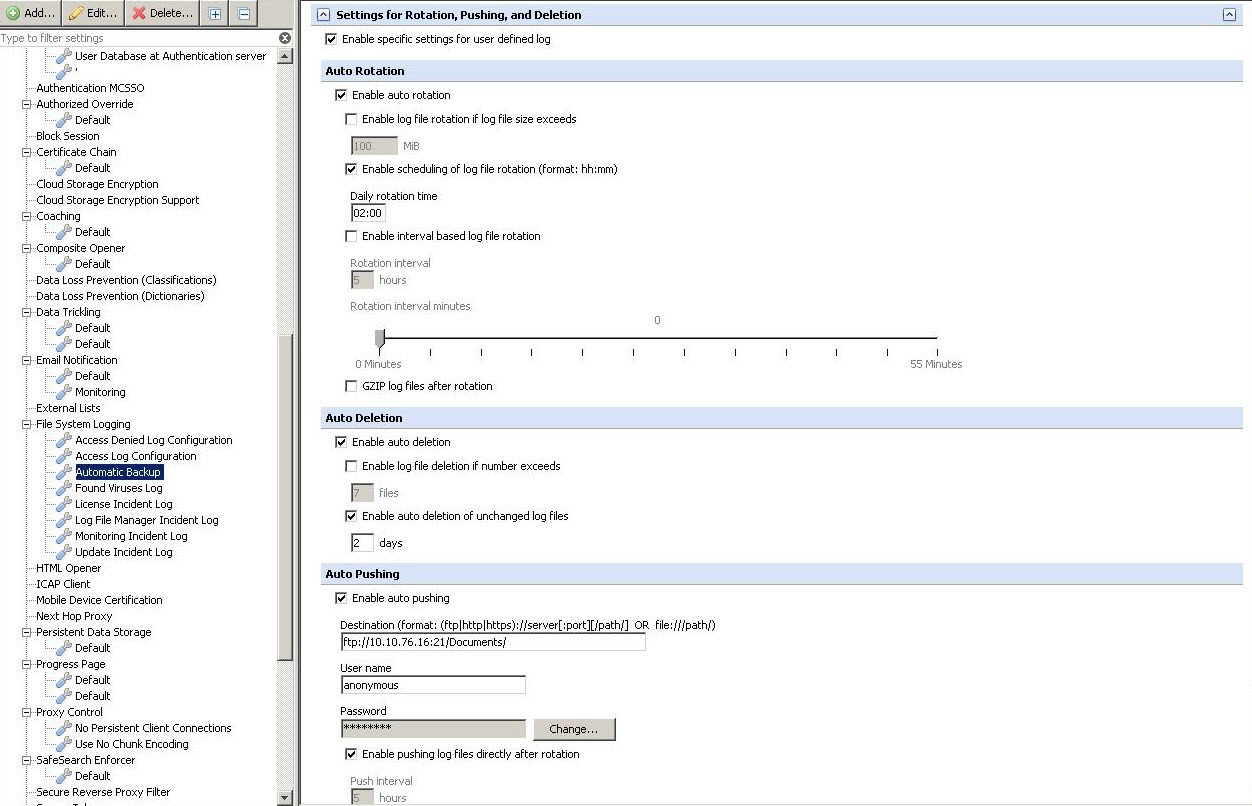
Rotate and Push the newbackup.log file
Pushing the new backup.log off box will be completed under the newly defined File System logging entry.
- Select the name defined in the previous step (see Automatic Backup in the screenshot below). On the right-hand side expand "Settings for Rotation, Pushing, and Deletion".
- Under Settings for Rotation, Pushing and Deletion check Enable specific settings for user defined log,
- Under Auto Rotation select Enable auto rotation as well as Enable scheduling of log file rotation (format: hh:mm), then enter the time the rotation should occur. Keep in mind that your rotation time is important, as we will be creating a scheduled backup job that must run before the rotation time. (In this example we will schedule the backup creation at 1 AM and rotate and push the file at 2 AM).
- Under Auto Deletion you can see in the example that we've chosen to automatically delete unchanged log files after 2 days, once this is operational we will not need to keep automatic backup files on the appliance as they are stored safely on your FTP server.
- The last configuration needed here is to enable Auto Pushing. Select the Enable auto pushing check box and define your destination server. In this case, an FTP server was used. Make sure to check Enable pushing of log files directly after rotation.
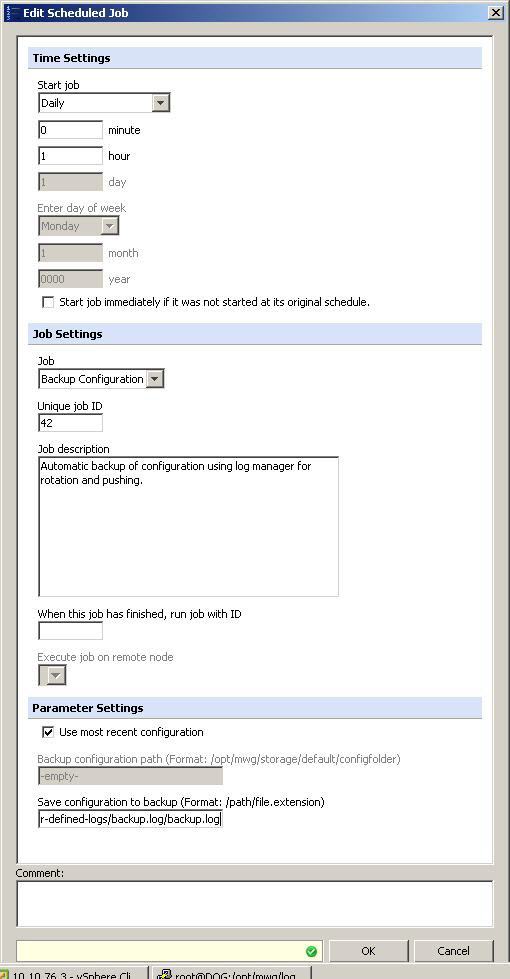
Schedule the automatic backup
The next task is creating a scheduled job.
- Find the scheduled jobs section under Configuration > Central Management > Advanced Scheduled Jobs. Click and you will receive the Edit a Scheduled Job window as seen below. This scheduled job will be started daily, set to run at 1 AM (in this example we will be scheduling the backup creation at 1 AM and rotating and pushing the file at 2 AM).
- Under Job settings, drop down to Backup Configuration and give this job a Unique job ID. This value is your choice provided it does not conflict with any other existing scheduled jobs.
Adding a job description is optional, I find it helpful to reference what the job is configured to accomplish so that if I a problem arises and further modification is needed it's clear what this jobs function is intended to do. - Under Parameter Settings check Use most recent configuration.
- Under Save configuration to backup define the full path to the actual backup.log file. Enter the path like: /opt/mwg/log/user-defined-logs/backup.log/backup.log.
- The duplicate "backup.log" in the defined /path/file.extension field is needed as the directory for these files is named backup.log (automatically by creating a new File System Logging entry). The new log entry is defined as backup.log (see Creating a new File System logging screenshot). Filenames created by this job are named as follows: backup1309040200-10.10.76.10.log
Restore configuration from backup.log file
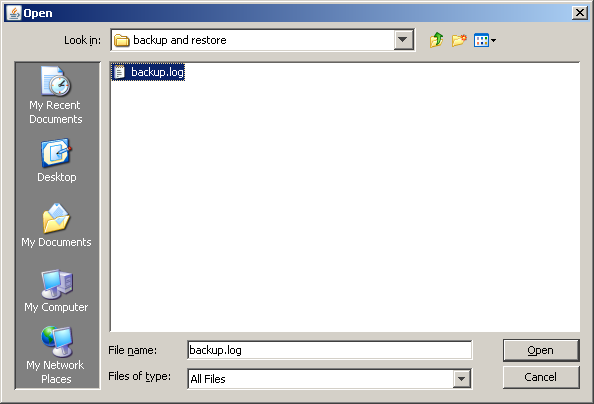
It is important to note that the files created are not automatically found when performing a restore via the Secure Web Gateway UI. When the UI attempts to find the backup file, it looks for a .backup extension as seen here:
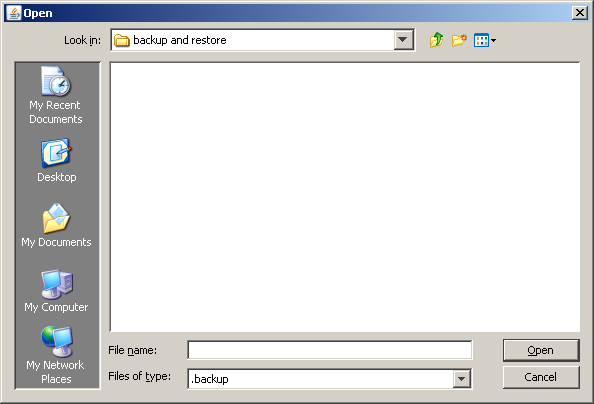
Changing the Files of type: drop-down to All Files allows the Secure Web Gateway to see the backup it should use for restoring. Here you can see the backup.log appears after the change of the file type change.
After the file is selected and Open is clicked the restore works normally.
Backup from the CLI
If you want to backup the appliance from the CLI, see the commands below.
Create a backup in /tmp called current.backup:
/opt/mwg/bin/mwg-coordinator -B"file:in=ACTIVE,out=/tmp/current.backup"
Troubleshooting
In the event that you are not seeing the backup files on your destination server or the backup is not being created properly, there are some items to check.
Backup.log files not being created by Scheduled Job?
There is a log created when scheduled jobs are configured. You can find this log in the Secure Web Gateway user interface under Troubleshooting > Log files > scheduled-jobs > scheduled.log.
Backup.log file not being uploaded to the configured server
If your backup.log is not showing up on the remote server, review the mwg-logmanager.errors.log located within the Secure Web Gateway user interface under Troubleshooting > Log files > mwg-errors > mwg-logmanager.errors.log