Install a Hardware Security Module in SWG
Introduction
This guide will cover the basics of installing and configuring a Hardware Security Module (HSM) in your Skyhigh Security Web Gateway.
What is an HSM for?
The HSM is used to protect private keys used in SSL communication. When the HSM is installed, it can take over private key operations for the keys that it protects. The HSM is a PCI card which must be physically installed in an appliance. HSM Software is installed on the SWG operating system to allow for integration with the hardware module. Using an HSM on Web Gateway is ideal because there is a large amount of SSL traffic that can be scanned by SWG. The HSM can be used to secure the private keys for the SWG's certificate authority (SSL scanning -- forward proxy), the "domain" key (SSL scanning -- forward proxy), any web server certificates (for reverse proxy), and client certificates (forward proxy -- used in server-side communication).
Cluster distributed HSM
Cluster distributed HSM support was added in version 7.5.0. Using Cluster distributed HSM allows a SWG share the HSM capabilities with other SWGs. This is beneficial when limited HSM PCI cards are available.
IMPORTANT: The phrase "Cluster distributed HSM" does not refer to a Network HSM (appliance that sits in the same network), the phrase refers to the ability for SWG to share use of an HSM, over the network to other SWGs.
Deployment
The HSM must be installed into at least one appliance. Once deployed into an appliance it is possible to configure cluster distributed HSM. Using cluster distributed HSM makes it easy to share the capabilities an HSM and also configure for failover when more than one appliance has an HSM installed/connected.
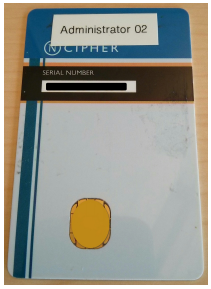
Administrator and Operator Cards
Use of the HSM is governed by Administrator and Operator cards, these are smart cards that can be inserted into the smart card reader to perform certain tasks.
IMPORTANT: I would advise labeling your smart cards before or immediately after creating them. During the process you will also need to generate strong passwords, so take good notes.
Administrator Cards
Administrator Cards are required for completing tasks with the Security World (such as creation or modifying settings). Administrator cards can be reused.
Operator Cards
Operator Card Sets are used to protect your private keys and encrypt them in the HSM. You can create new Operator card sets or transfer existing ones to use them on multiple HSMs. If you use multiple HSMs in your environment you will most likely just create one Operator Card Set and use it on all your HSMs.
Hardware Installation
The HSM is supported in specific appliances. SWG also supports specific HSMs.
Supported Web Gateway Models
- 5000A and 5500A (Dell based)
- 5000B, 5500B, 5000C, 5500C, 5000D, and 5500D (Intel based)
Supported HSM cards and Network HSM
- Thales nShield Solo 6000+ module
- Thales (formerly nCipher) nShield 500e F3 or compatible (legacy)
- Thales nShield Connect (support added in 7.7.1)
- SafeNet Network HSM formerly Luna SA, now owned by Gemalto (support added in 7.7.0)
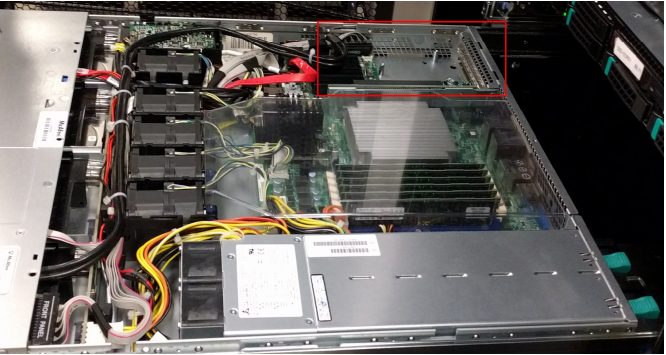
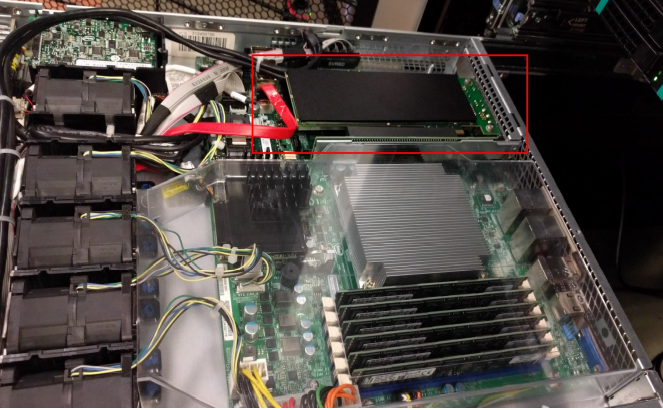
Physical Installation
Installation of the HSM card into the Web Gateway is fairly straight forward. We will walk through the installation on a WG5000C.
Tamper seal statement
Log a support case simply to document that the appliance was opened for necessary purposes.
Components
When you receive your HSM PCI card it should come with other components required for setup and use. The components shown below are older models (Thales nShield 500e) but the concept and setup is the same.
- HSM PCI card
- Card reader
- Administrator / Operator cards

Remove from power
As with most hardware installations, power down the appliance and remove from power before performing any changes.
Open the appliance and remove the PCI riser
The PCI riser should be on the far left of the appliance (looking from the front). Gently remove the riser card from the motherboard.
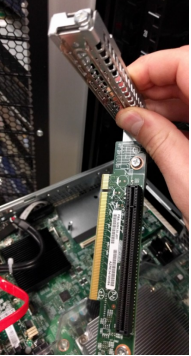
Attach the HSM card to the riser
Use a phillips head screw driver to remove the PCI slot cover then securely attach the HSM card to the riser card.
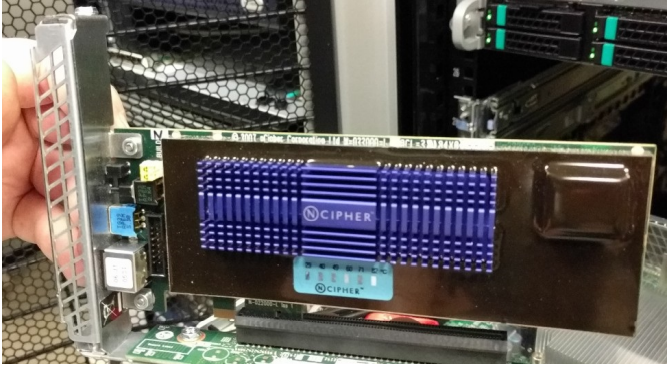
Install the riser with HSM card attached
Gently reinsert the riser card back onto the motherboard with the HSM attached. Once installed put the cover back on and power the appliance up.
Software Configuration
Once the HSM PCI card is installed we can move onto configuring the software.
Create the HSM Security World key (only for initial setup)
Security Worlds are used to identify one or more modules that belong to the same group of HSMs and can share the same kind of configuration. You can create a new Security World or transfer an existing one. If you use multiple HSMs in your environment you will most likely just create one Security World and use it on all of your HSMs.
Prerequisites
- Physical access
- CLI access
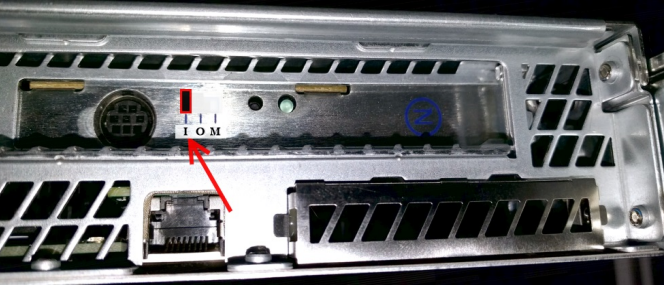
Switch the card to Initialize mode
First, switch the Module into pre-initialization state: set the micro switch at the back of the module towards I (Initialize).
Reset the module
After switching modes we must run a command to reset the module, this lets the module know that modes have changed:
/opt/nfast/bin/nopclearfail –c –a

# Example output:

/opt/nfast/bin/nopclearfail -c -a

Module 1, command ClearUnit: OK
Verify the module status
To check the state of the module enter the command below (-m1 represents module 1), check for any failures in the output (mode line):
# For just module 1 mode output:

/opt/nfast/bin/enquiry -m1|grep mode

# For module 1 output:

/opt/nfast/bin/enquiry -m1

# For full output

/opt/nfast/bin/enquiry
Create the Security World
When the module is in pre-initialization mode, create a new Security World by entering the command
/opt/nfast/bin/new-world –i –Q x/y
- x/y stands for the amount of administrator cards.
- x stands for the number of administrator cards needed for operations
- y stands for the number of administrator cards to create
E.g. 1/2 means, we will create two cards, but only one is needed, 1/1 means, we only create one administrator card and this one is needed for all operations. During this process you are asked to insert a card. This card can be an old administrator card or an empty card. For more information about administrator cards see Thales' documentation (HSM vendor)
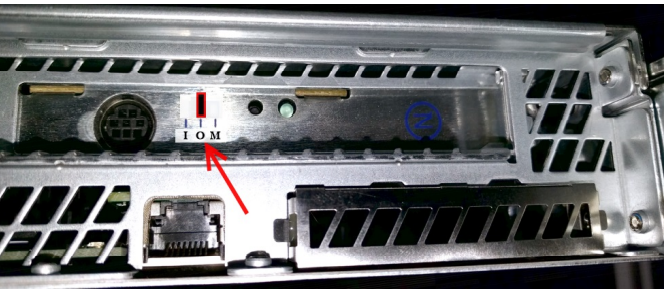
Switch the card to Operational mode
After you have created the Security World and the administrator card(s), you have to switch the module back into operational state. To do so, turn the switch at the back of the module to O (Operational).
Reset the module again
Wait 30 seconds and reset the card again with:
/opt/nfast/bin/nopclearfail –c –a
Verify the module status again
Verify that the card is back in the operational state with:
# For just module 1 mode output:

/opt/nfast/bin/enquiry -m1|grep mode

# For module 1 output:

/opt/nfast/bin/enquiry -m1

# For full output

/opt/nfast/bin/enquiry
Create Operator Card Set (OCS)
Operator Card sets are used to protect your private keys and encrypt them in the HSM. You can create new Operator Card sets or transfer existing ones to use them on multiple HSMs. If you use multiple HSMs in your environment you will most likley just create one Operator Card set and use it on all of your HSMs.
After this you are able to create the Operator Card Set. Operator cards are necessary for the creation of the needed keys in the correct way. You create the card set by entering the command:
/opt/nfast/bin/createocs –m1 –Q x/y –N <name>
- m1 stands for the module, you want to create (module 1)
- Q x/y has the same meaning for operator cards as described above for the administrator cards. (Q 1/2 or Q 1/1 …)
- -N <name> identifies the name of the card set
During this process, you are asked to insert the appropriate card(s), that shall be created. You cannot use an old operator card, you have to use empty cards. You also have to enter a for each Operator card used.
Create HSM protected private keys
After creating the operator card set, you must create or import private keys to be protected by the HSM. In Web Gateway there are three keys that can be used by your policy:
- SSL Scanning CA key
- SSL Scanning Domain key
- Reverse proxy server key
- Client certificate key
In the examples below we will create the key for SSL Scanning purposes for these purposes.
Prerequisites
- CLI access
Generating private keys
For each of the keys we wish to generate, we need to run the following below. It is important to remember the Key identifier as it will be used in later steps.
/opt/nfast/bin/generatekey -g hwcrhk
Example Output:
[root@swg1-hsm-server ~]# /opt/nfast/bin/generatekey -g hwcrhk

type: Key type? (RSA, DSA, DH) [RSA] > RSA

size: Key size? (bits, minimum 1024) [1024] > 2048

OPTIONAL: pubexp: Public exponent for RSA key (hex)? []

>

ident: Key identifier? [] > sslscannerca

nvram: Blob in NVRAM (needs ACS)? (yes/no) [no] >

key generation parameters:

operation       Operation to perform        generate

application     Application                 hwcrhk

verify          Verify security of key      yes

type            Key type                    RSA

size            Key size                    2048

pubexp          Public exponent for RSA key (hex)

ident           Key identifier              sslscannerca

nvram           Blob in NVRAM (needs ACS)   no

Key successfully generated.

Path to key: /opt/nfast/kmdata/local/key_hwcrhk_rsa-sslscannerca [root@swg1-hsm-server ~]#
Importing private keys (optional)
If you already have a private key, and wish to import it into the HSM, the following steps can be used.
/opt/nfast/bin/generatekey -i hwcrhk
Fill in the appropriate fields for import, taking note of the Key identifier as it will be used in later steps.
List the protected private keys
To list the protected private keys, run the command below:
/opt/nfast/bin/nfkminfo -l
Example output:
Keys with module protection: key_hwcrhk_rsa-sslscannerca
Create a Certificate Signing Request (CSR)
This step can be skipped if you imported a private key from an existing certificate/key pair.
If you created a new private key within the HSM Security World, we will need to generate a CSR to obtain a signed certificate. To generate a CSR using one of the newly protected keys use the below command, replacing your key identifier:
openssl req -engine chil -keyform engine -new -sha256 -key KEYIDENTIFIER -out FILENAME.csr
Example:
openssl req -engine chil -keyform engine -new -sha256 -key sslscannerca -out sslscannerca.csr
You can then download the CSR file (in the example sslscannerca.csr) and have it signed by your internal or external authority (in the case of a reverse proxy certificate).
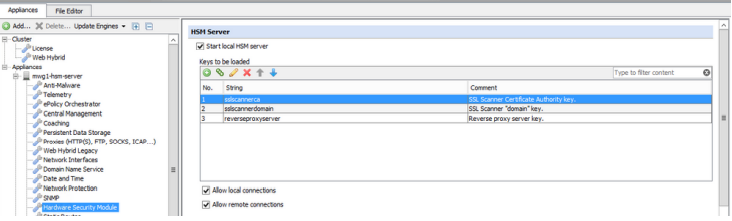
Loading the private key identifiers in Web Gateway UI
In order for the Web Gateway to use the keys within the HSM's Security World, we must enumerate the available keys in the UI.
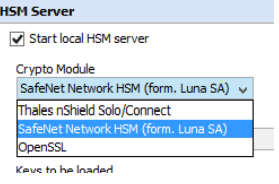
- Navigate to Configuration > Hardware Security Module and add all of the key identifiers in the "Keys to be loaded":
- Additional steps to perform for passphrase or multicard-OCS-protected private keys after configuring SWG -UI. Execute the command on the shell (e.g. via SSH):
/opt/swg/bin/hsmagent -c
The command requests the secrets required to load specially-protected private keys. It has to be executed after each upgrade and reboot.
The console will then guide/ask the administrator for each declared identifier to enter the passphrases or insert required smartcards of the OCS (Operator-Card-Set) into the HSM.
Additionally the customer can inspect the following log file to see if there are any unexpected errors:
- Troubleshooting > [Appliance name] > Log Files, then open swg-errors and view the hsmagent.errors.log
- Or from the appliance command line at: /opt/swg/log/swgerrors/hsmagent.errors.log
Use private keys in Web Gateway Policy
Now that the keys are protected by the HSM, and loaded in the Web Gateway, we need to put the keys to use.
SSL Scanning Certificate Authority and Domain keys
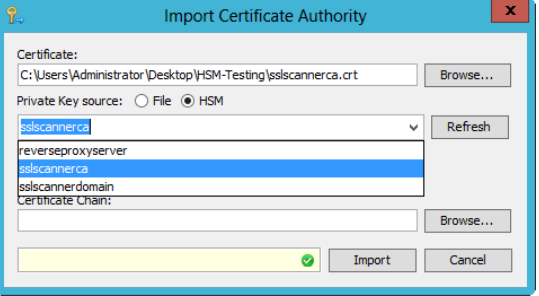
Navigate to Policy > Settings > SSL Client Content CA and click "Import..."
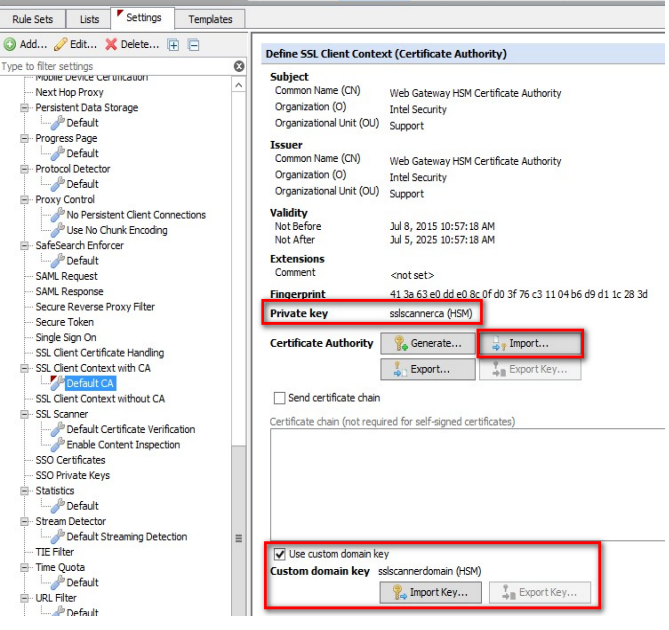
In the "Import Certificate Authority" dialog, select your certificate (that you received from your external authority), and select the corresponding key identifier.
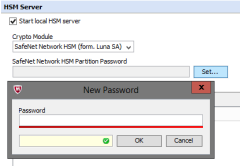
Configuring Gemalto/Luna/SafeNet Network HSM (Optional)
(Optional) The exact steps to configure the SafeNet Network HSM depends on the deployment mode. Use the Gemalto documentation for reference. The commands stated here are only examples. Support was added in 7.7.0 for SafeNet Network HSM.
Configure the Web Gateway to use SafeNet Network HSM:
Create SafeNet client certificate on the Web Gateway appliance:
/opt/gemalto/lunaclient/bin/vtl createCert -n <your_ip_address>
Copy the client certificate to the SafeNet Network HSM:
scp /opt/gemalto/lunaclient/cert/client/.pem admin@ <your_net_hsm>:
Configure the SafeNet HSM (after login to the HSM):
client register –c <your_label> -ip<your_ip_address>

client assignPartition –c<your_label> -par <your_partition>
Copy the SafeNet Network HSM server certificate to the Web Gateway appliance:
scp admin@<your_net_hsm>:server.pem
Establish the connection SafeNet client-server connection (initialize slot 0):
/opt/gemalto/lunaclient/bin/vtl addServer –n<your_net_hsm> -c server.pem
Verify the connection to the SafeNet Network HSM (you should see the initialized slot 0):
/opt/gemalto/lunaclient/bin/vtl verify
Adjust the Crytokey.conf if required (a GemEngine section is added to this file and should not be modified).
Configuring cluster distributed HSM
The SWG offers cluster distributed HSM, meaning a single or multiple appliance(s) can have a HSM card installed and it can share the capabilities with other nodes in the SWG cluster. This is separate from the nShield Connect appliances, you must have a PCI card installed in one or multiple SWGs to take advantage of the HSM.
Concept
Each SWG comes with a HSM agent (piece of software) that can be enabled. The agents communicate with each other using certificates.
IMPORTANT: All clients must know the server's certificate, and all servers must know the client's certificate. You can use the same certificate on both sides if you wish or they can all be unique. For demonstration purposes, I will be using the same certificate on both the HSM server and the HSM client.
For this scenario, I'm going to refer to the SWG with the HSM = SWG-HSM-SERVER. The SWG without the HSM = SWG-HSM-CLIENT.
HSM server listener
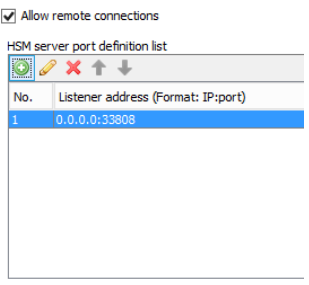
On the SWG-HSM-SERVER navigate to Configuration > Hardware Security Module, then check the box for "Allow remote connections" and define a local listener port. The default is 33808, this just means SWG-HSM-SERVER will be listening on that port for remote HSM related traffic (secured by TLS and client cert auth).
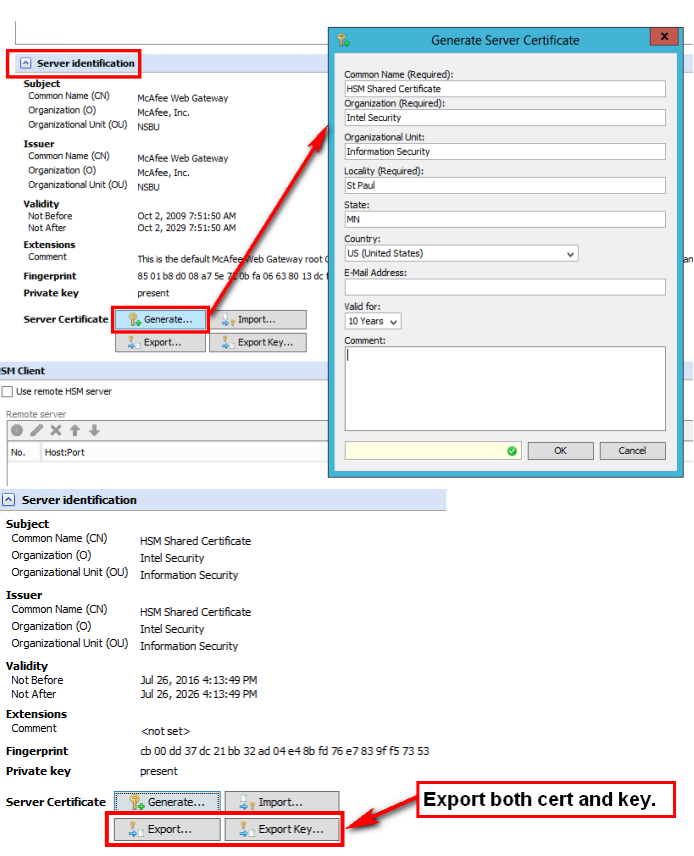
HSM server identification
Again under Configuration > Hardware Security Module, scroll down to "Server Identification" and expand that section. Once expanded click the Generate... button. Populate the "Generate Server Certificate" form fields with your organization's details. Do not leave the defaults. Once you have created your own certificate, SWG-HSM-SERVER will now present this certificate to any HSM clients (like SWG-HSM-CLIENT).
Export the certificate (Export... button) and the key (Export Key...) button. Later, we will need to install the server certificate on SWG-HSM-CLIENT.
HSM client identification
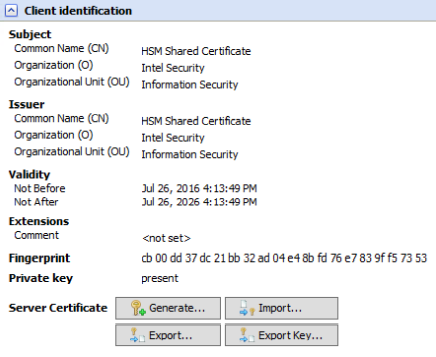
On SWG-HSM-CLIENT, navigate to Configuration > Hardware Security Module. Scroll down to the HSM Client section and check the box for "Use remote HSM server" and expand the "Client identification" section. If you wish to have a unique certificate per node, click Generate. If you are going to use a shared certificate, click Import and select the certificate and key from the Server identification export (mentioned above).
HSM client-server two-way trust
Now that the client and server identification are configured we need to configure the bullet points below (it sounds tougher than it is). This is just a matter of specifying IPs/ports and importing certificates.
- Configure client (SWG-HSM-CLIENT) to talk to server (SWG-HSM-SERVER)
- Configure client to trust server certificate
- Configure server to trust the client certificate
To configure the client to the server communication we go back to SWG-HSM-CLIENT under the Configuration > Hardware Security Module > HSM Client section and click the + icon and type the IP of the On SWG-HSM-SERVER as well as the port. Import the HSM server certificate that we exported earlier. SWG-HSM-SERVER is 10.10.65.61. I used the shared certificate for demonstration.
Now the SWG-HSM-CLIENT knows to trust the HSM server's certificate.
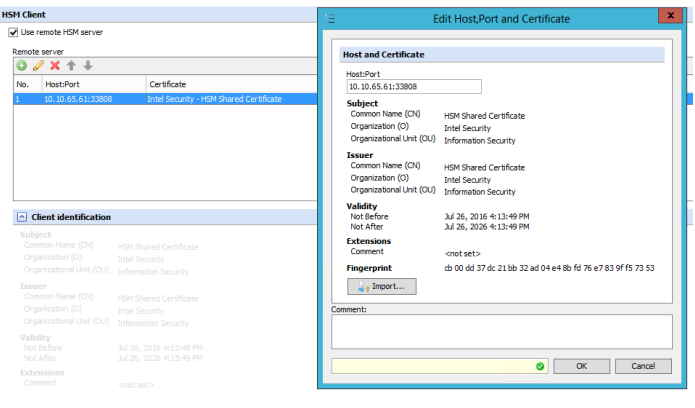
To configure the server to trust the client we go to SWG-HSM-SERVER under Configuration > Hardware Security Module. Scroll down to Permitted clients under HSM Server. Click the Add button and type the IP of SWG-HSM-CLIENT and import the certificate that was shared or that is unique.
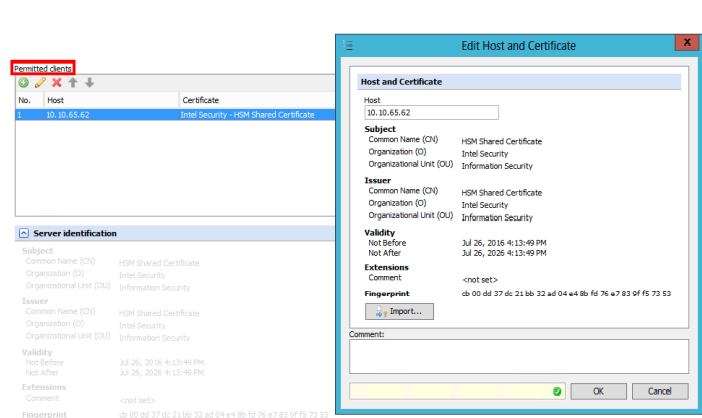
Now that the server knows the client IP and the client knows the server information, the trust relationship is established and cluster distributed HSM should be ready to go.
Transferring a Security World
To use the same Security World across multiple HSMs you need to create it once, and then transfer it to all of your appliances which have HSMs installed.
1. Connect to your original Web Gateway with the HSM installed, using SSH (e.g. Putty) or SCP (e.g. WinSCP)
2. Copy the Security World to your machine or transfer it directly to the new Web Gateway:
- Copy the file /opt/nfast/kmdata/local/world to the new Web Gateway under /opt/nfast/kmdata/local/
- Update the permissions to nfast:nfast 770
- Set the module to Initialization status (set physical switch to I)
- Reset the module: /opt/nfast/bin/nopclearfail -c -a
- Verify the module status: /opt/nfast/bin/enquiry -m1|grep mode
- Import the Security World: /opt/nfast/bin/new-world -l
- Insert Administrator Cards created during initial setup
- Set the module back to Operational mode (set physical switch to O)
- Reset the module: /opt/nfast/bin/nopclearfail -c -a
- Verify the module status: /opt/nfast/bin/enquiry -m1|grep mode
Transferring an Operator Card set
To use the same Operator Card sets across multiple HSMs we need to create the initial set, then transfer the files to the rest of the SWGs with HSMs (as done with the Security World).
- Connect to your original SWG with the HSM installed, using SSH (e.g. Putty) or SCP (e.g. WinSCP)
- Copy the Operator Card set files to your machine or transfer it directly to the new SWG:
- Copy the card_* files from the /opt/nfast/kmdata/local/ folder to the new SWG under the same directory.
- Update the permissions to nfast:nfast 770
Backup Procedure
Use of the HSM creates files (the Security World) on the operating system which are not covered by the normal backup procedure. It is necessary to backup these files in the case of a reimage or replacement. If these files are not backed up then SWG will no longer be able to access the keys within the card. To backup the Security World use the command below. You should also be performing regular backups from the UI under Troubleshooting > Backup/Restore.
tar -czvf hsm_kmdata_backup.tar.gz /opt/nfast/kmdata
Restore Procedure
To restore the Security World we'll need to extract the tar.gz and retain existing permissions. In the case of a reimage, I would advise backing up the "fresh" directory prior to restoring the prior backup.
Conclusion
By the end of this article you should have a good idea of the work required to get an HSM PCI card installed as well as the surrounding Web Gateway configuration.
Editor's Note
This article previously used the phrase "Network based HSM" in reference to Web Gateway's ability to share the HSM capabilities across the Web Gateway cluster. This phrase has been replaced with "cluster distributed HSM". This is a feature of Web Gateway. With 7.7.1, Web Gateway now supports actual network based HSMs. Network based HSMs allow Web Gateway (or other devices) to connect to it over the network. This is a general feature of network based HSMs.