Add a Hard Drive to a RAID array
Prerequisites
What is explained in the following is about applying hardware-related measures to RAID devices on hardware models that serve as platforms for Secure Web Gateway appliances.
RAID functions are provided for Secure Web Gateway appliances on a hardware basis only for model D appliances and older models of the 5000 and 5500 types. These models are equipped with a hardware RAID controller.
This means that the instructions below apply to the following appliance models:
- WBG-5000-C and WBG-5500-C
- WBG-5000-D and WBG-5500-D
They do not apply to the WBG-5000-E, WBG-5500-E, and newer appliance models. For information about using RAID functions with these models, see mwg-raid Tool Commands.
Background Info
The RAID Controller on Intel appliances is designed to prevent reinsertion of a hard drive which has previously failed. If a hard drive is removed from the RAID array and then the same drive is reinserted (reseated), the drive will be marked 'Unconfigured (bad)' and the RAID rebuilding process will not start. This behavior is by design to prevent reusing a bad hard disk drive.
It can also happen that a replaced drive (new drive) is not automatically detected and integrated into the RAID. In this case the status would show 'Unconfigured (good)'.
In both cases the overall RAID state will show "Degraded" as not all drives are active as part of the RAID array.
Purpose
The purpose of this article is to provide instructions for re-integrating a physical hard drive into an existing RAID array. This can be achieved either from the command line of your Web Gateway or via the RAID BIOS console (appliance needs to be taken offline for this method).
Checking RAID status from command-line
- Log into the Web Gateway appliance with an SSH client using the ‘root’ user account.
- Enter the following commands to see the physical drive status and the state of the RAID array:
- Run the following command to see the state of the RAID array:
/opt/MegaRAID/CmdTool2/CmdTool2 -ldpdinfo -a0 -nolog | egrep "(State)"

Note that the RAID status shows "Degraded" because there is at least one drive missing
- Run the following command to see the status of the missing physical drive
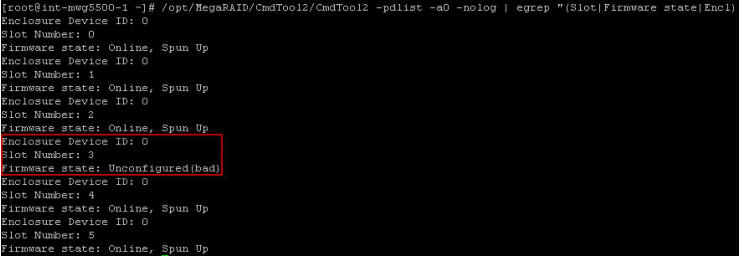
/opt/MegaRAID/CmdTool2/CmdTool2 -pdlist -a0 -nolog | egrep " (Slot|Firmware state|Encl)"
The output of the command should resemble the example output below. In the example below, note that Slot Number 5 reports an 'Unconfigured(bad)' status, indicating that this drive was likely previously removed and reinserted :
Here are other potential status outputs:
- Unconfigured(bad) - As described above, this status indicates a drive that was removed and then reinserted (reseated) and therefore no longer part of the RAID array
- Unconfigured(good) - This status indicates a new (replacement) drive was inserted but isn't yet part of the RAID array
- Failed - This status indicates a drive that has failed and is no longer usable. For Failed drives, please see the Failed Drives section below. The remainder of the article will focus on adding drives with status 'Unconfigured(bad)' or 'Unconfigured(good)' back into the RAID array.
Adding a drive back into the RAID array
Via command-line (recommended)
As mentioned above, manually adding a drive back into the RAID array is a step that is needed if the status of that drive is 'Unconfigured(bad)' or 'Unconfigured(good)'. The steps below will walk you through adding a drive back into the RAID array via command-line.
This procedure can be performed without taking the appliance offline or rebooting. Keep in mind though that rebuilding a RAID can take some time and during the rebuild performance can be impacted due to the high number of I/O operations.
- Log into the Web Gateway appliance with an SSH client using the ‘root’ user account.
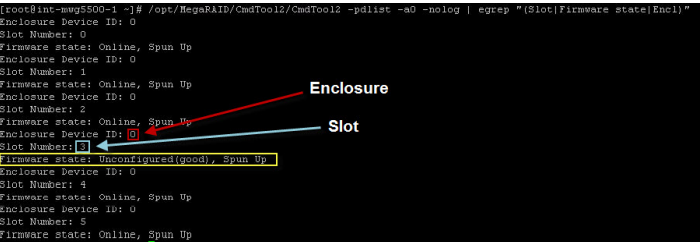
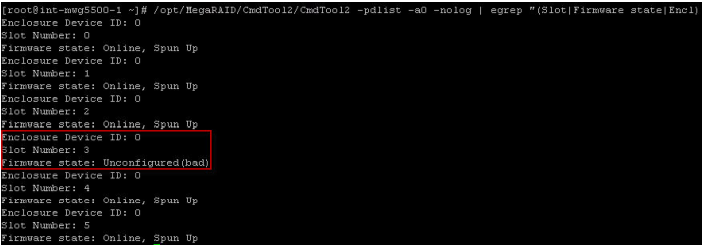
- Show state of physical drives
/opt/MegaRAID/CmdTool2/CmdTool2 -pdlist -a0 -nolog | egrep "
(Slot|Firmware state|Encl)"
Note the "Enclosure ID" and "Slot Number". These numbers are used in the commands going forward.
Example Unconfigured (good):
Example Unconfigured (bad):
- Optional. Only needed if the status from step #2 shows 'Unconfigured(bad)'
- Use the command below to mark the 'Unconfigured (bad)' drive as 'Unconfigured (good)' for further processing
- Enter the Enclosure ID (X) and Slot number (Y) from step 2
/opt/MegaRAID/CmdTool2/CmdTool2 -PDMakeGood -PhysDrv[X:Y] -a0 -nolog
Example:

- Find the drive missing in the logical RAID config with the following command:
/opt/MegaRAID/CmdTool2/CmdTool2 -PDGetMissing -a0 -nolog
- Note the "Array" and "Row" number. These numbers will be used in the commands going forward
Example:

- Replace the missing RAID drive with the "Unconfigured (good)" drive
- Enter the Enclosure ID (X) and Slot number (Y) from step 2
- Enter the Array number (A) and row number (B) from step 4
/opt/MegaRAID/CmdTool2/CmdTool2 -PdReplaceMissing -PhysDrv[X:Y] - arrayA -rowB -a0 -nolog
Example:

- Start the rebuilding process to sync the new drive with the exisiting RAID
- Enter the Enclosure ID (X) and Slot number (Y) from step 2
/opt/MegaRAID/CmdTool2/CmdTool2 -PDRbld -Start -PhysDrv[X:Y] -a0 - nolog
Example:

7. The rebuild process can take quite some time (several hours depending on the size of your RAID). To see progress you can run the command below from time to time
- Enter the Enclosure ID (X) and Slot number (Y) from step 2
/opt/MegaRAID/CmdTool2/CmdTool2 -PDRbld -ShowProg -PhysDrv [X:Y] - a0 -nolog
Example:

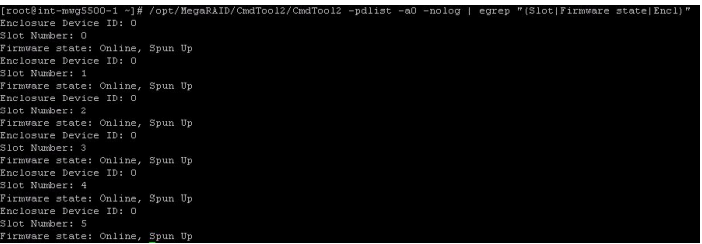
- Once the rebuild has finished, all drives should show up as "Online, Spun Up"
/opt/MegaRAID/CmdTool2/CmdTool2 -pdlist -a0 -nolog | egrep " (Slot|Firmware state|Encl)"
Example:
- The RAID state should show "Optimal"
/opt/MegaRAID/CmdTool2/CmdTool2 -ldpdinfo -a0 -nolog | egrep " (State)"
Example:

Via booting into RAID configuration utility
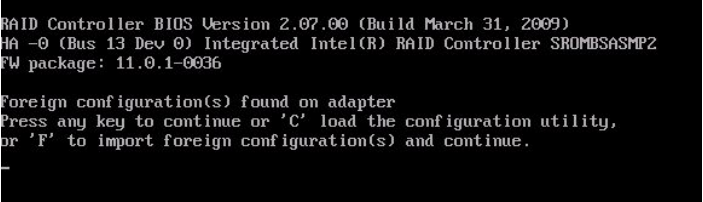
- Reboot the system to hit the RAID menu. On the screen below, hit "C" to go into the configuration utility for the RAID controller.
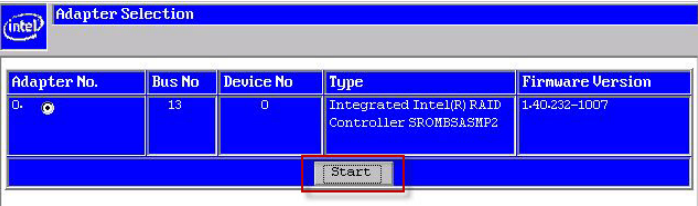
- After you load into the configuration, you will have to select the RAID controller in question and hit "START" to configure that RAID device.
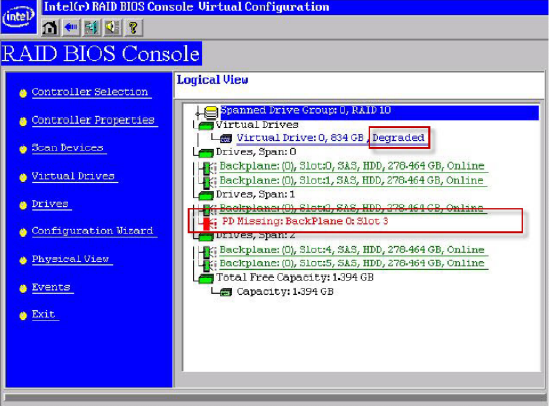
- After the initial screen loads for the controller you will see the following which shows the RAID in a "Degraded" state with "PD# Missing"
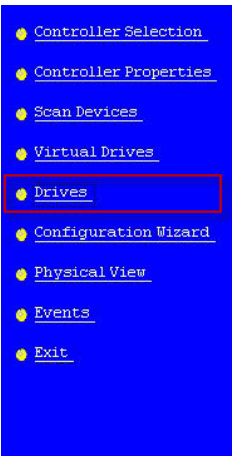
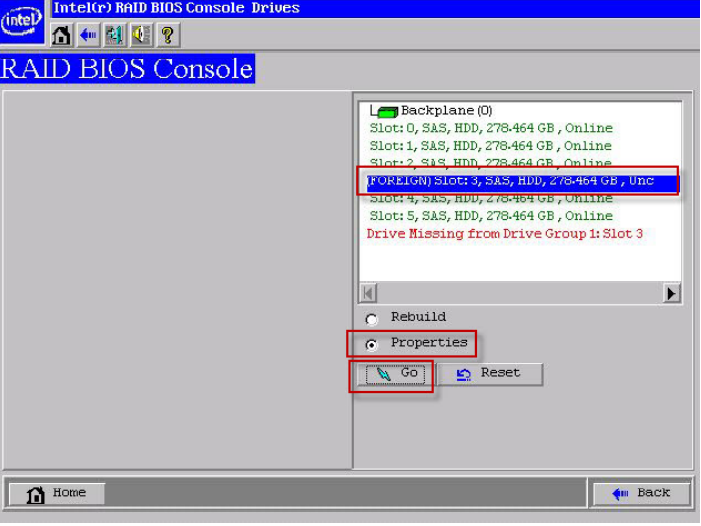
- Go into the "Drives" part of the RAID menu
- After going into this location, you will see that the drive is in a "Unconfirmed BAD" state. Please highlight the drive, select "Properties" and then "Go"
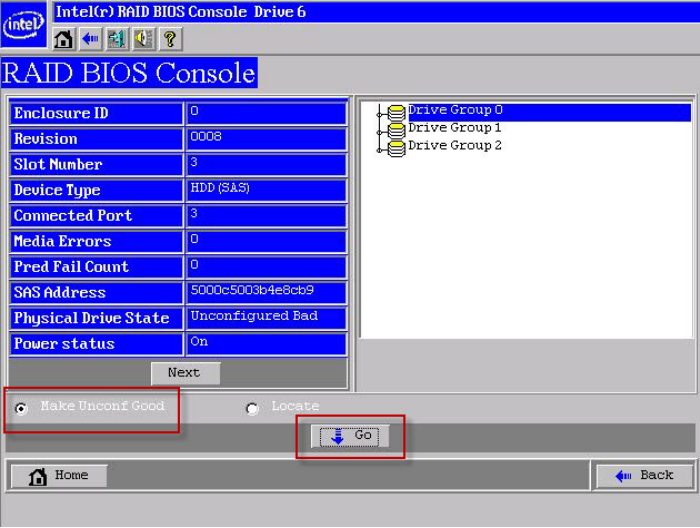
- Since the drive is in a "Unconfigured BAD" state, we will need to change this to "Unconfigured Good". Skip this step if your drive is showing "Unconfigured Good" already.
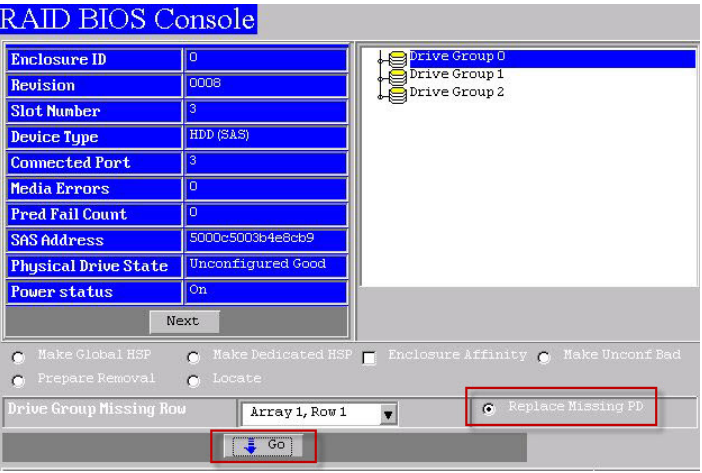
- Next select "Replace Missing PD" and hit "Go" again. This will add the drive back into the RAID array.
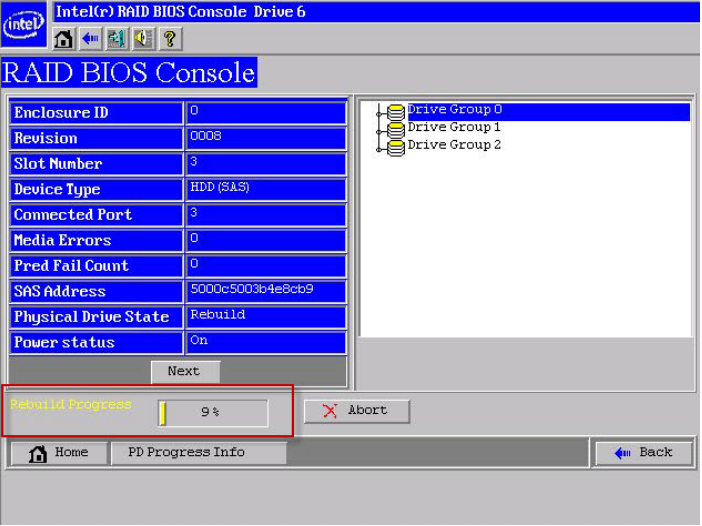
- Select "Rebuild" and "GO" to start the rebuild process of the RAID

- The rebuild can take quite a bit of time. Progress can be monitored on the screen
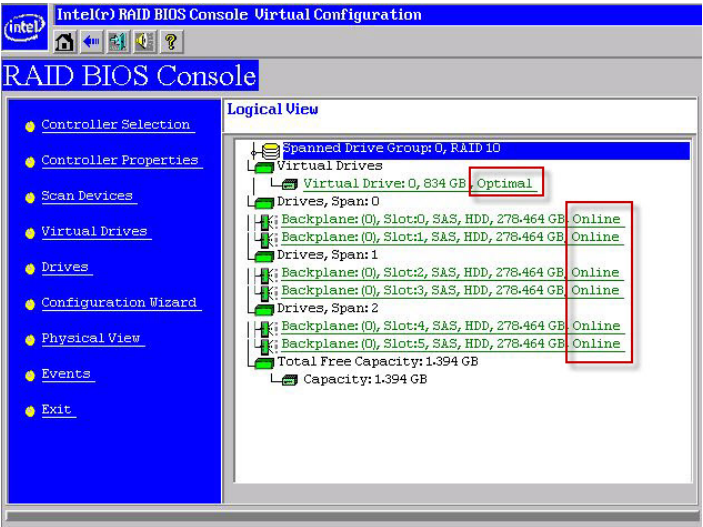
- Once the rebuild is done, hit the "Home" button and verify the raid status shows "Optimal"

Failed Drive
Generate Hardware logs
Please generate and provide Skyhigh Security technical support with the output of the getlogs.sh script. This will provide technical support with information to diagnose your hardware problem.
RMA contact details
Please provide the following information in the Skyhigh Security technical support case you've opened:
- Technical Contact Name:
- Technical Contact Phone:
- Technical Contact Email Address:
*If On-Site contact information is same as Technical contact information, you can leave it blank.
- On-Site Contact Name:
- On-Site Contact Phone:
- On-Site Contact Email Address:
- Company Name:
Service tag: **run 'dmidecode -s system-serial-number' from CLI or check on top of the physical appliance**
- On-Site Floor and Room (if needed):
- On-Site Street Name and Number:
- On-Site City, State:
- On-Site Postal Code:
- On-Site Country:
- Special Access Restrictions On-Site:
- Receiving hours (if applicable):
- Special Instructions: