Custom oAuth Application for Office 365 and Azure API Integration
Skyhigh CASB allows customers to connect to Office 365 APIs through a custom application with asymmetric authentication instead of requiring a global administrator account with a username and password for Office 365 and a non-administrator account. With this function, you can also run Skyhigh CASB for Office 365 in a read-only mode.
IMPORTANT:
Before you begin, contact Skyhigh Support to enable the Custom OAuth app for your tenant.
- For all cloud services except Azure
-
When you contact Skyhigh Support, make sure you ask for custom OAuth support only for the service(s) you don't want to use the Global Admin account to enable the Skyhigh CASB connection. The exception is Microsoft Dynamics, which must use custom OAuth.
-
If the Global Administrator (GA) role is not available, you can enable a non-global administrator role (make sure you don't have the administrator role) in instances using custom OAuth for all Office 365 cloud services except Exchange. For exchange, if you are not using response action quarantine, then you can use a non-global admin role.
-
If you have already enabled the API connection using a GA account for a service, then you do not need to enable custom OAuth support for this service. For example, if you need to enable custom OAuth support for Microsoft Dynamics, which is mandatory, you don't need to re-do the authentication for other services like SharePoint, OneDrive, and Exchange.
-
Microsoft Teams APIs in Microsoft Graph that access sensitive data are considered protected APIs. For example, https://docs.microsoft.com/en-us/gra...protected-apis. For this reason, Custom OAuth app ID used for this API call in Skyhigh CASB Teams must be approved by Microsoft, and you have to raise a request with Microsoft for approval. Once the request is approved by Microsoft, then only you can use it in Skyhigh CASB.
-
- For Azure, Global Administrator is not a requirement for user-based OAuth
When you contact Skyhigh Support, they will request the Instance Id. Find this in Skyhigh CASB via the instance setup page. For example, expand this screenshot --> [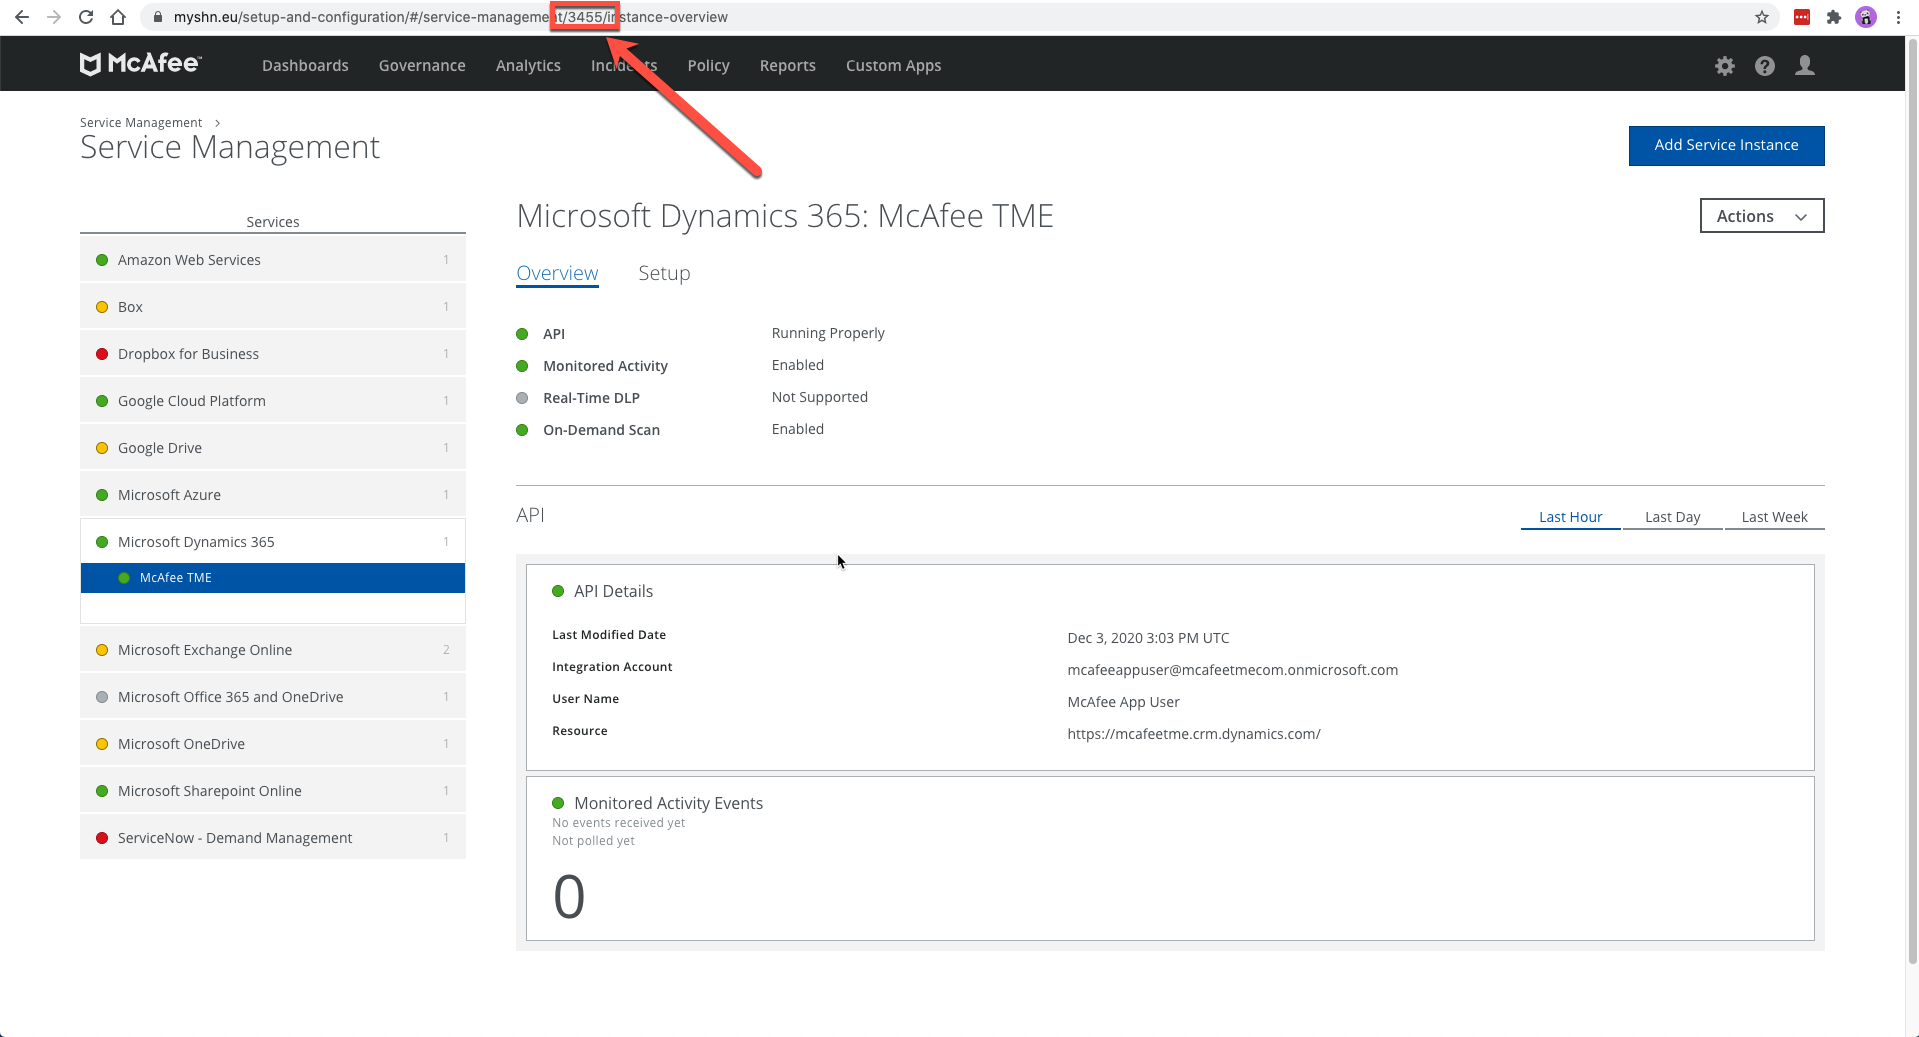 ]
]
Configure an Application Registration in the Azure Portal
To register a new application in the Azure portal, perform the following steps:
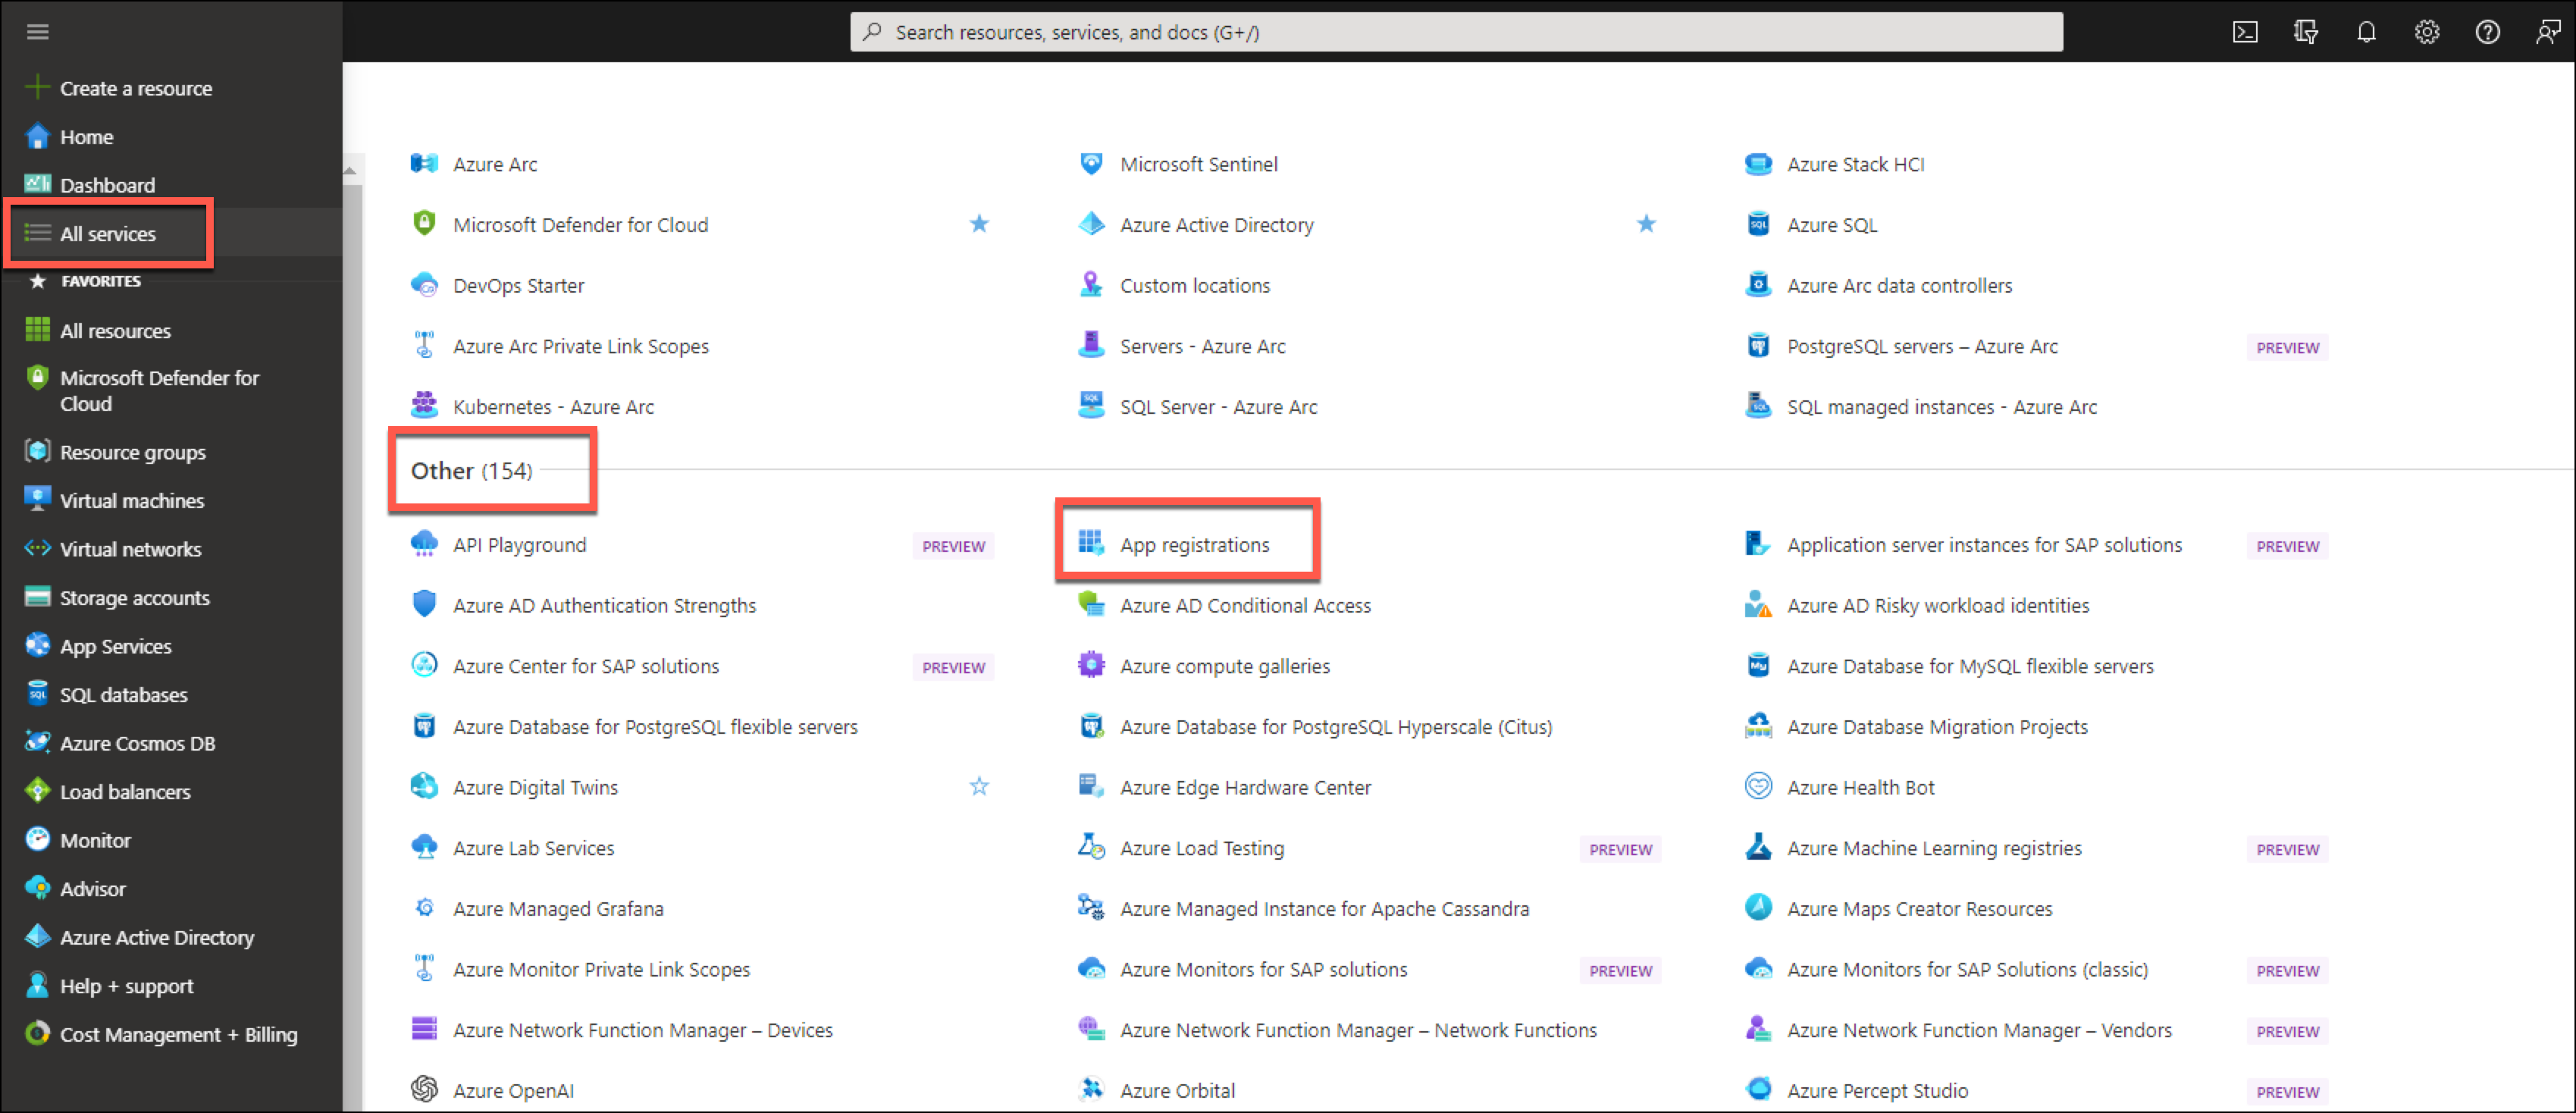
- Log in to the Azure portal at https://portal.azure.com/.
- Go to Home > App registrations and click New registration.
- Configure the following details in the registration form:
- Enter the name of the application. For example, Skyhigh Security Compliance Control.
- Under Supported account Types, select Accounts in this organizational directory only.
- Under Redirect URL, select Web and enter one of the following Sign-On URLs depending on the Skyhigh CASB backend:
NOTE: A redirect URL step is not required for Dynamics 365 Application.
PROD:  https://www.myshn.net/shndash/extensions/offlinedlp_ret.jsp
EUPROD: https://www.myshn.eu/shndash/extensions/offlinedlp_ret.jsp
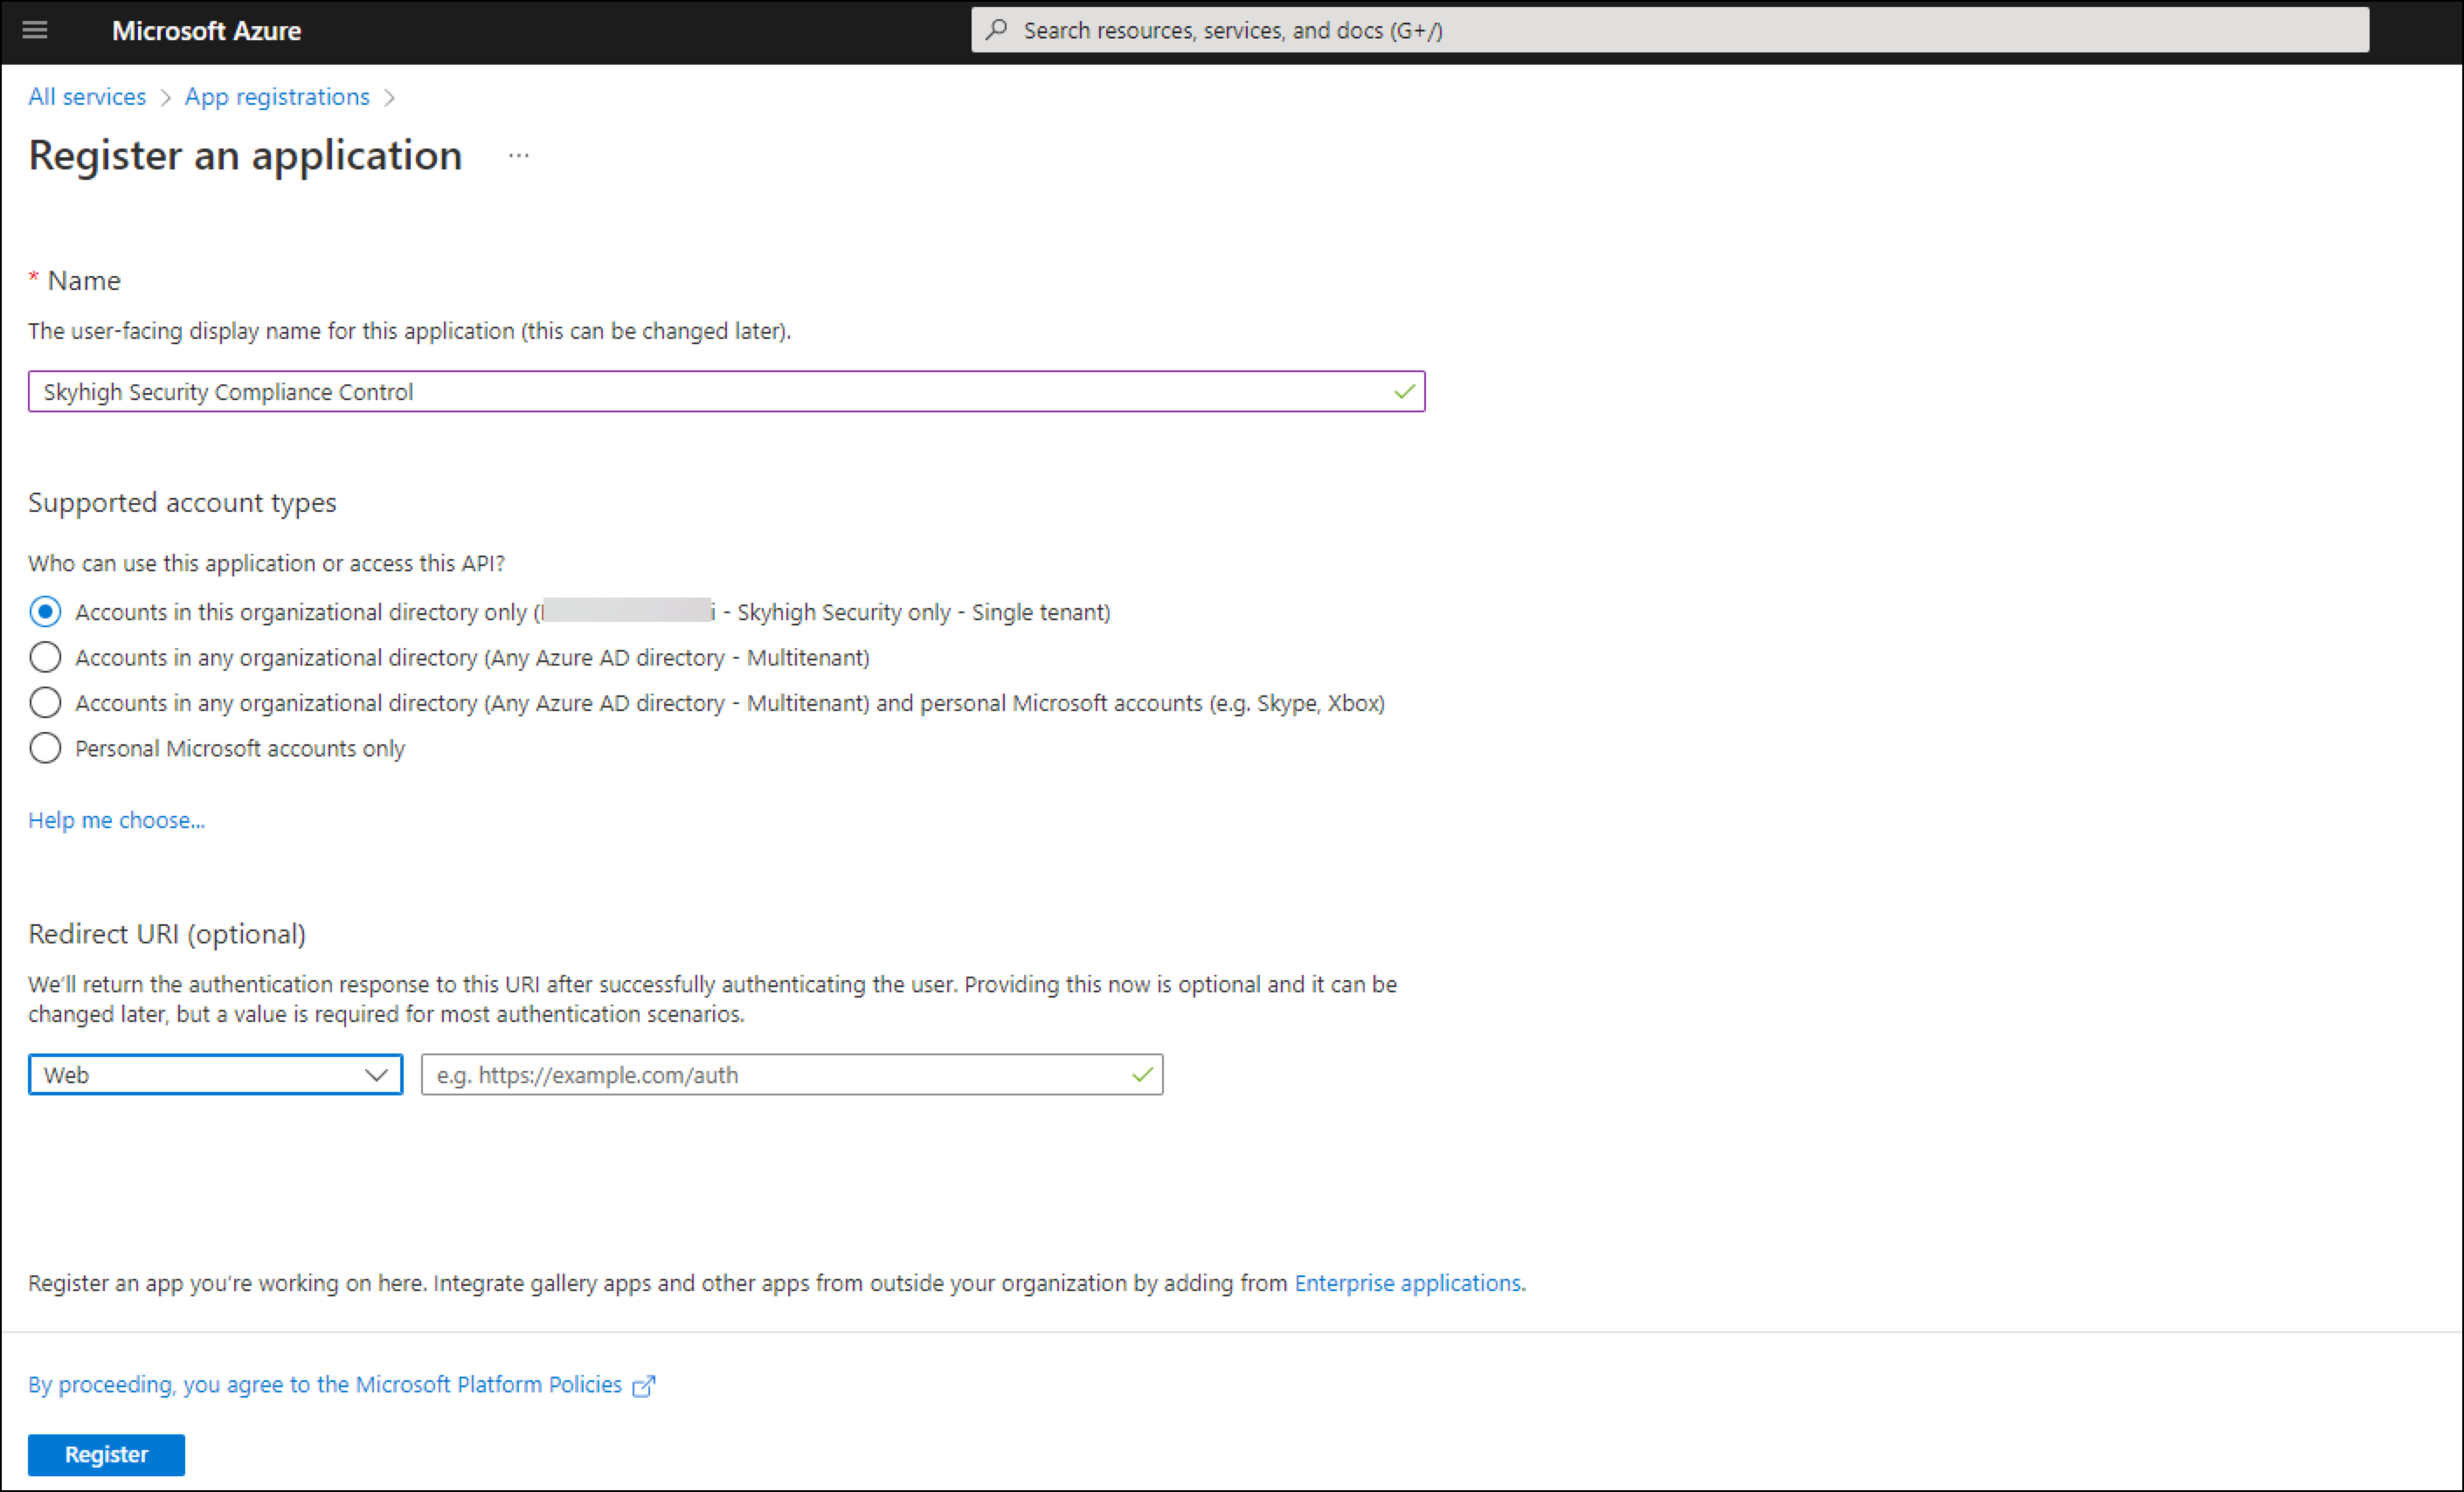
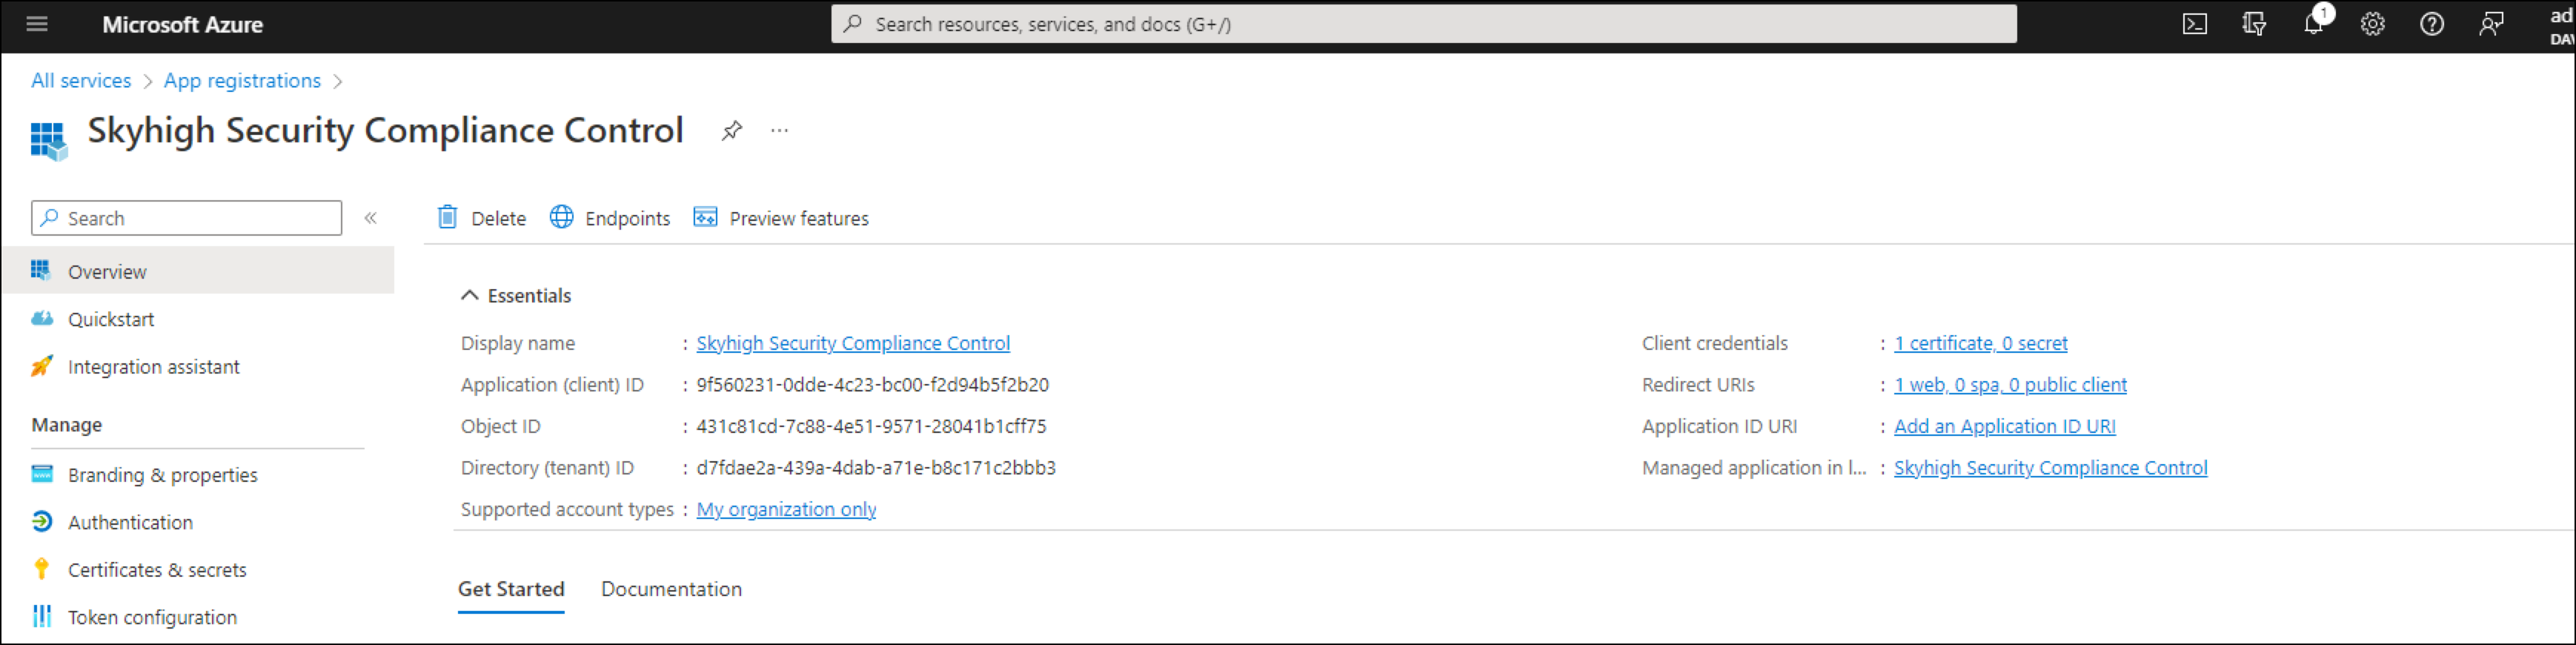
- To create a new application, click Register.
- Confirm the new application's properties are configured correctly, as per the last step in this guide.
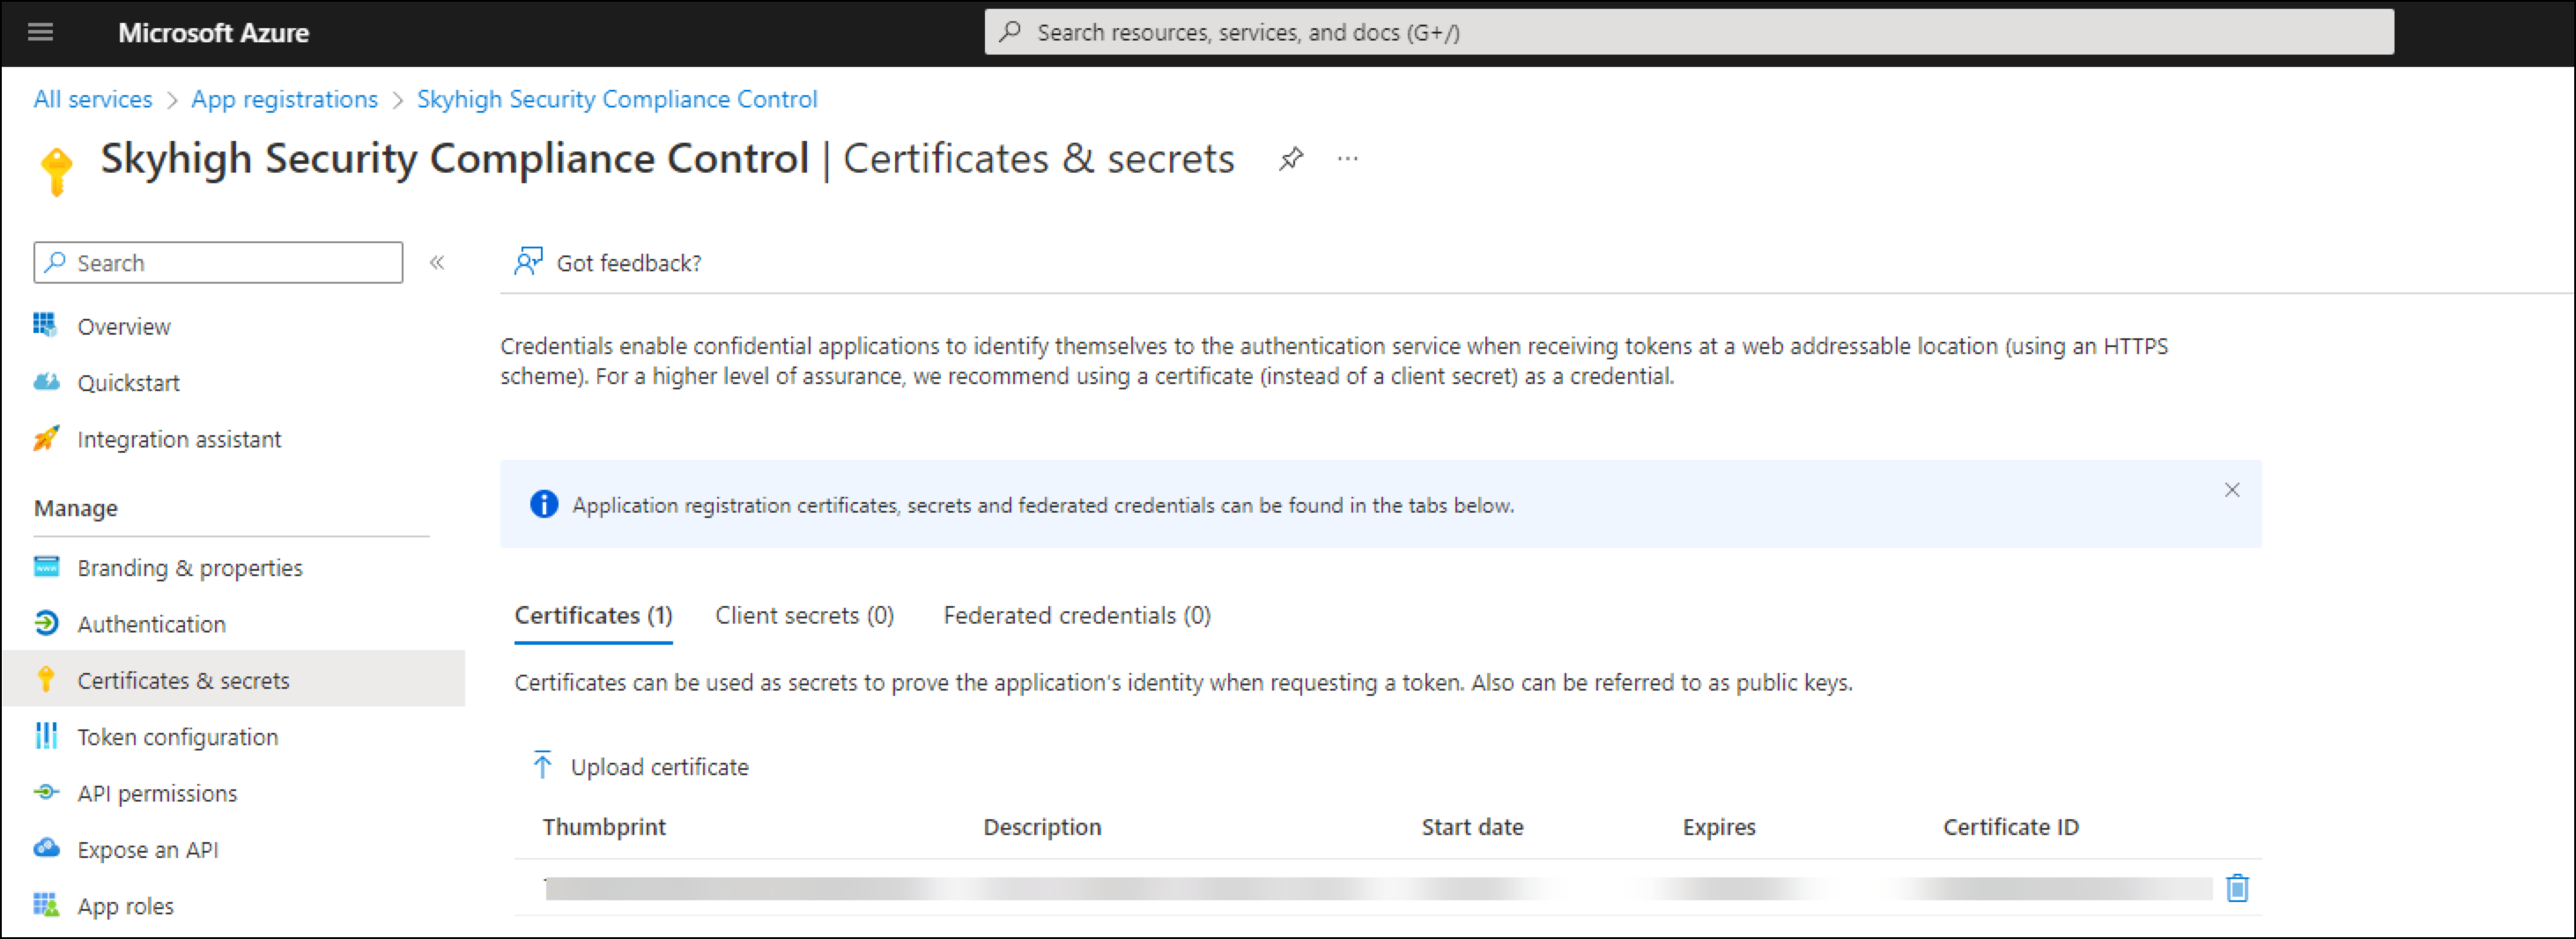
- Perform the following activities using OpenSSL to create a self-signed certificate.
- Generate a private key: Key length should be 2048.
openssl genrsa -out office365OfflineDlpKey.pem 2048 - Create a certificate Signing request:
openssl req -new -key office365OfflineDlpKey.pem -out office365OfflineDlp.csr - Create a X.509 certificate with generated key and signing request:
openssl x509 -req -in office365OfflineDlp.csr -signkey office365OfflineDlpKey.pem -out office365OfflineDlp-cert.pem -days 3650 - Check the start/end date of the certificate:
openssl x509 -startdate -noout -in office365OfflineDlp-cert.pem
openssl x509 -enddate -noout -in office365OfflineDlp-cert.pem
- Go to Certificates & Secrets in the new app, click Upload certificate and upload office365OfflineDlp-cert.pem to the Azure portal.
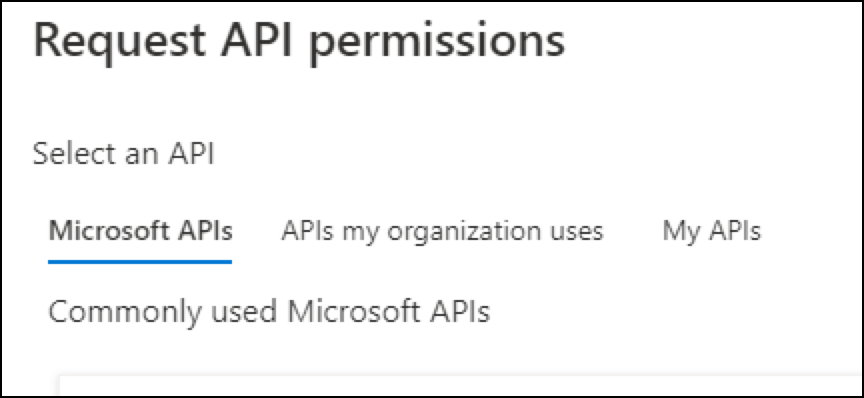
- To add the required APIs with the permissions, click API Permissions.
IMPORTANT:
- Select and add the required APIs with their respective permissions as per the following tables. All permission types should be set to Application Permissions unless otherwise stated.
- Do not add additional permissions, and do not leave out any permissions. Stick to this list or API enablement will not work.
- For all CSPs except Azure and Azure Information Protection (AIP), assign the permissions per the tables below.
|
NOTE: If you don't see the required APIs in the Microsoft APIs tab, search in the APIs my organization uses tab.
|
| For Activity Monitoring set the following permissions | |||
|---|---|---|---|
| Exchange Online | OneDrive / SharePoint | Teams | Dynamics 365 |
|
Microsoft Graph: Read user profile Read directory data Office 365 Management API: Read Activity data of your organization Office 365 Exchange Online: Read and write emails in all mailboxes Use Exchange Web Services with full access to all mailboxes |
Microsoft Graph: Read items in all site collections (Sites.Read.All) Office 365 SharePoint Online: Read user profile Office 365 Management API: Read Activity data of your organization |
(It is not possible to connect MS Teams in "Activity Monitoring only mode", enable with DLP permission as stated below)
|
Office 365 Management APIs: Read Activity data of your organization (ActivityFeed.Read)
|
| For API DLP set the following permissions | |||
|---|---|---|---|
| Exchange Online | OneDrive / SharePoint | Teams (Messages) | Dynamics 365 |
|
Office 365 Exchange Online: Read and write emails in all mailboxes Use Exchange Web Services with full access to all mailboxes (full_access_as_app) Read items in all site collections (Sites.Read.All) Microsoft Graph: Read users profile (User.Read.All) Read items in all site collections (Sites.Read.All) Read and write mail in all mailboxes (Mail.Readwrite) Read directory data (Directory.Read.All) Read all usage reports (Reports.Read.All) SharePoint: Read users profile (User.Read.All) |
Microsoft Graph: Read items in all site collections (Sites.Read.All) Read directory data (Directory.Read.All) Read and write Microsoft Intune device configuration (DeviceManagementConfiguration.ReadWrite.All) Read all usage reports (Reports.Read.All) Read your Organization's policies (Policy.Read.All) Office 365 SharePoint Online: Have full control of all site collection (Sites.FullControl.All) Read and write items and lists in all site collections Sites (Sites.Manage.All) Read users profile (User.Read.All) |
Office 365 Management APIs: Read Activity data of your organization (ActivityFeed.Read) Microsoft Graph: ChannelMessage.Read.All ChannelMessage.UpdatePolicyViolation.All Chat.Read.All Chat.UpdatePolicyViolation.All Directory.Read.All Group.Read.All Group.ReadWrite.All User. Read User.Read.All ChannelMember.ReadWrite.All TeamMember.ReadWrite.All ChatMember.ReadWrite.All |
Dynamics CRM (type=delegated): Access Common Data Service as organization users (user_impersonation) Microsoft Graph (type=delegated): Sign in and read user profile (User.Read) |
- For all CSPs except Azure: Once you have added all permissions, click Grant admin consent for Domain.
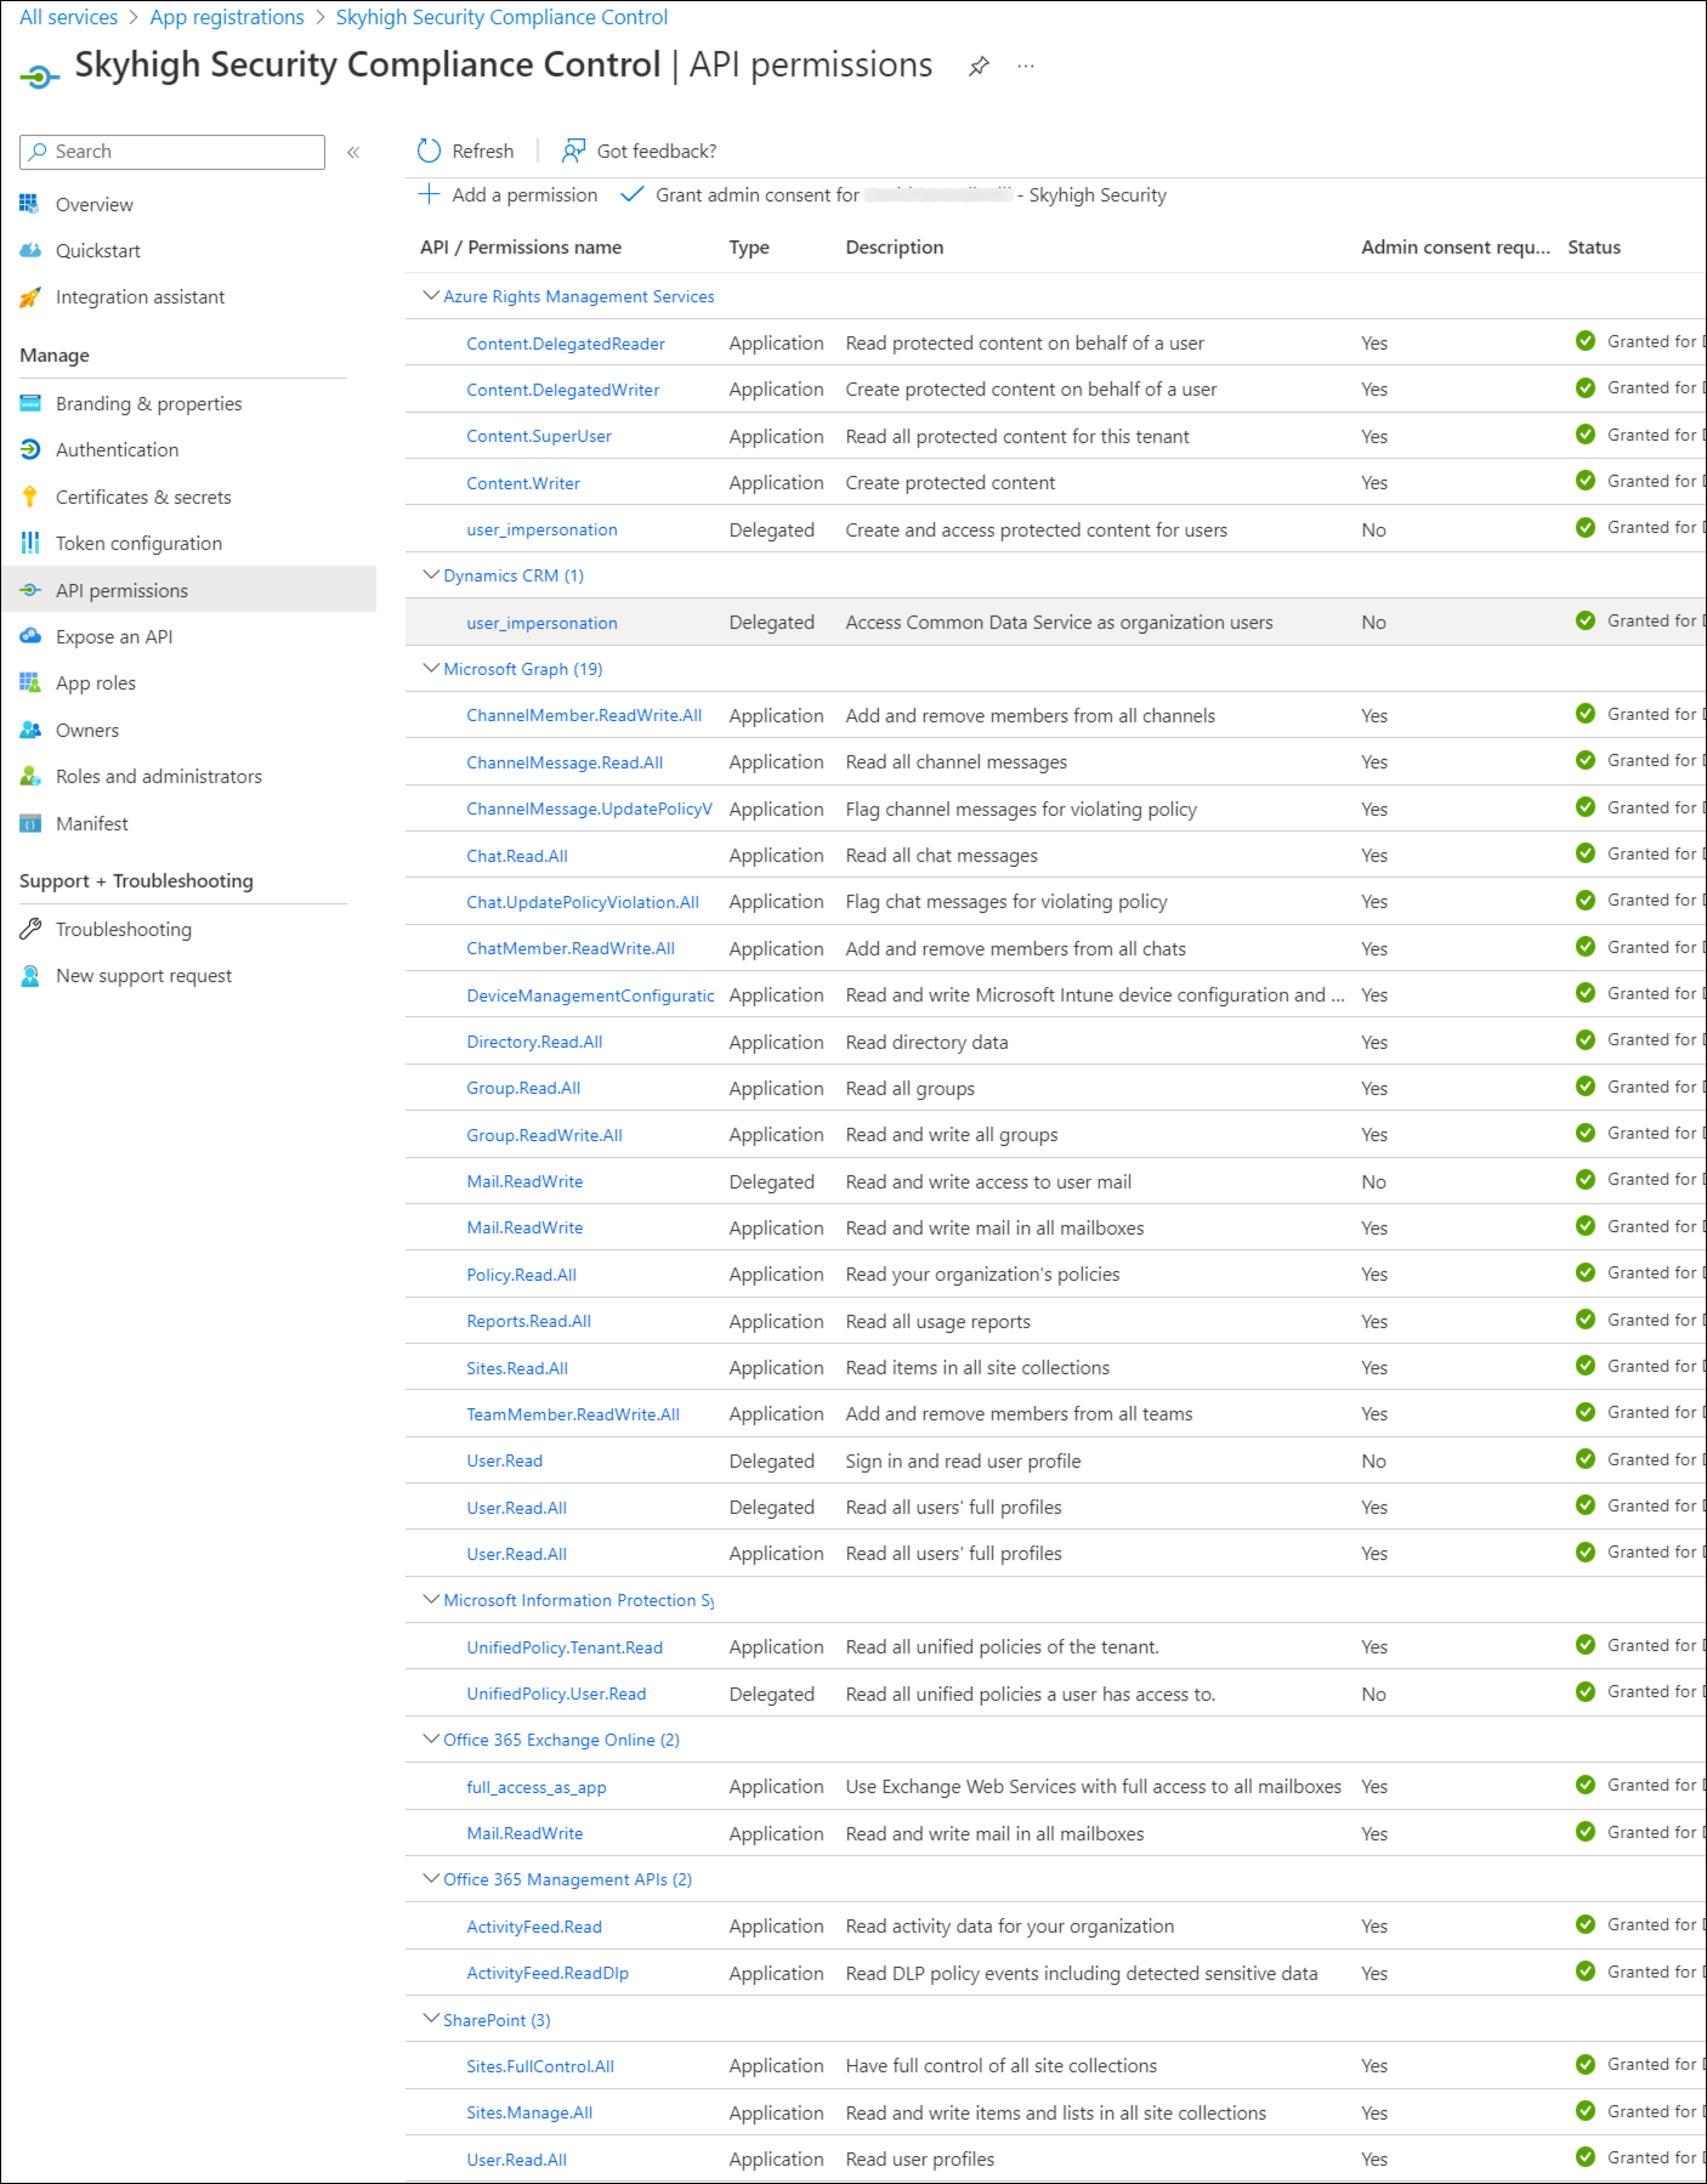
The result looks similar to the following images. Click to enlarge.
| Office 365 | Microsoft Dynamics |
|---|---|
|
|
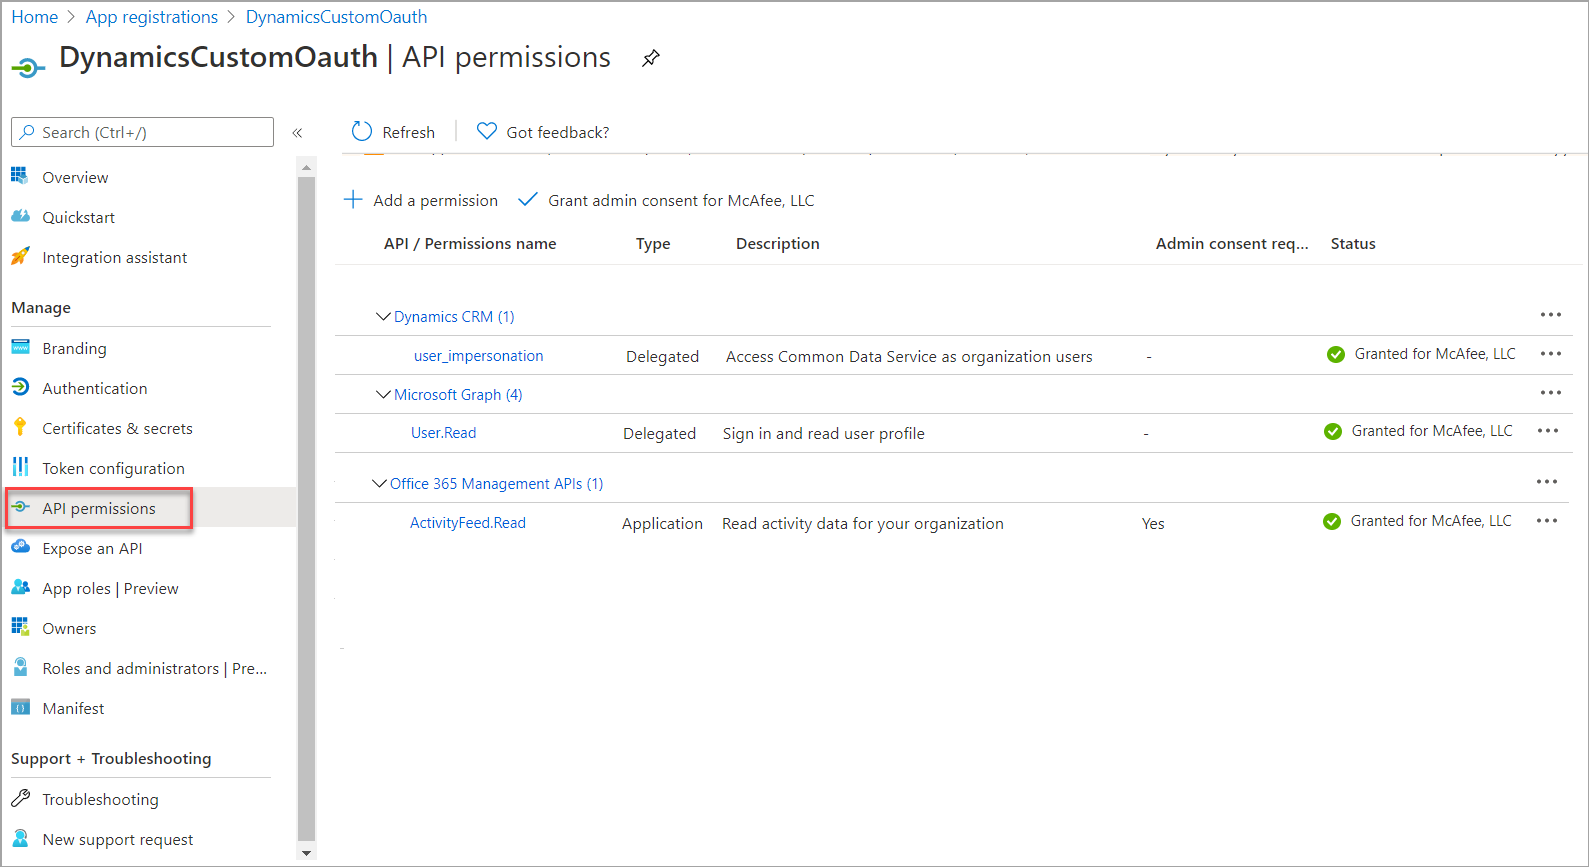 |

- To open the Manifest file, click Manifest. You will be using the information on this page to complete the Skyhigh CASB configuration.

Skyhigh CASB API Connection
IMPORTANT:
- If you are setting up Dynamics, pause here, and complete the configuration steps outlined in this guide: Configuring and connecting the Microsoft Dynamics API. Make a note of the appId in the manifest above. You will need this to configure Dynamics.
- If you have not already, contact Skyhigh Support and request to enable the Custom OAuth app for your tenant. Ask for custom OAuth support only for the service(s) you don't want to use the Global Admin account to enable the Skyhigh CASB connection. The exception is Microsoft Dynamics, which must use custom OAuth.
- If you have already enabled the API connection using a Global Administrator (GA) account for a service, then you do not need to enable custom OAuth support for this service. For example: If you need to enable custom OAuth support for Microsoft Dynamics which is mandatory, you do not need to re-do the authentication for other services like SharePoint, OneDrive and Exchange.
- When you contact Skyhigh Support they will request the Instance Id. Find this in the Skyhigh CASB console via the instance setup page. For example, expand this screenshot --> [
 ]
] - If you are using Exchange Online, you must contact Skyhigh Security Support to enable Microsoft Graph REST API access for your instances.
To enable API access in Skyhigh CASB:
- Go to Service Management > O365 Service and click Enable. You should be prompted to provide the custom OAuth credentials. If you are not prompted then contact Skyhigh Support to enable custom OAuth for the applicable service.
- Extract the data from the Manifest file to enter the following details:
- Client ID is the appId from the Manifest. (The Manifest screen is shown above.) It looks like a UUID. For example, 543bd03b-cd6e-417d-b31b-871ba0ef44f1
- Private Key is the .pem file containing the private key that you created earlier (office365OfflineDlpKey.pem).
- Thumb Print is the customKeyIdentifier of the keyCredentials of Manifest. Looks like a short, base64 encoded string. For example, 4BDBCCC84D81B29D1E6A6E0976A120275B393A7C
- Resource URL is the URL for the instance:
- SharePoint. For SharePoint, use https://<O365TENANTNAME>.sharepoint.com.
- OneDrive. For OneDrive, use https://<O365TENANTNAME>-my.sharepoint.com.
- Exchange. For Exchange, use https://<O365TENANTNAME>.sharepoint.com.
- Dynamics. Use your Dynamics custom domain. For example: https://<yourdomain>.crm.dynamics.com.
- Microsoft Teams. For Microsoft Teams, use https://<O365TENANTNAME>.sharepoint.com
- Admin Resource URL is the URL for the SharePoint Admin Portal. Even when the connection is established for OneDrive, enter the SharePoint Admin Portal URL. For example, https://<O365TENANTNAME>-admin.sharepoint.com
- Admin Email is the email address of an admin user for the services as defined. For example, admin@mycompany.onmicrosoft.com
- OneDrive. Provide an admin email to create a quarantine folder. Technically this can be any user (need not be an admin) and do not make it public. But, the best practice is to use an Office 365 account created for Skyhigh CASB, as a service account).
- SharePoint. Create a quarantine library in each site and make the admin exclusive owner of that library. For this purpose, use an admin email as input, which will be the owner of the Quarantine library in each site. Technically this can be any user (need not be an admin) and do not make it public. But, the best practice is to use an Office 365 account created for Skyhigh CASB, as a service account). For ease of use, the best practice is to use a service account for SharePoint similar to OneDrive.
- Exchange. Skyhigh CASB creates a Quarantine folder in that admin’s mailbox while enabling API access. So for Exchange, it can be any user similar to OneDrive and this user does not have to have Exchange Admin permissions, but this user *must* have an Exchange mailbox provisioned. Ensure this by logging into Outlook Web Access at least once before.
NOTE: The purpose of Admin Email in Exchange Online is to enable API access and it can be done only by admin accounts. However there is an option to configure API from a different mailbox as quarantine mailbox, without requiring an admin account.
- Dynamics 365. Enter the Application Username. For details, see Configuring and Connecting the Microsoft Dynamics API.
- Azure IaaS. For Azure IaaS, the value of the admin email is not relevant but should reflect a real user's email address.
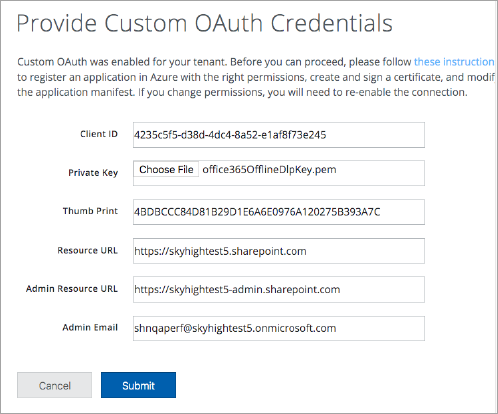
- Click Submit.
NOTE: For Dynamics 365 and Microsoft Teams, STOP HERE.
Azure Permissions
IMPORTANT:
- Select and add the required APIs with their respective permissions as per the following tables. All permission types should be set to Application Permissions unless otherwise stated.
- Do not add additional permissions, and do not leave out any permissions. Stick to this list or API enablement will not work.
- For all CSPs except Azure and Azure Information Protection (AIP), assign the permissions per the tables below
|
NOTE: If you don't see the required APIs in the Microsoft APIs tab, search in the APIs my organization uses tab.
|
Azure Permissions
Azure Information Protection (AIP) Permissions
Microsoft Azure API Connection
To enable a Custom OAuth (Service Principal) connection for Azure, follow these steps to create the new service principal. Use "Option 1: Upload a Certificate" as an authentication option. https://docs.microsoft.com/en-us/azu...on-two-options
To enable custom OAuth for Azure, the form has slightly different parameters.
For commercial Azure and for Gov Cloud Commercial, the Resource URL is populated by default.
NOTES:
- For Gov cloud configured with Azure Gov, the Resource URL will be "https://management.core.usgovcloudapi.net/"
- Admin Resource URL is not editable.
- If you are configuring Gov cloud with commercial Azure, then contact Skyhigh Support to complete the configuration.
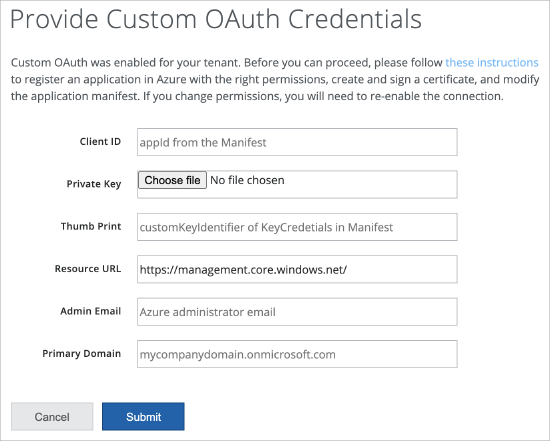
NOTES FOR AZURE:
- “No valid subscriptions found. Please retry with valid input” error implies that the Reader role is missing.
- “No valid subscriptions to enable DLP on Azure. Please retry with valid input” error implies that Reader and Data Access role is missing.
Azure Information Protection (AIP) Connection
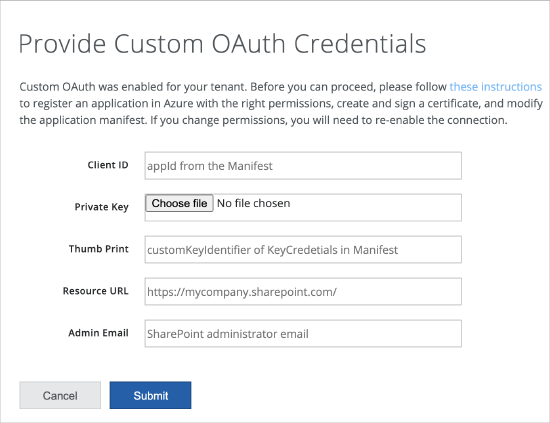
To enable API access in the Skyhigh CASB for AIP:
- Log in to Skyhigh CASB and go to Settings > Data Classification > AIP Service instance and click Enable. You should be prompted to provide the custom OAuth credentials. If you are not prompted, contact SkyhighSupport to enable custom OAuth for the applicable service.
- Extract the data from the Manifest file to enter the details of the parameters. The details of the parameters are similar to Skyhigh CASB API connection except for Admin Email.
- Admin Email. The email of the user must have Azure Right management and Azure Information and Information Protection permissions.
Microsoft Teams
- Admin Email. The value of the admin email is not relevant but should reflect a real user's email address.
User Account Requirements for Office 365
As described in the section Skyhigh CASB API Connection it is best practice to create a user account/service account for Skyhigh CASB in your Office 365 environment that is used to install the Skyhigh CASB SharePoint Integrator app and keeps the Quarantine folders for the several products.
The best practice is to create an Office 365 user, for example, with the name Skyhigh CASB Integration User and username like skyhigh_integration_user@company.onmicrosoft.com. In this case, enter skyhigh_integration_user@company.onmicrosoft.com as the Admin Email when enabling API access.
If you intend to enable API access for all Office 365 products, OneDrive, SharePoint, and Exchange, make sure the user account has the following permissions and functions:
- Licensed for OneDrive, SharePoint, and Exchange.
- The user has an email address (preferably the same as the user login name).
- The user has an Exchange mailbox (For Exchange).
- The user has "SharePoint Admin" permissions (for SharePoint Quarantine library) (see "Skyhigh CASB API Connection" above for more detail).
- The user has a OneDrive provisioned (for OneDrive Quarantine Library).
- Using the Email Address of the admin/service user you plan to use, log in to Office 365 and open OneDrive, SharePoint and Mail at least once to make sure the services are initialized.
- If enabling only for Activity Monitoring, log in using the Email Address of the admin/service user and create a Quarantine folder in the user's OneDrive base directory and the base SharePoint site.
To provision OneDrive, you can log in with this user once and open the OneDrive. It is provisioned on first use. or you can use PowerShell to provision OneDrive as described in this article: https://technet.microsoft.com/en-us/library/dn800987.aspx
IP Allow List
In rare cases, when using IP restrictions in Office 365 vNext and SharePoint the following Skyhigh CASB IP addresses/address ranges need to be added to an Allow List in Office 365:
- 13.57.135.0/25
- 52.8.140.255
- 52.52.211.25
References
Skyhigh CASB uses a Multi-Tenant App for OAuth flow which in turn uses Service Principal for collecting data from Customer’s Azure Account. More details about the app mode and service principals can be found here https://docs.microsoft.com/en-us/azu...ice-principals
- https://azure.microsoft.com/en-in/documentation/articles/active-directory-integrating-applications/
- https://msdn.microsoft.com/en-us/office/office365/howto/building-service-apps-in-office-365
- https://blogs.msdn.microsoft.com/exchangedev/2015/01/21/building-daemon-or-service-apps-with-office-365-mail-calendar-and-contacts-apis-oauth2-client-credential-flow/
- https://technet.microsoft.com/en-us/library/dn800987.aspx
- https://docs.microsoft.com/en-us/azure/active-directory/develop/app-objects-and-service-principals